
Marketing
This guide covers the marketing tools used to manage email and SMS communication in TheFaithApp. These tools include:- Marketing dashboard
- Integrations
- Mailgun
- Twilio
- Email campaigns
- Email templates
- Email subscribers
- SMS campaigns
- SMS templates
- SMS subscribers
Before You Start
- Sign in to your admin account.
- Open
Marketingfrom the six-product sidebar, then chooseDashboard,Email Marketing,SMS Marketing, orIntegrations. - Use
Integrationsbefore building campaigns if your providers are not set up yet. - New accounts may show empty states until your first template, subscriber list, or campaign is added.
Marketing Dashboard
Use the dashboard to monitor the overall health of your email and SMS activity from one place.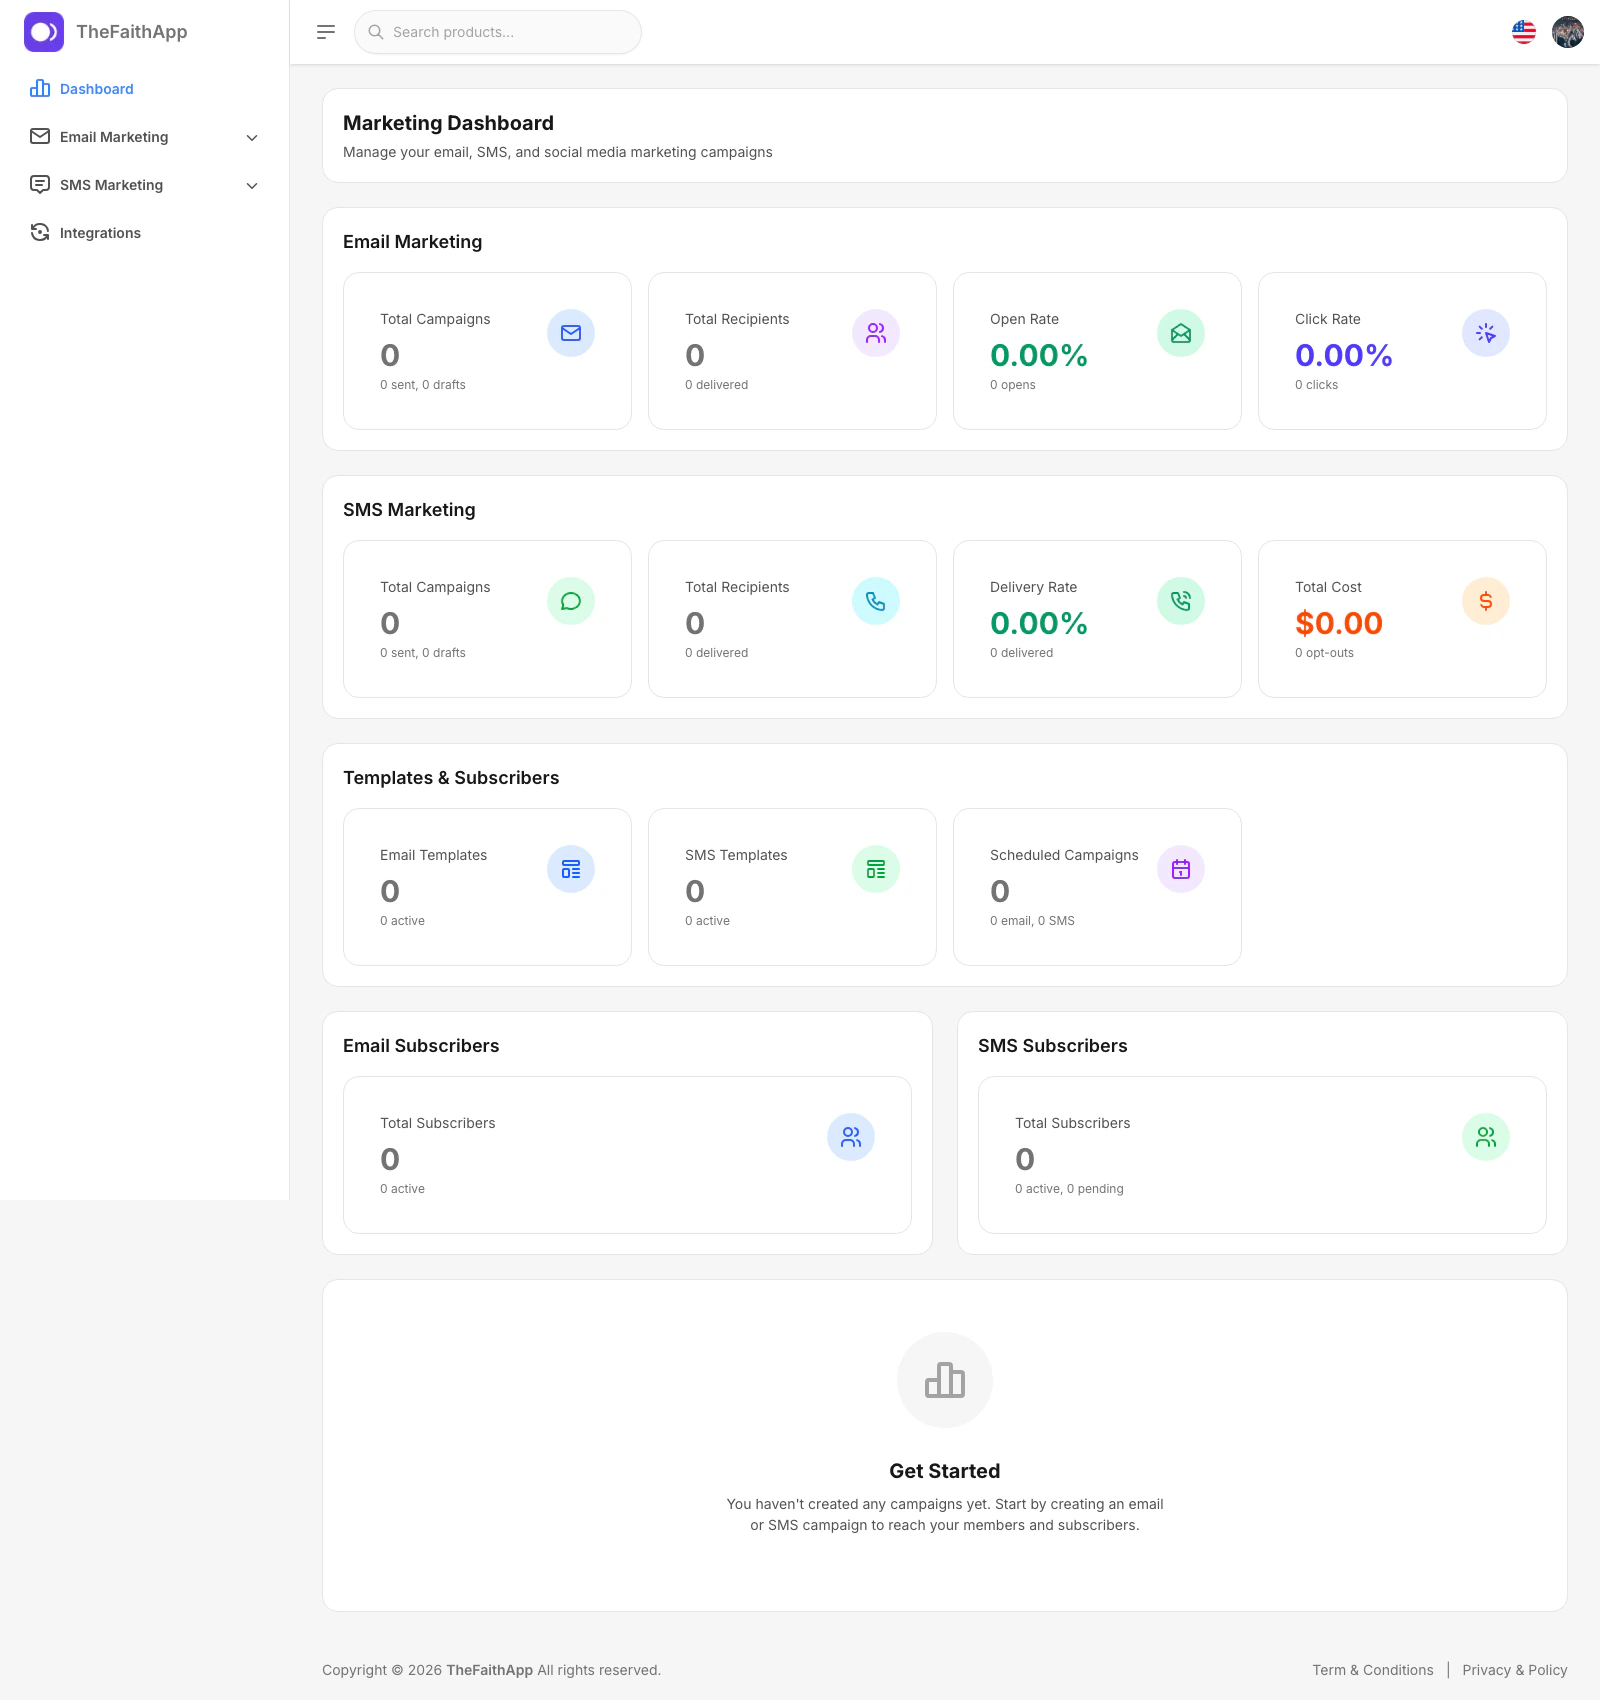
What You Can Do
- Review email campaign totals
- Review SMS campaign totals
- Check open, click, and delivery rates
- Monitor template and subscriber totals
- See scheduled campaign totals at a glance
Steps
- Open
Marketing. - Stay on
Dashboard. - Review the summary cards for email, SMS, templates, and subscribers.
- Open the related marketing section when you want to take action on a specific area.
Notes
- The dashboard is the best starting point for a quick daily review.
- Empty cards usually mean this area has not been configured or used yet.
Integrations
Use integrations to connect the providers that power your email and SMS delivery.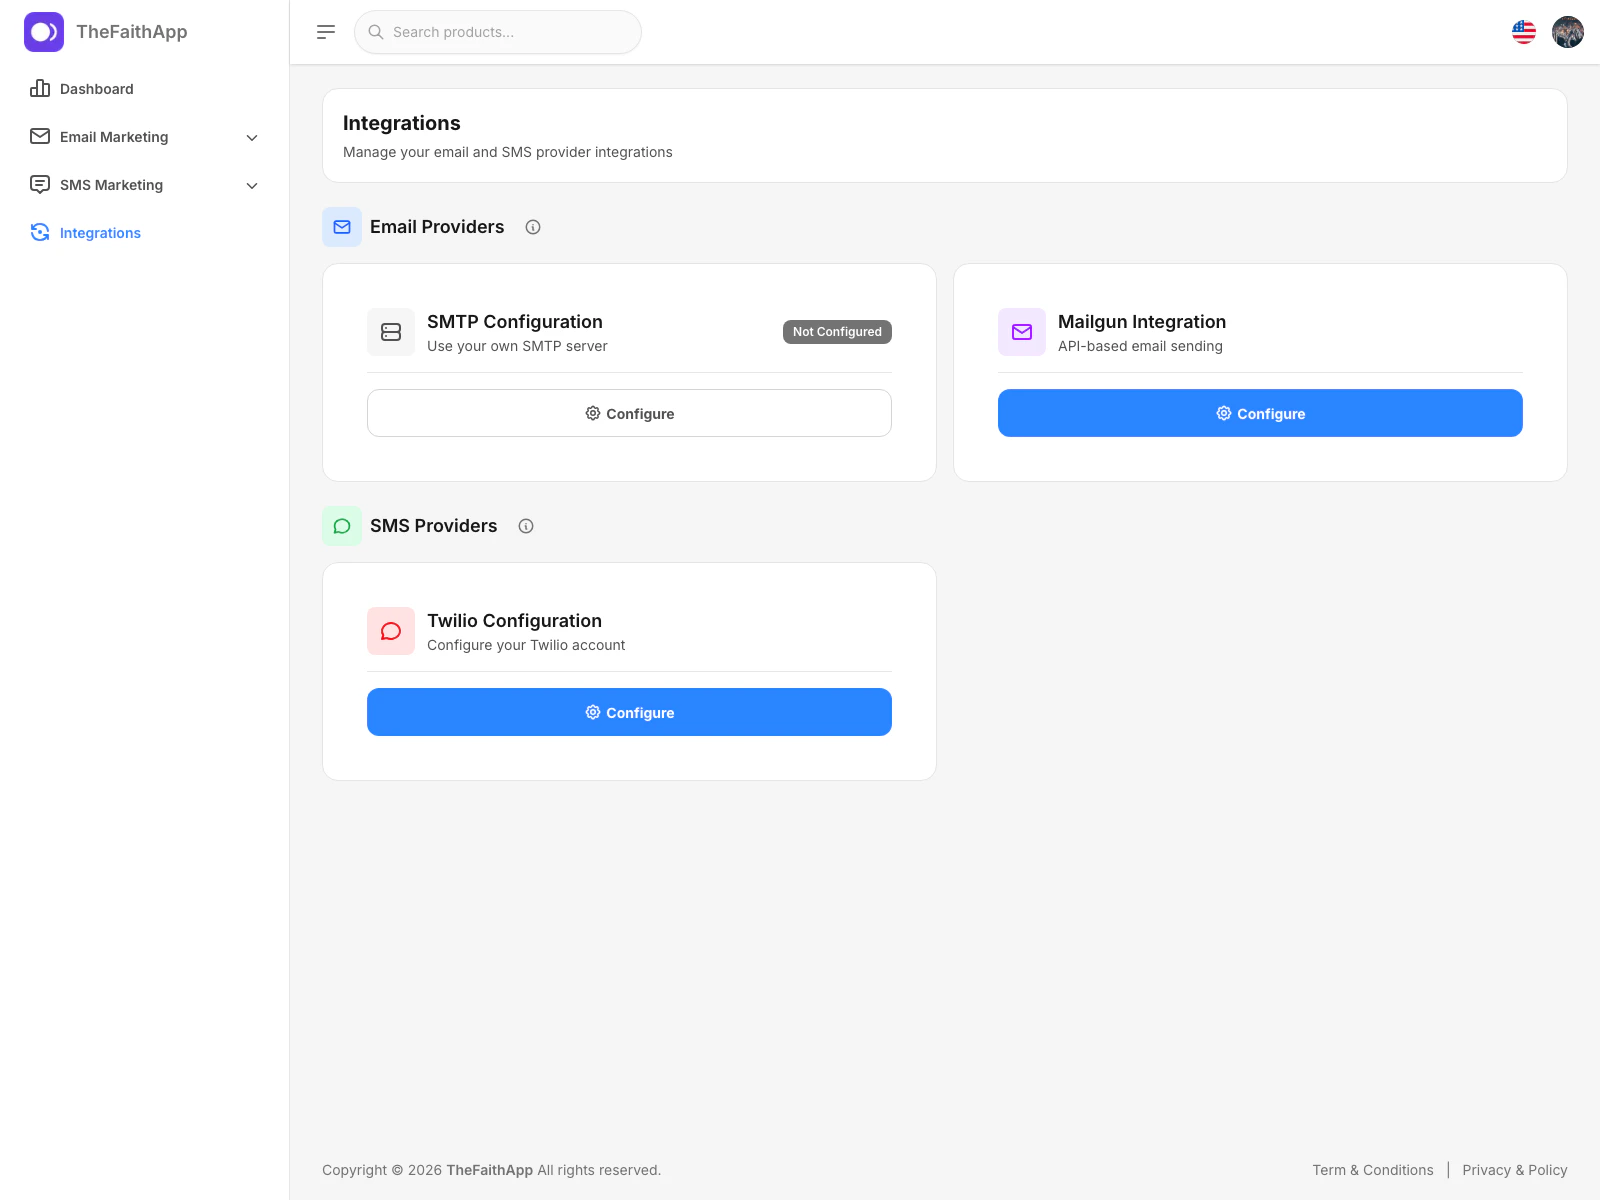
What You Can Do
- Open SMTP setup
- Configure Mailgun
- Configure Twilio
- Review which providers are already active
Steps
- Open
Marketing. - Click
Integrations. - Review the email and SMS provider cards.
- Click
Configureon the provider you want to update.
Notes
SMTP Configurationopens the general settings area for SMTP setup.- Mailgun and Twilio can both be managed directly from this screen.
Mailgun
Use the Mailgun drawer when your team wants Mailgun to handle email delivery.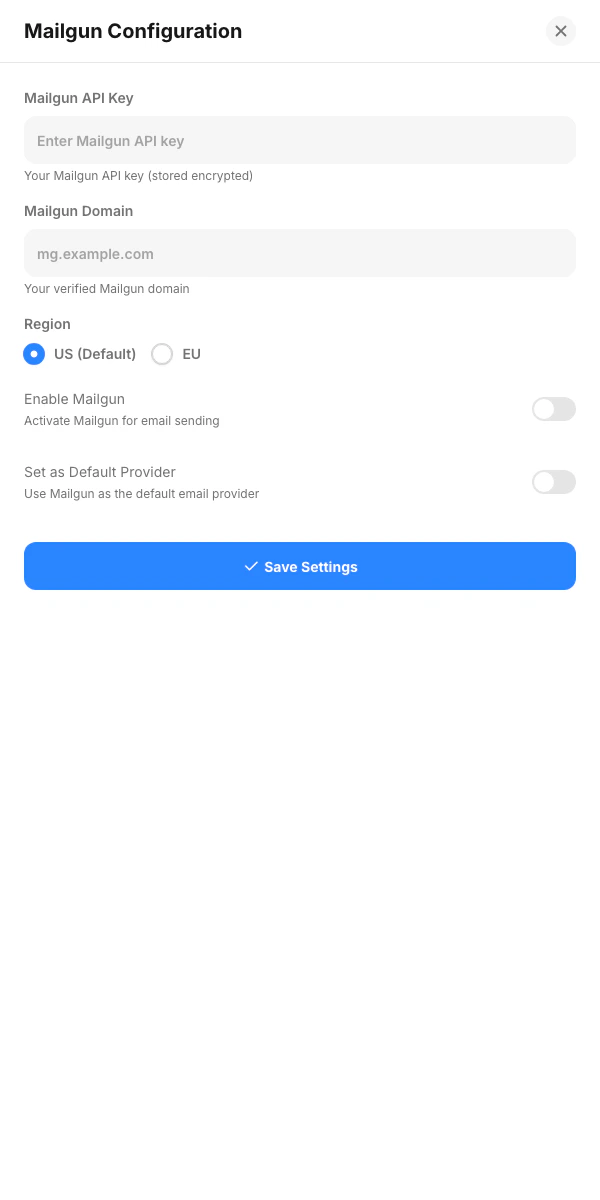
What You Can Do
- Enter your Mailgun API key
- Add the verified Mailgun domain
- Choose the Mailgun region
- Turn Mailgun on or off
- Set Mailgun as the default email provider
Steps
- Open
Marketing. - Click
Integrations. - In the
Mailgun Integrationcard, clickConfigure. - Enter the provider details.
- Turn on Mailgun if you want to use it for sending.
- Save the settings.
Notes
- Use the region that matches your Mailgun account.
- Set Mailgun as default only if it should be the main email sending service for your church.
Twilio
Use the Twilio drawer when your team wants its church-owned Twilio account to handle SMS, approved WhatsApp delivery, and the homebound phone companion.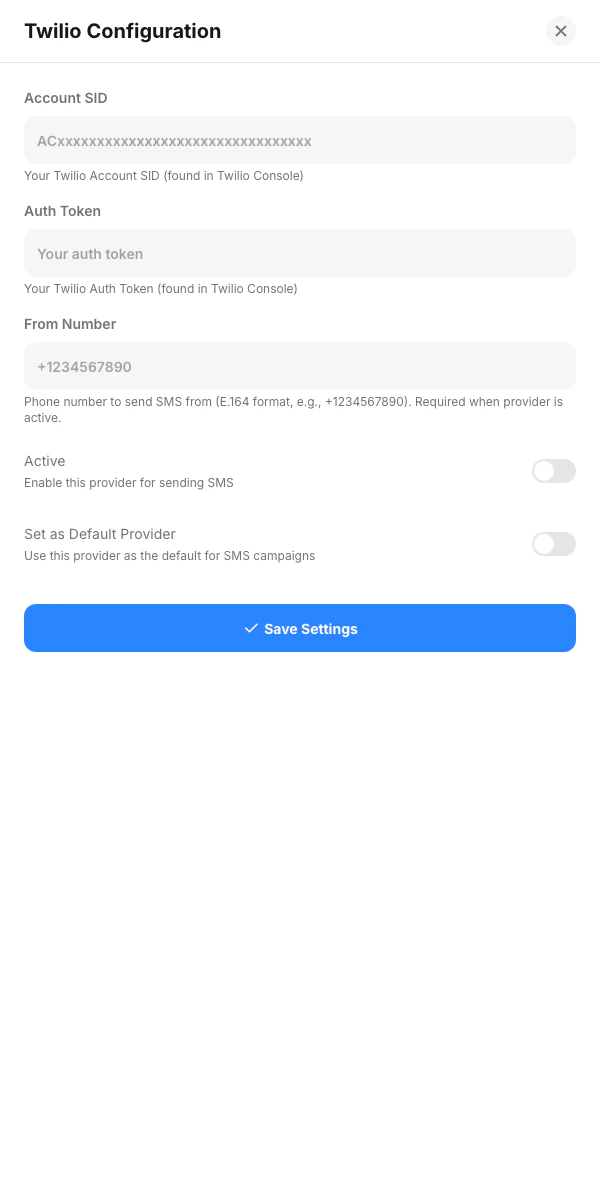
What You Can Do
- Enter the Twilio account SID
- Enter the auth token
- Add the sending phone number
- Turn Twilio on or off
- Set Twilio as the default SMS provider
- Copy the church-specific incoming-message webhook
- Test the saved credentials
Steps
- Open
Marketing. - Click
Integrations. - In the
Twilio Configurationcard, clickConfigure. - Enter the provider details.
- Turn on Twilio when you are ready to send SMS campaigns.
- Save the settings, then select
Test Connection. - Copy the webhook URL and add it to the Twilio number’s
A message comes insetting withHTTP POST.
Notes
- The phone number should be the number your church will send SMS from. It must also have Voice capability when the church uses the homebound phone companion.
- Set Twilio as default if it should be the main SMS provider for your account.
- The credential test does not send a message or place a call. Complete the live tests in the setup guide before launch.
Email Campaigns
Use email campaigns to plan and manage email communication for members and subscribers.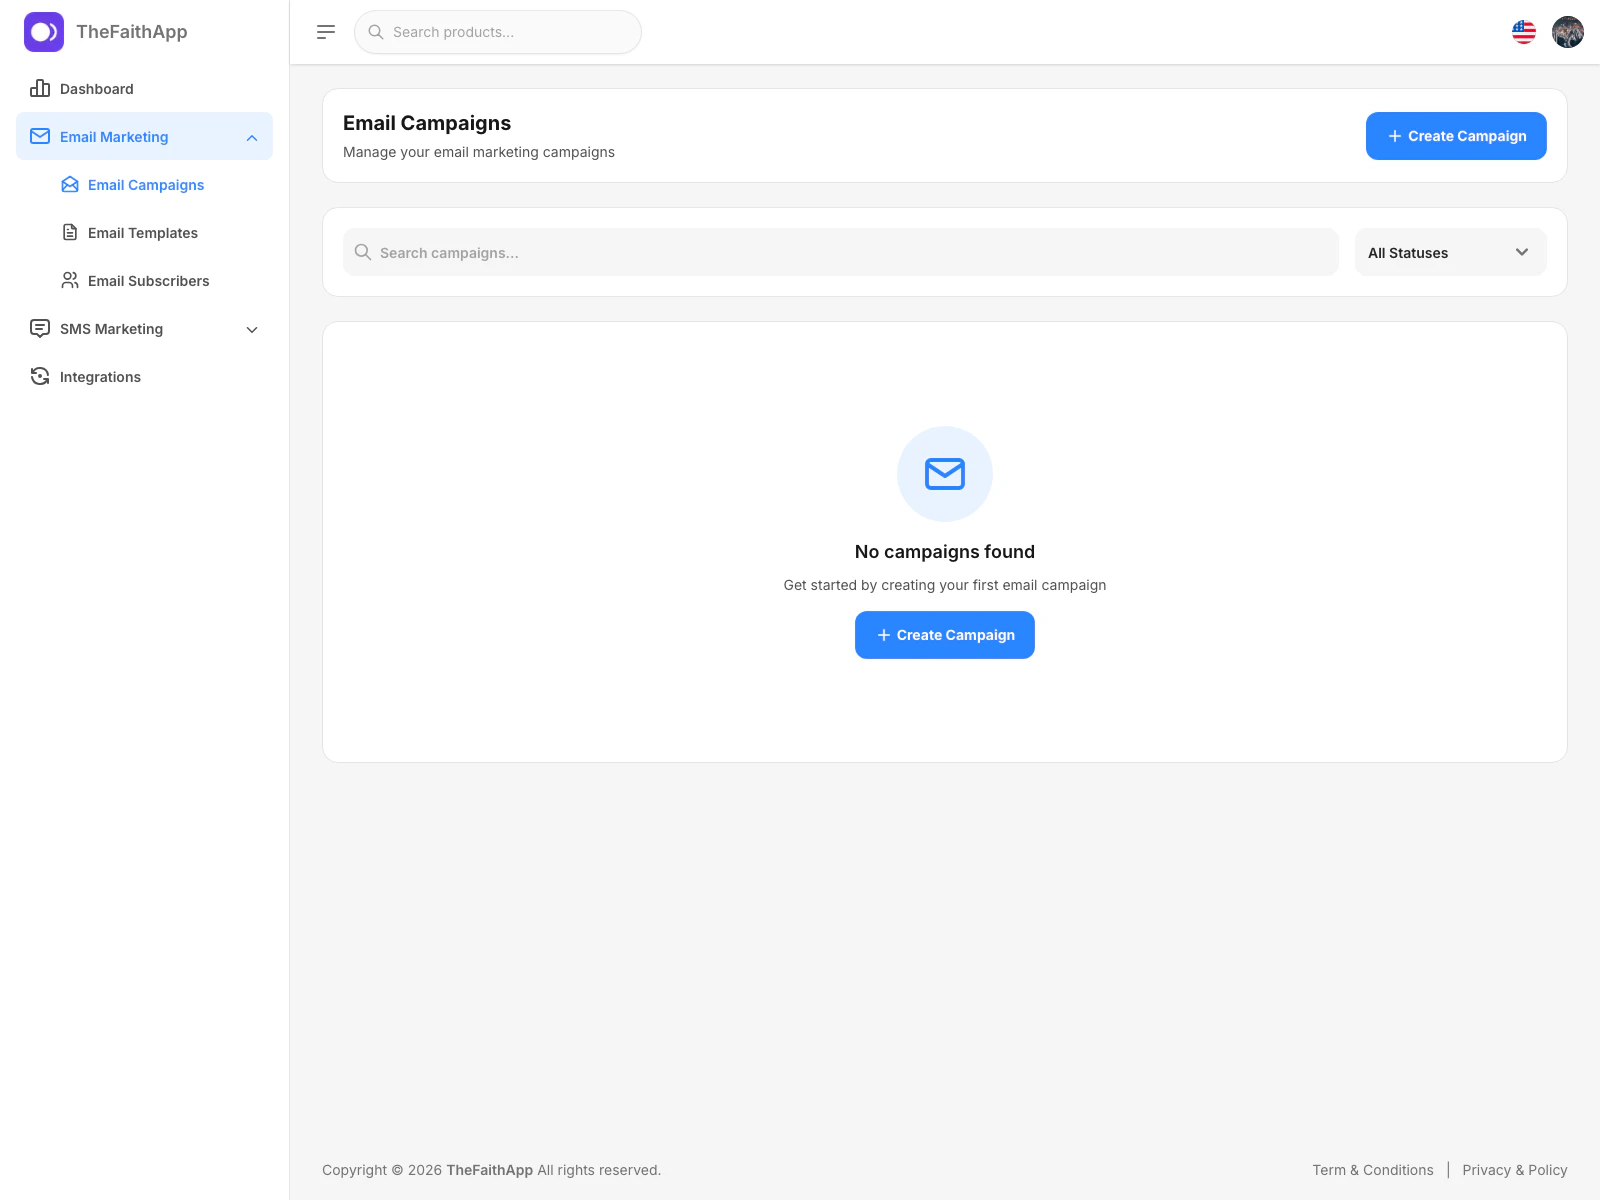
What You Can Do
- Search campaigns
- Filter by status
- Create a new campaign
- Review empty-state prompts when no campaigns exist yet
Steps
- Open
Marketing. - Expand
Email Marketing. - Click
Email Campaigns. - Use search or status filters to narrow the list.
- Click
Create Campaignwhen you want to start a new email campaign.
Notes
- This page is the main workspace for reviewing campaign status.
- New accounts will usually start with an empty state here.
Creating an Email Campaign
Use the create drawer when you want to start a guided email campaign setup.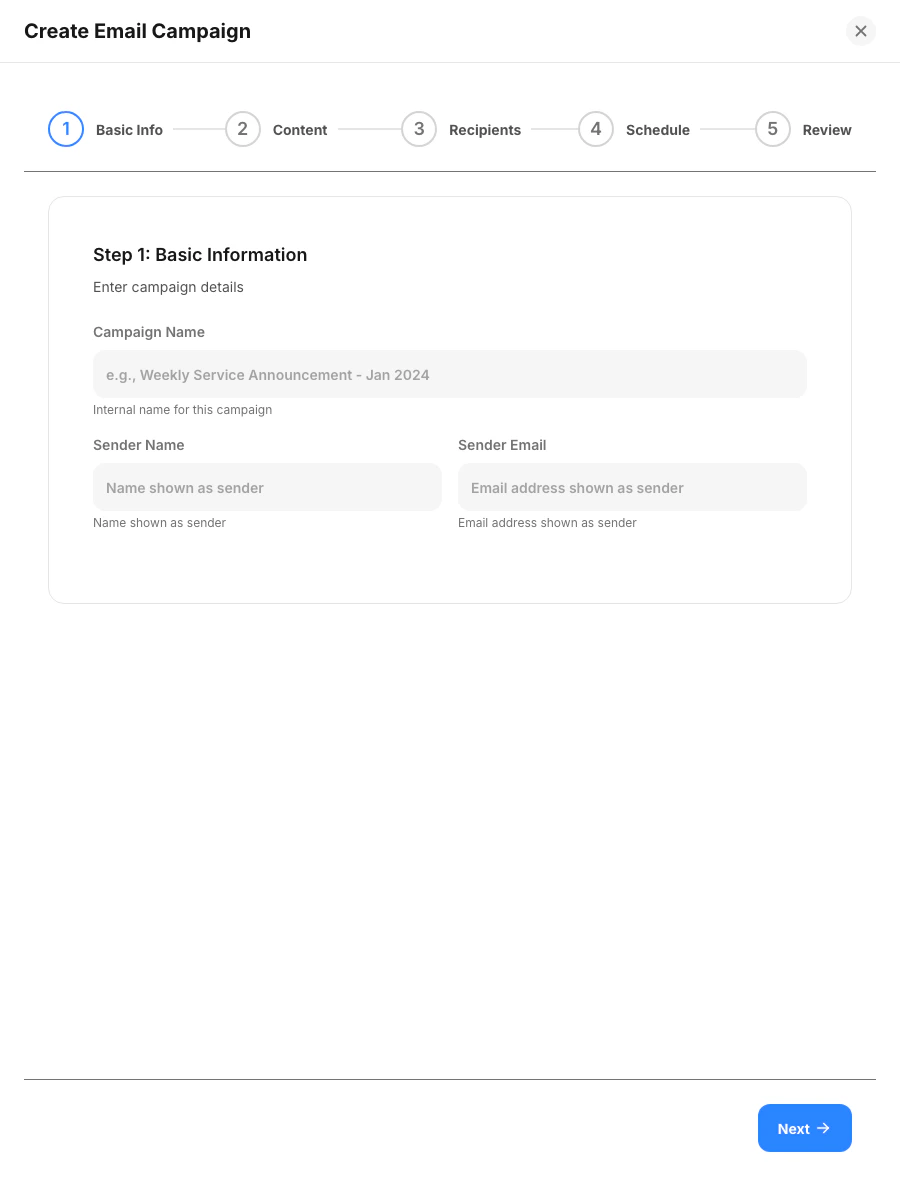
What You Can Do
- Enter campaign details
- Move through the guided setup steps
- Choose recipients
- Decide whether to send now or schedule later
Steps
- Open
Email Campaigns. - Click
Create Campaign. - Enter the campaign name, sender name, and sender email.
- Continue through the content, recipients, schedule, and review steps.
- Save or continue based on the campaign flow shown in the drawer.
Notes
- The campaign builder uses a step-by-step flow to keep setup organized.
- Template loading and recipient totals are still limited in the current build, so treat this flow as in progress.
Email Templates
Use email templates to prepare reusable layouts and messaging before creating campaigns.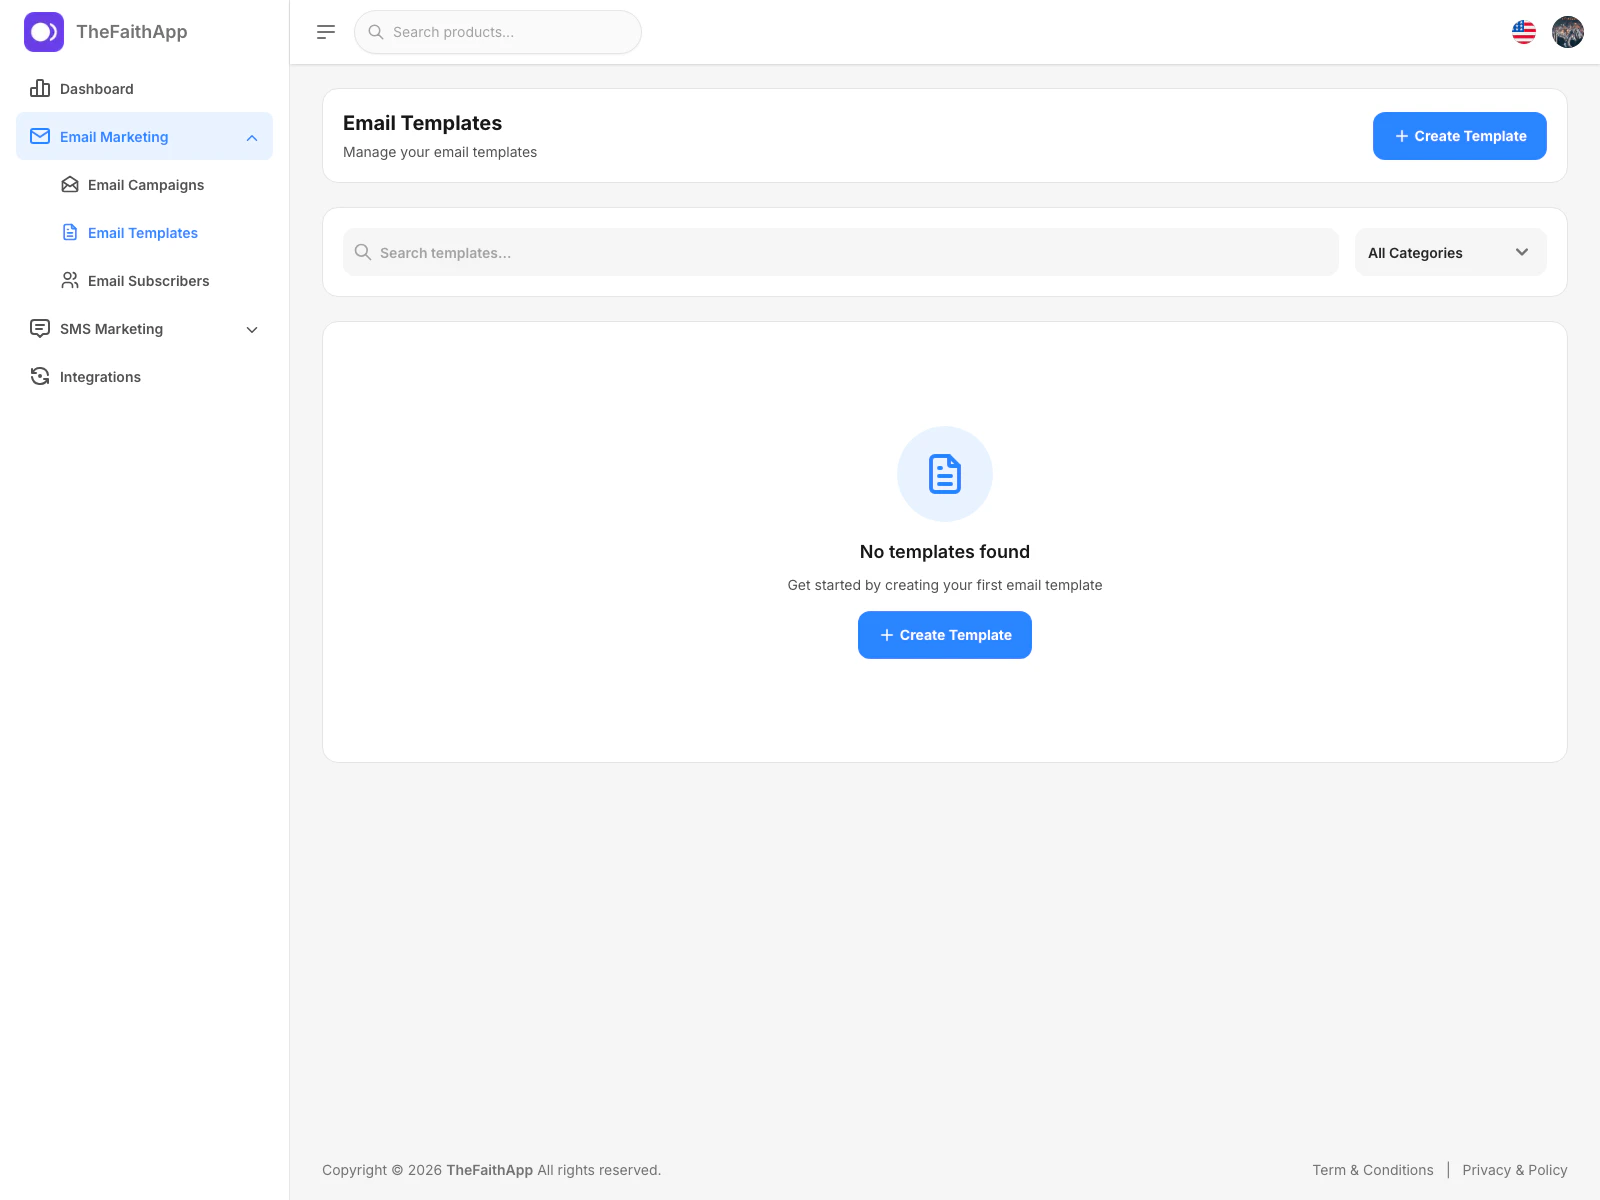
What You Can Do
- Create a template
- Filter templates by category
- Edit a template
- Duplicate a template
- Delete a template
Steps
- Open
Marketing. - Expand
Email Marketing. - Click
Email Templates. - Use the category filter if you want to narrow the list.
- Click
Create Templateto add a new reusable template.
Notes
- Templates are helpful when your team sends similar messages often.
- Keep template names clear so campaign builders can choose the right one quickly.
Creating an Email Template
Use the create template drawer when you want to prepare the structure of a new email before sending campaigns.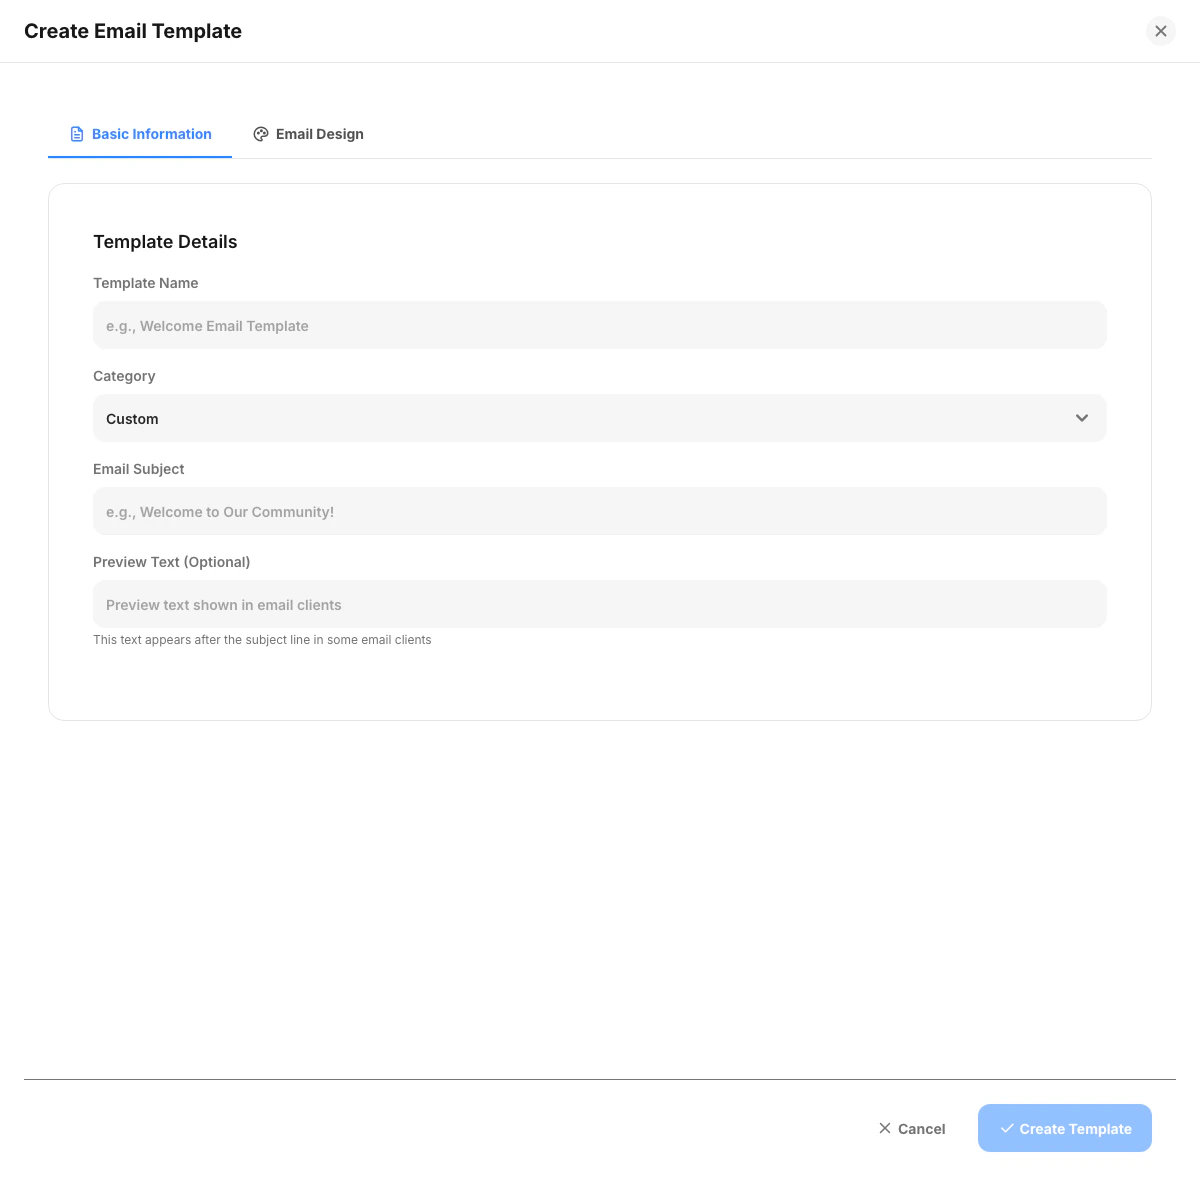
What You Can Do
- Add a template name
- Choose a category
- Add the subject line
- Add optional preview text
- Move into the design tab for the email layout
Steps
- Open
Email Templates. - Click
Create Template. - Enter the basic template details.
- Open the
Email Designtab when you are ready to build the layout. - Save the template.
Notes
- Preview text helps members understand the message before opening the email.
- Use categories to keep welcome emails, announcements, and follow-up templates organized.
Email Subscribers
Use email subscribers to manage who can receive email communication from your church.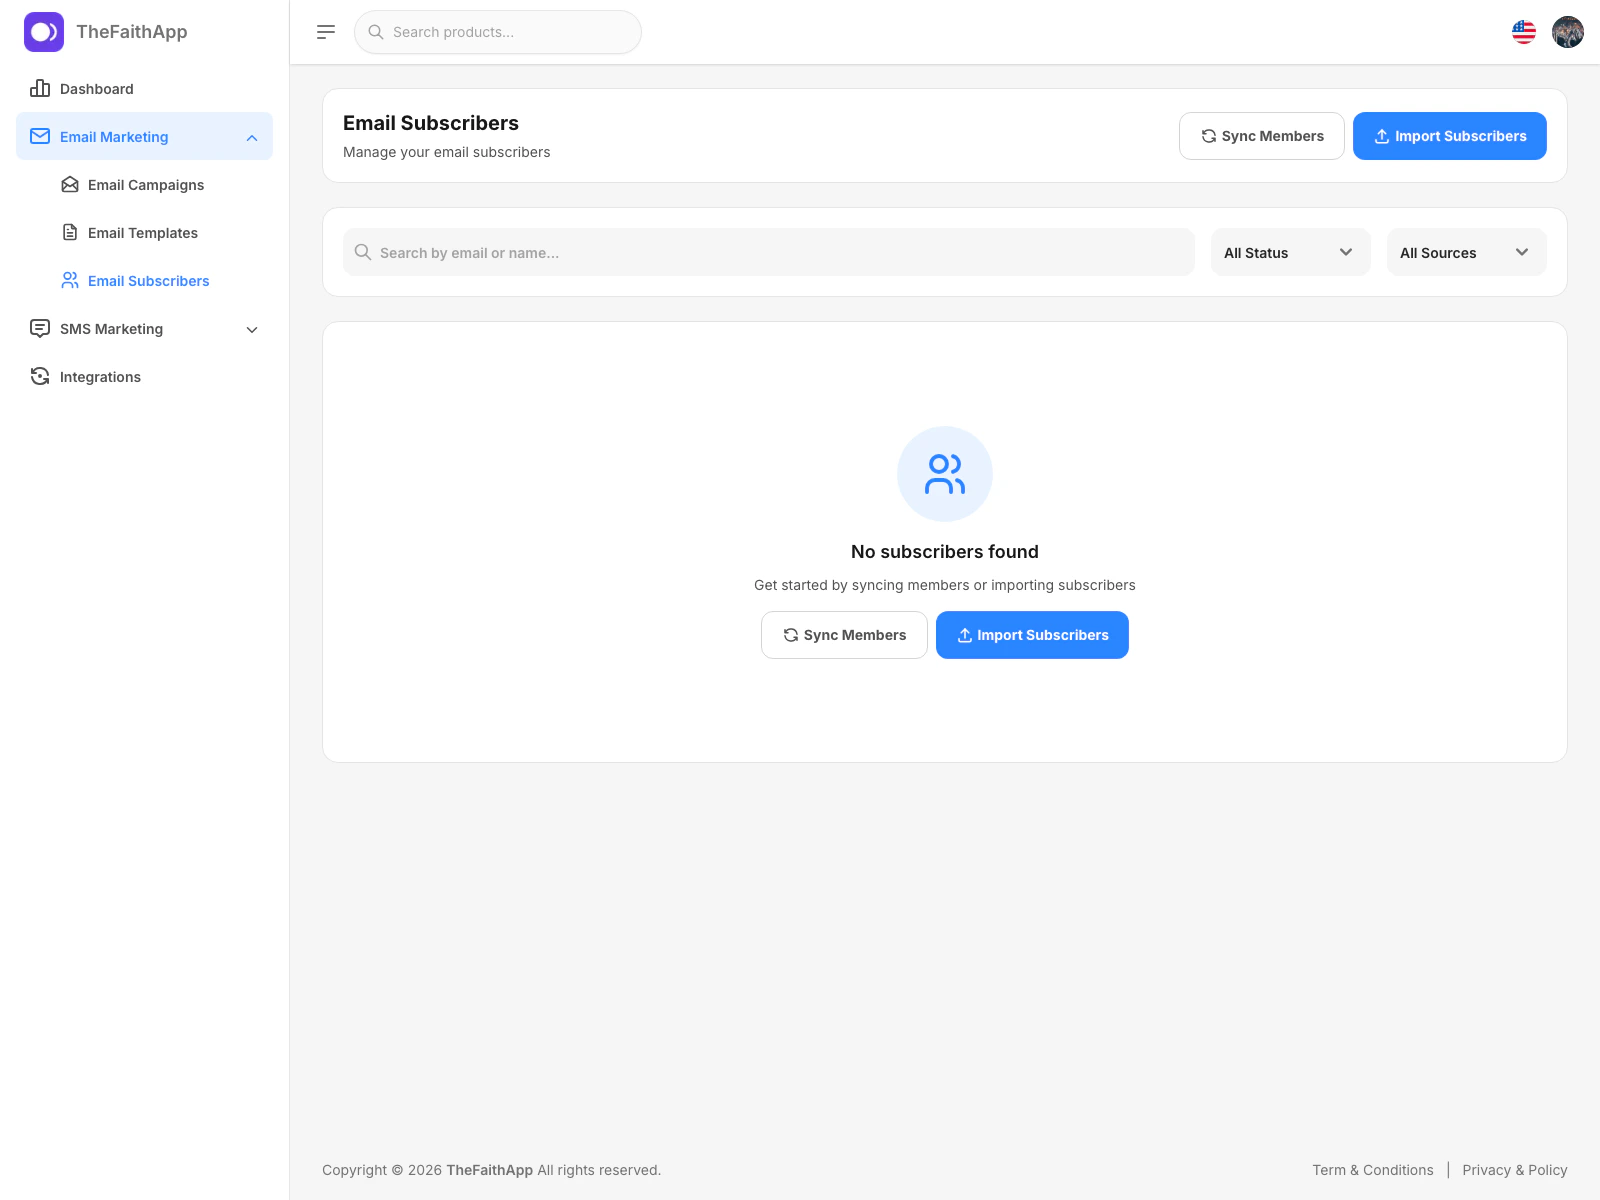
What You Can Do
- Search subscribers
- Filter by status
- Filter by source
- Sync members into the subscriber list
- Import subscribers from CSV
- Unsubscribe, resubscribe, or delete subscribers
- Bulk unsubscribe or bulk delete selected subscribers
Steps
- Open
Marketing. - Expand
Email Marketing. - Click
Email Subscribers. - Use search or filters to review the list.
- Click
Sync Membersto pull member records into the subscriber list. - Click
Import Subscribersif you want to upload a CSV file.
Notes
- Source labels help your team tell whether a subscriber came from members, imports, or manual entry.
- Syncing members is useful after major membership updates.
Importing Email Subscribers
Use the import drawer when you already have a CSV file of contacts to add.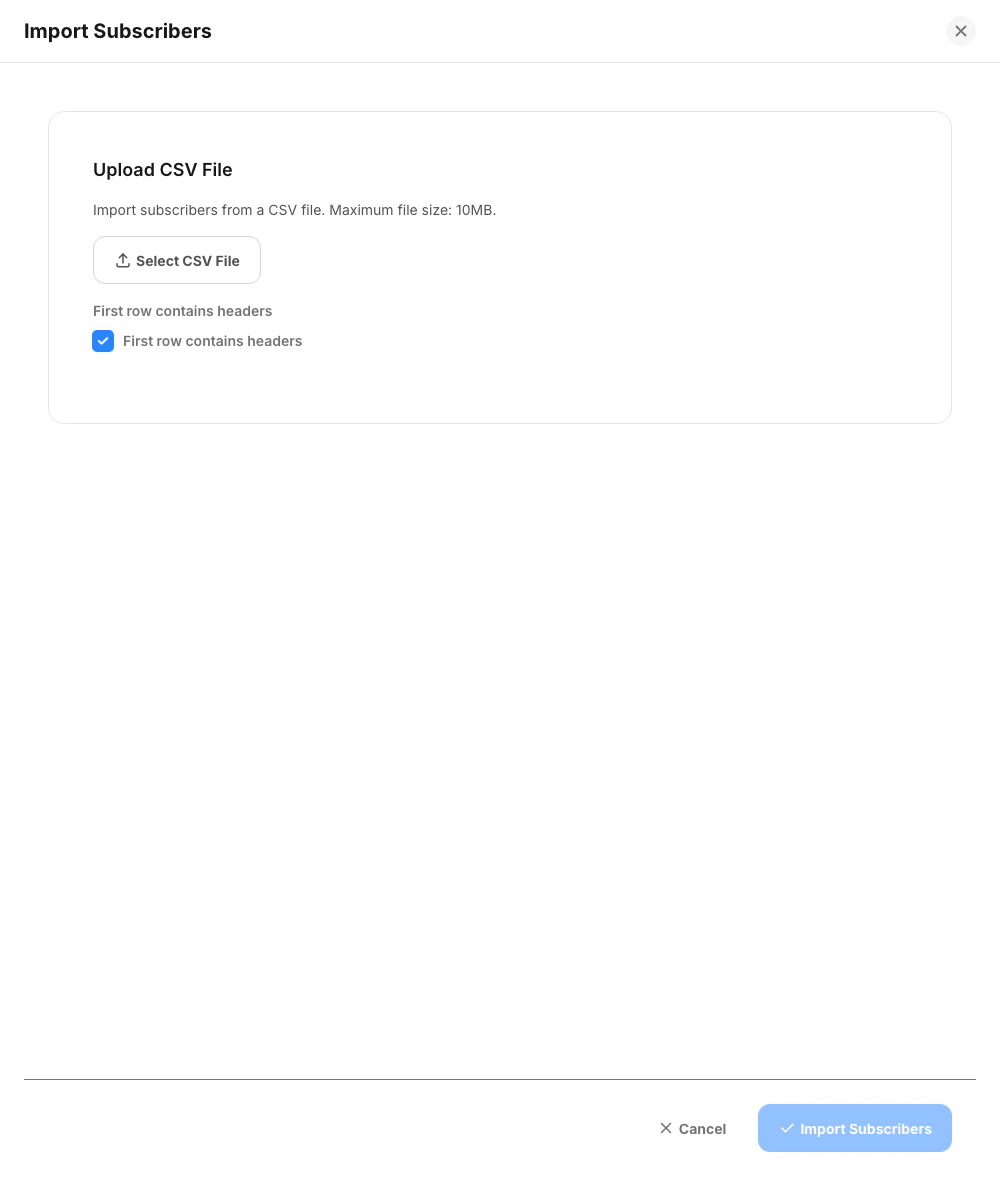
What You Can Do
- Upload a CSV file
- Confirm whether the first row contains headers
- Import a batch of contacts in one step
Steps
- Open
Email Subscribers. - Click
Import Subscribers. - Select the CSV file.
- Confirm whether the first row contains headers.
- Click
Import Subscribers.
Notes
- CSV import is the fastest option when you already have contacts outside the platform.
SMS Campaigns
Use SMS campaigns to prepare text message communication for members or subscriber groups.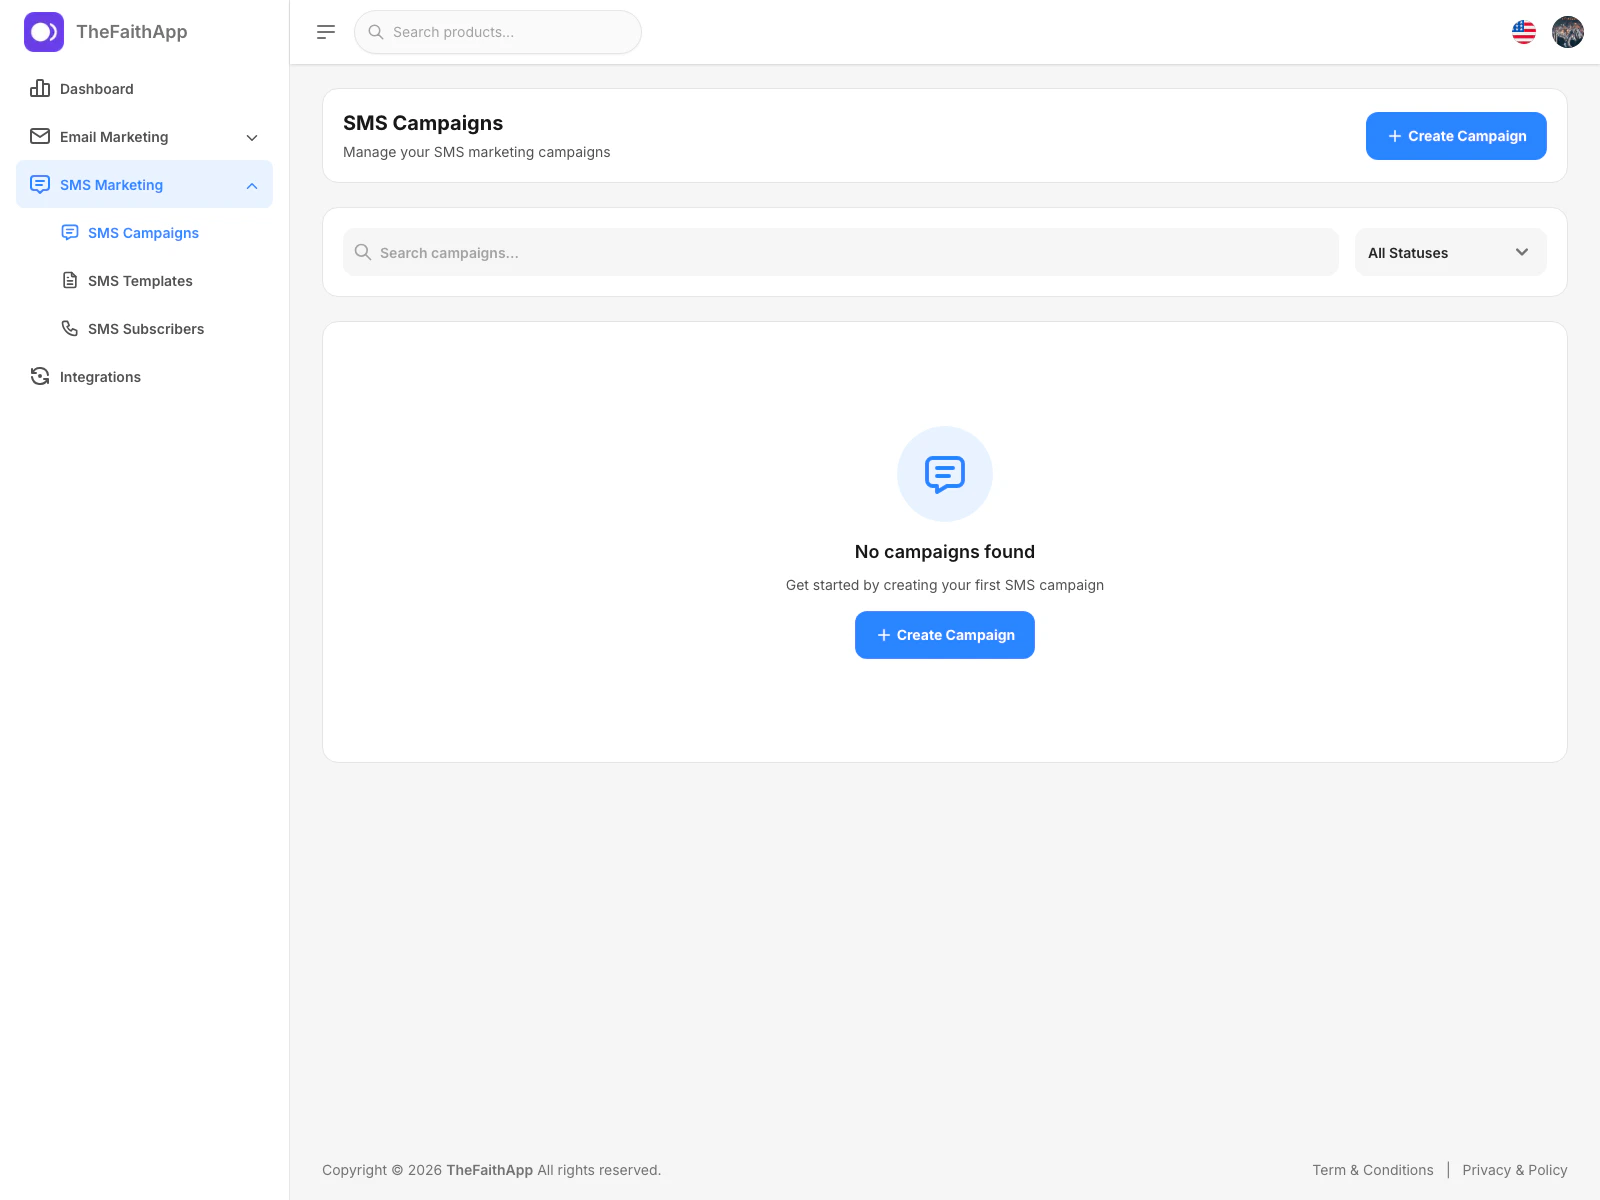
What You Can Do
- Search campaigns
- Filter by status
- Create a new SMS campaign
- Review the campaign list from one place
Steps
- Open
Marketing. - Expand
SMS Marketing. - Click
SMS Campaigns. - Use search or status filters when needed.
- Click
Create Campaignto start a new SMS campaign.
Notes
- SMS campaigns use a guided flow similar to email campaigns.
Creating an SMS Campaign
Use the create drawer when you want to build an SMS campaign step by step.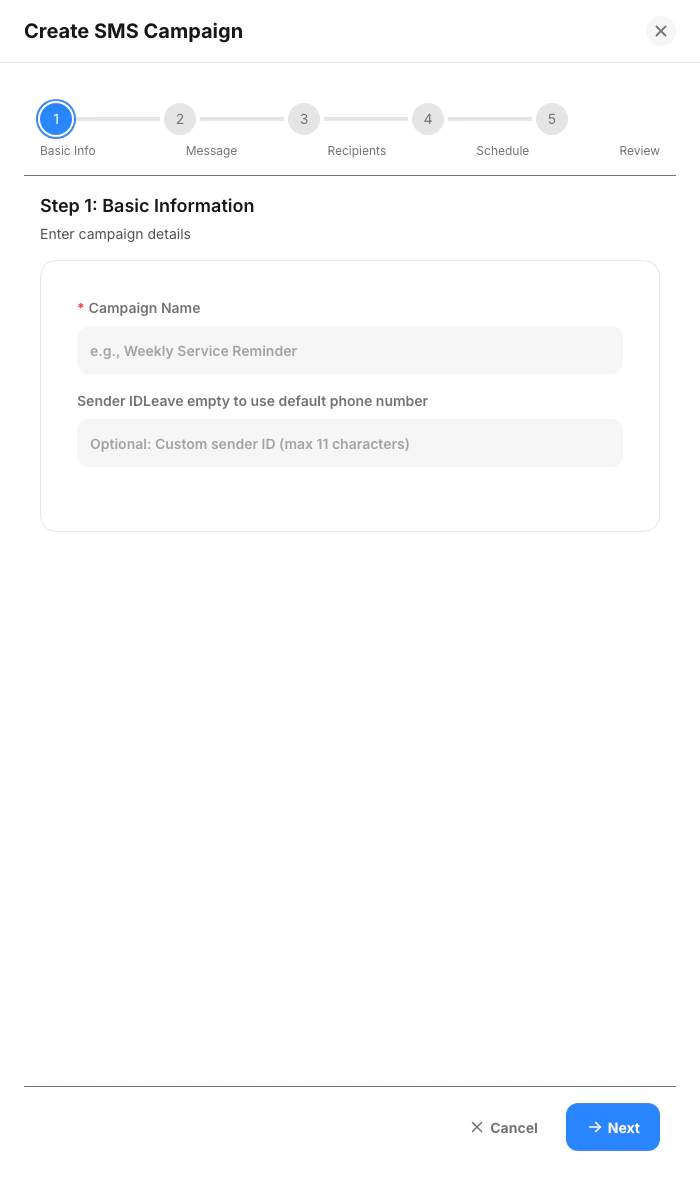
What You Can Do
- Enter campaign details
- Choose a saved SMS template
- Review recipient totals
- Schedule the campaign or send it immediately
Steps
- Open
SMS Campaigns. - Click
Create Campaign. - Enter the campaign name and optional sender ID.
- Continue through message, recipients, schedule, and review.
- Complete the campaign setup from the final step.
Notes
- The SMS builder shows the campaign process in five clear steps.
- Recipient totals are calculated as you choose the audience.
SMS Templates
Use SMS templates to save reusable message formats for future campaigns.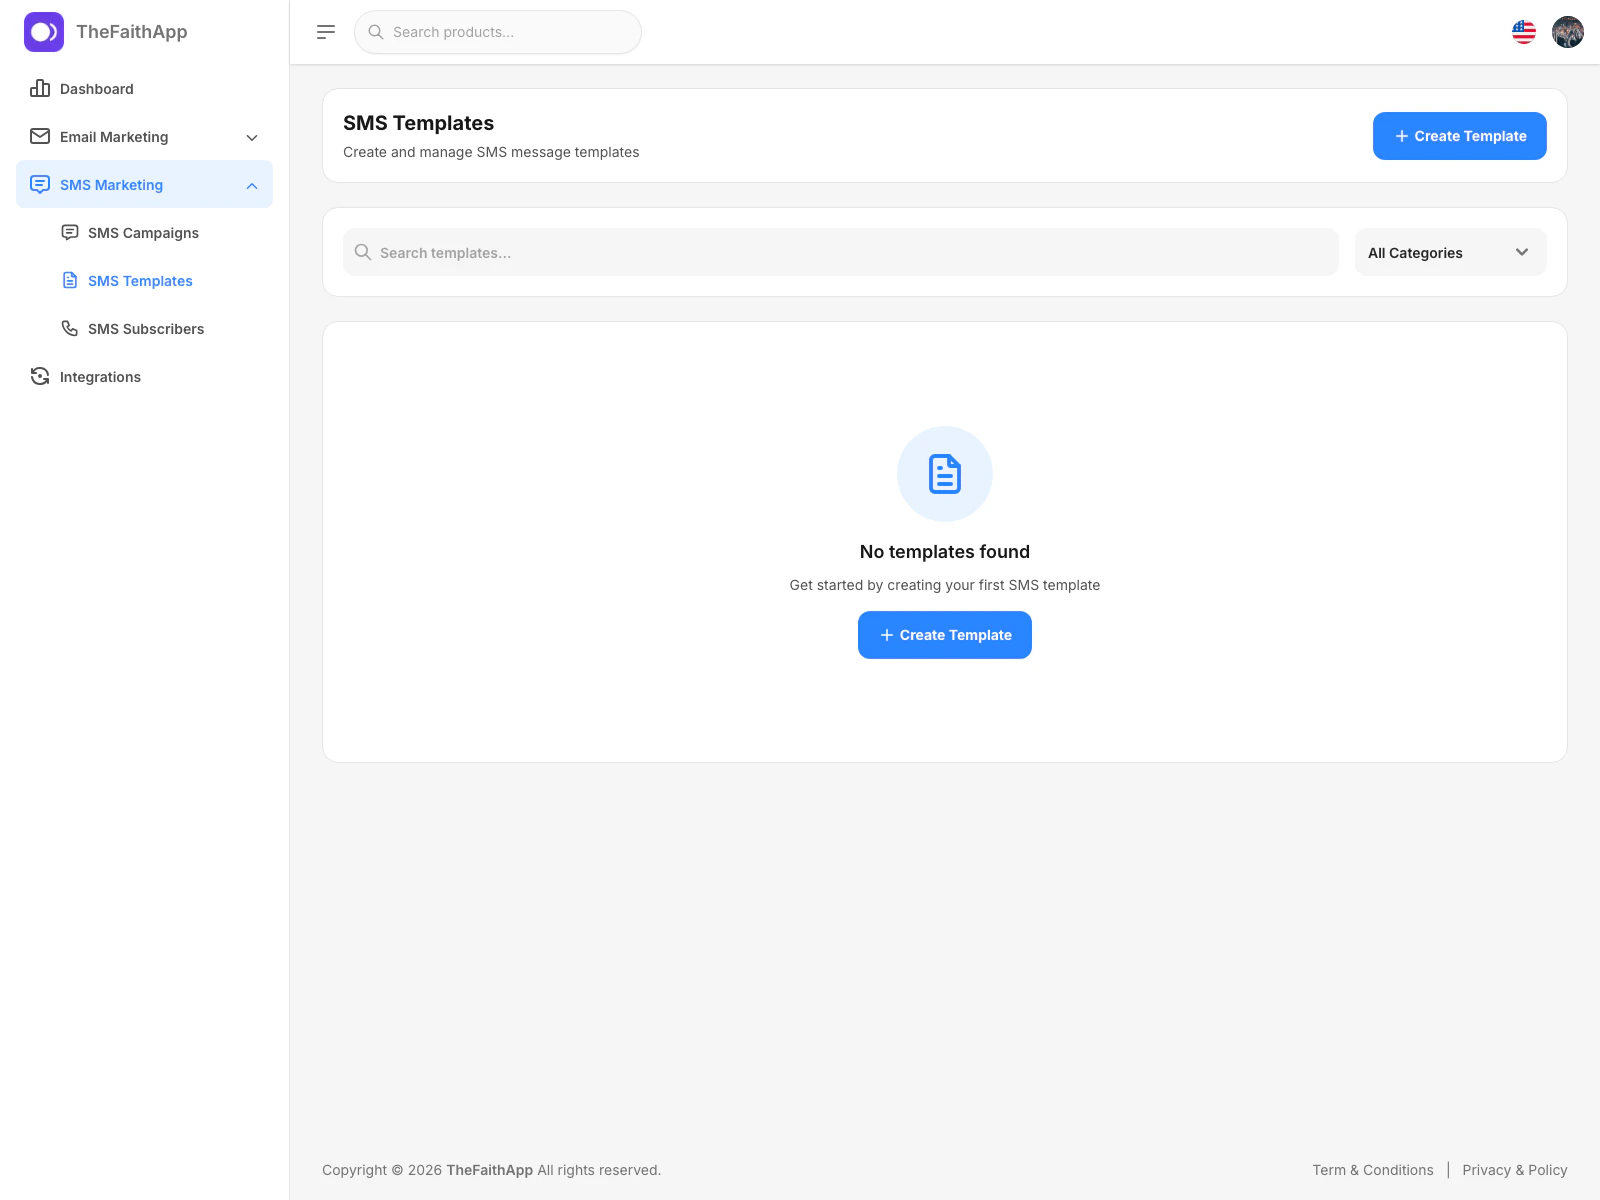
What You Can Do
- Create a template
- Filter by category
- Edit a template
- Duplicate a template
- Delete a template
Steps
- Open
Marketing. - Expand
SMS Marketing. - Click
SMS Templates. - Use the category filter when needed.
- Click
Create Templateto add a reusable message.
Notes
- SMS templates help teams move faster when they send recurring reminders or announcements.
Creating an SMS Template
Use the create drawer when you want to save a new reusable SMS message.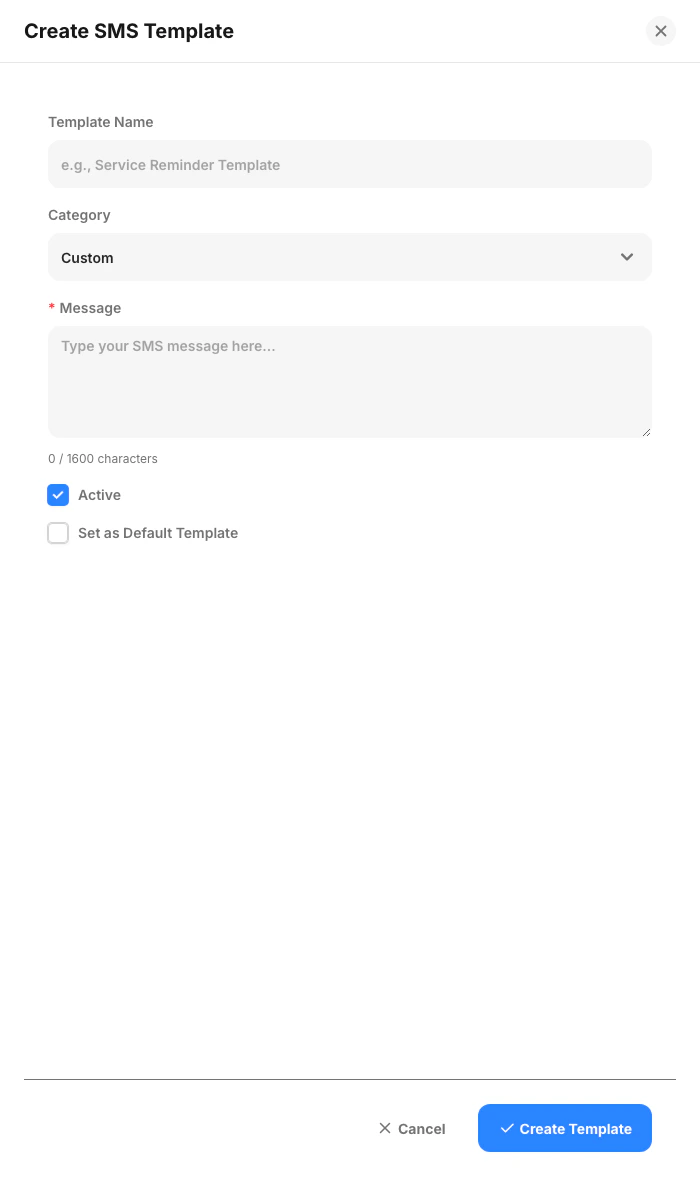
What You Can Do
- Add a template name
- Choose a category
- Write the SMS message
- Set the template active or inactive
Steps
- Open
SMS Templates. - Click
Create Template. - Enter the template name and category.
- Write the message content.
- Save the template.
Notes
- Keep templates short and clear so they fit SMS comfortably.
SMS Subscribers
Use SMS subscribers to manage the people who can receive text message communication from your church.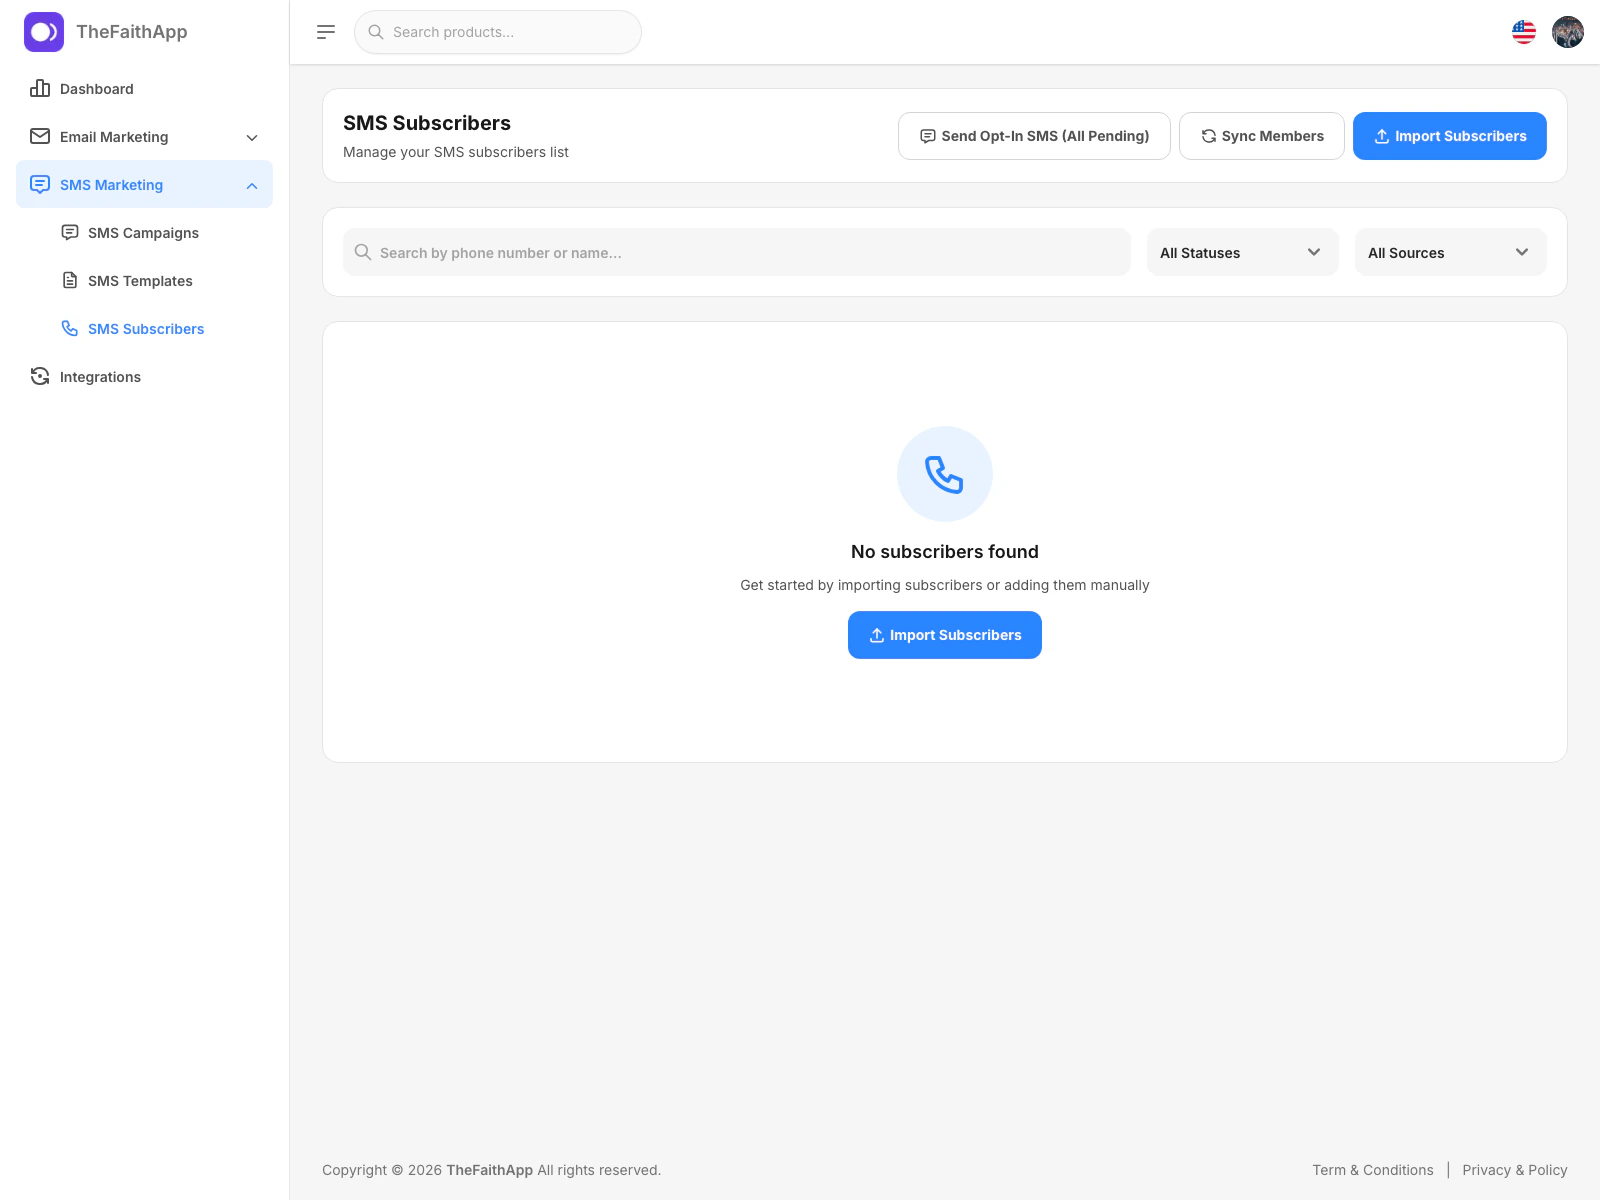
What You Can Do
- Search subscribers
- Filter by status
- Filter by source
- Send opt-in SMS to all pending contacts
- Sync members into the SMS list
- Import subscribers from CSV
- Send individual opt-in messages
- Confirm opt-in
- Unsubscribe or delete subscribers
Steps
- Open
Marketing. - Expand
SMS Marketing. - Click
SMS Subscribers. - Use search or filters to review the list.
- Click
Send Opt-In SMS (All Pending)when you want to follow up with pending contacts. - Use
Sync MembersorImport Subscriberswhen you need to add more contacts.
Notes
- SMS subscriber status is especially important because opt-in confirmation affects who can receive future messages.
Importing SMS Subscribers
Use the import drawer when you already have a CSV file of phone contacts to add.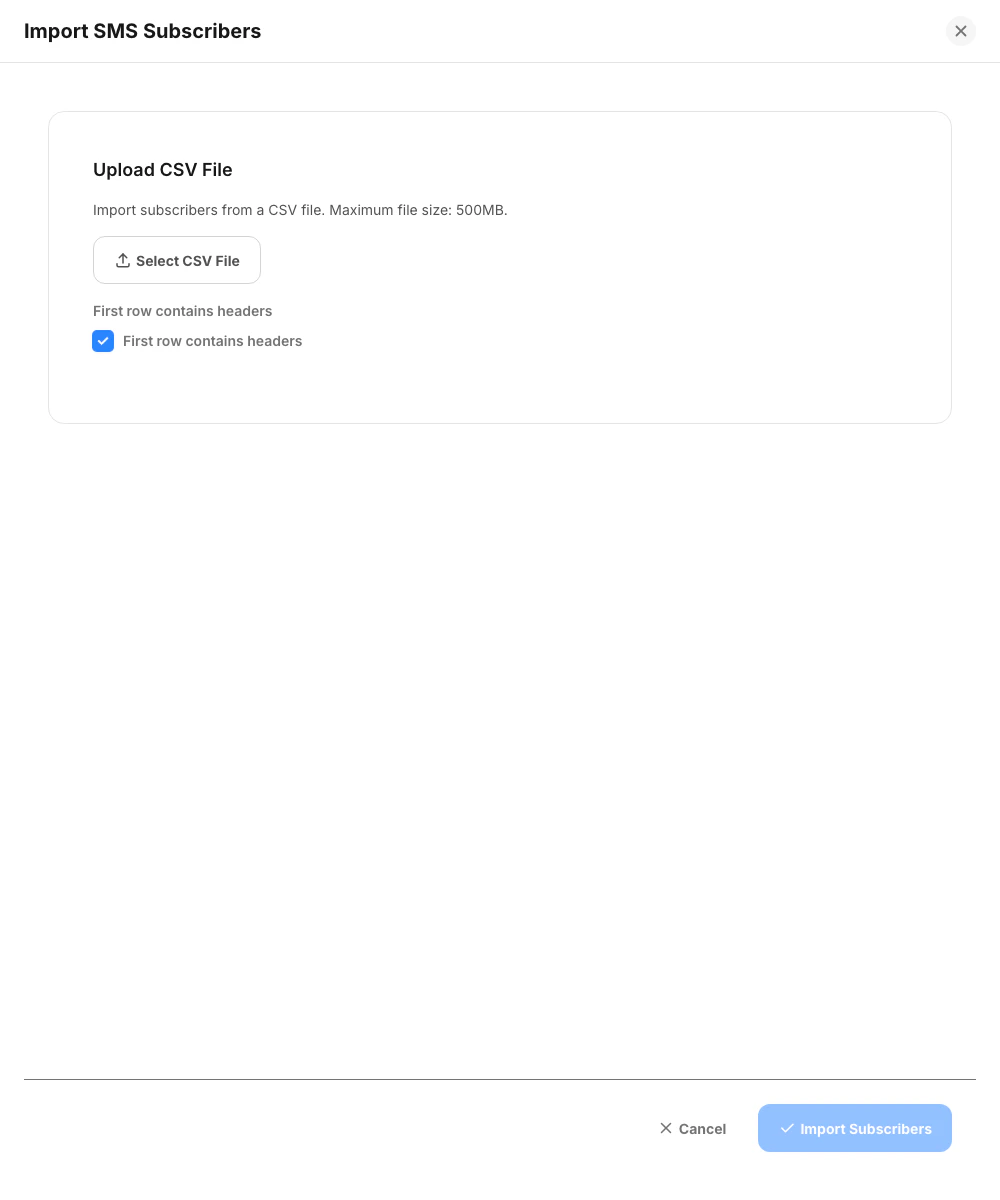
What You Can Do
- Upload a CSV file
- Confirm whether the first row contains headers
- Import a batch of SMS contacts
Steps
- Open
SMS Subscribers. - Click
Import Subscribers. - Select the CSV file.
- Confirm the header option.
- Click
Import Subscribers.
Notes
- Import is useful when your church already has a separate SMS contact list.
Current Product Notes
SMTP Configurationis linked fromMarketing > Integrations, but the actual setup screen opens in the generalSettingsarea.- The email campaign builder is visible and usable as a guided workflow, but template loading and recipient totals are still limited in the current build.
- Email campaign card
ViewandEditactions are not fully available yet in the current build.