
Settings, Branding, and App Customization
This guide covers the settings and customization areas used to manage church details, public branding, technical app setup, and the mobile app experience in TheFaithApp. These tools include:- Church profile
- Social media links
- Email settings
- Developer tools and Firebase setup
- White-label branding
- Custom domains
- Custom branding for public pages
- Brand & theme
- Navigation builder
- Page builder
- Component library
- Customization releases
Before You Start
- Sign in to your admin account.
- Open
Settingsfor church profile, social media, email, developer tools, and branding. - Open
App Customizationfrom the six-product sidebar forPage Builder,App Navigation,Component Library, andBrand & Theme. - Some setup steps, especially SMTP and Firebase, may require help from your technical team or provider.
Church Profile
Use church profile settings to keep your church identity, contact details, and general organization information up to date.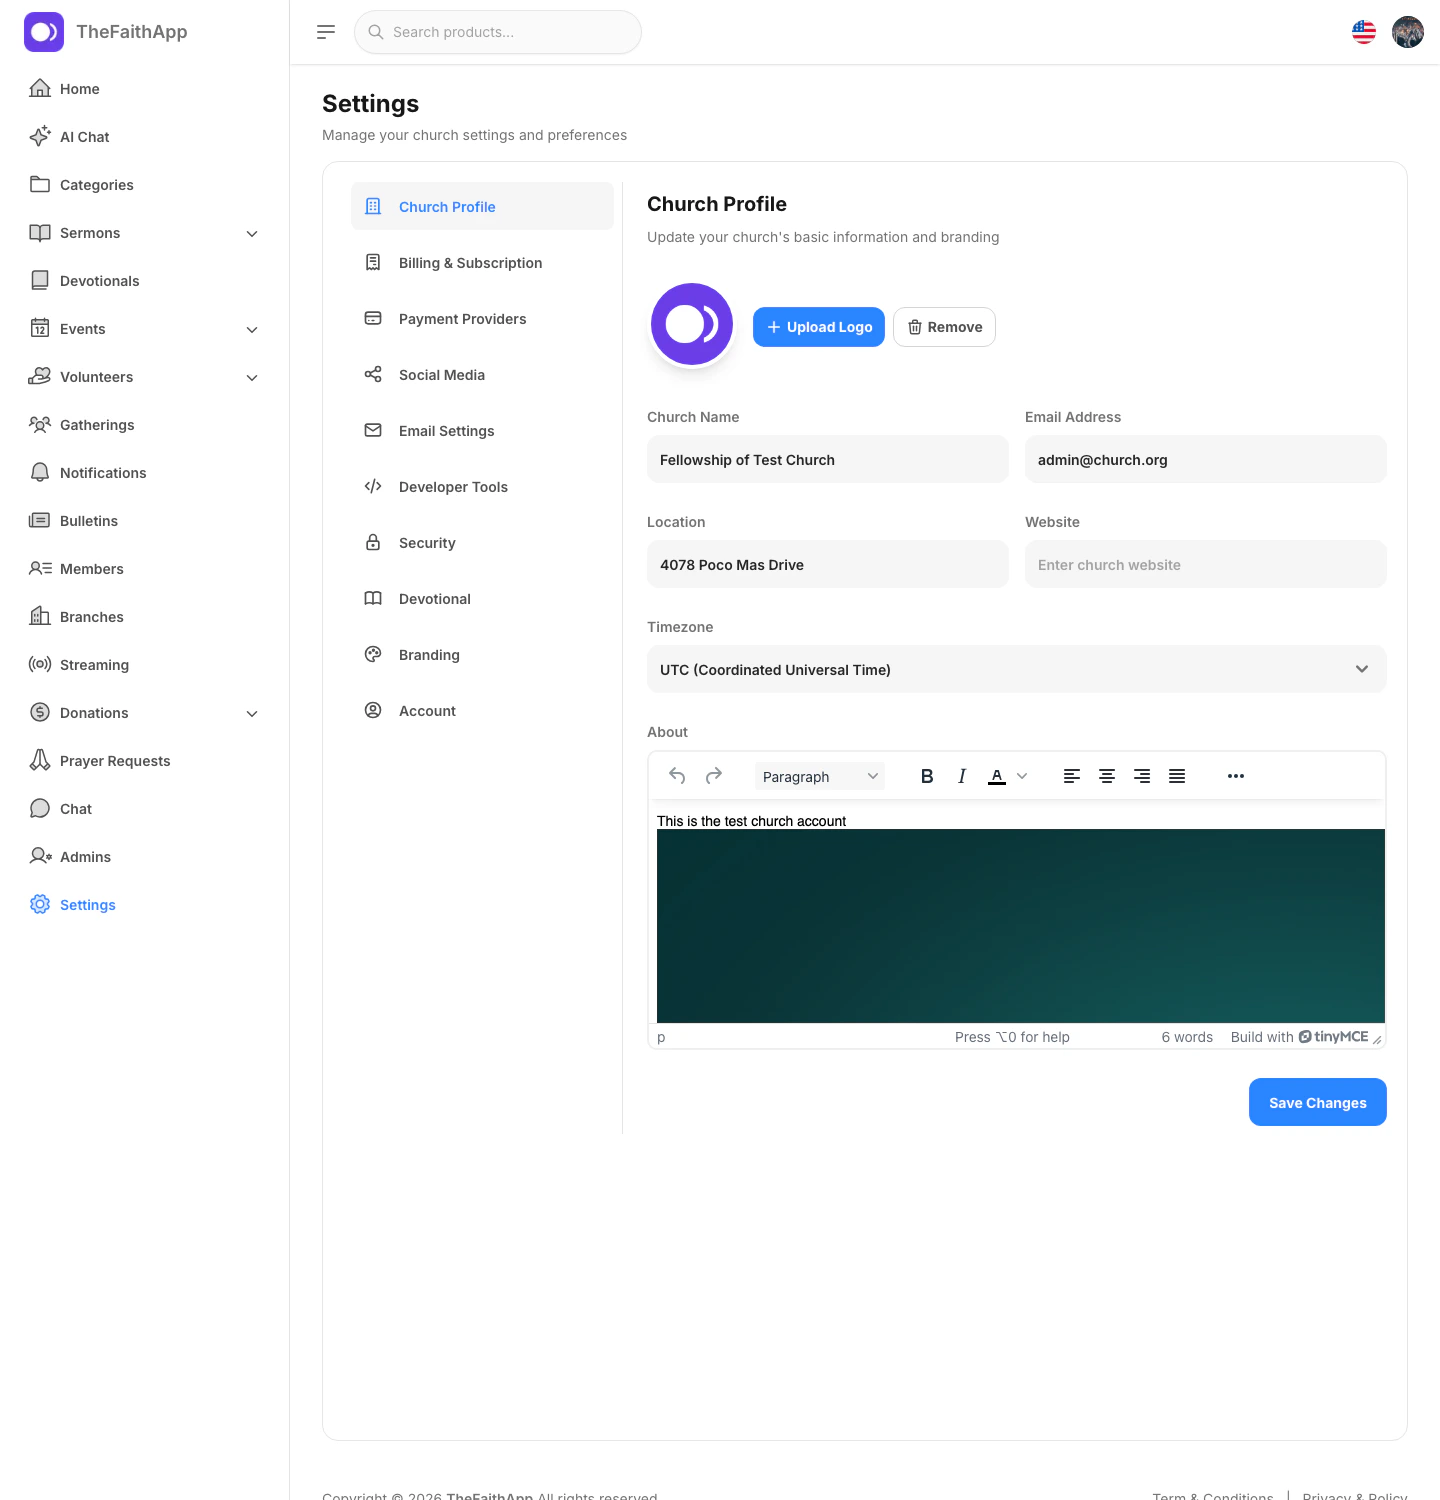
What You Can Do
- Update the church name
- Update the main church email address
- Update location and website details
- Choose the correct timezone
- Update the church description
- Upload or replace the church logo
Steps
- Open
Settings. - Stay on
Church Profile. - Update the church information you want to change.
- Upload a new logo if needed.
- Click
Save Changes.
Notes
- Keep this page current because the same church details can appear across other parts of the platform.
Social Media
Use social media settings to share your public church links with members and visitors.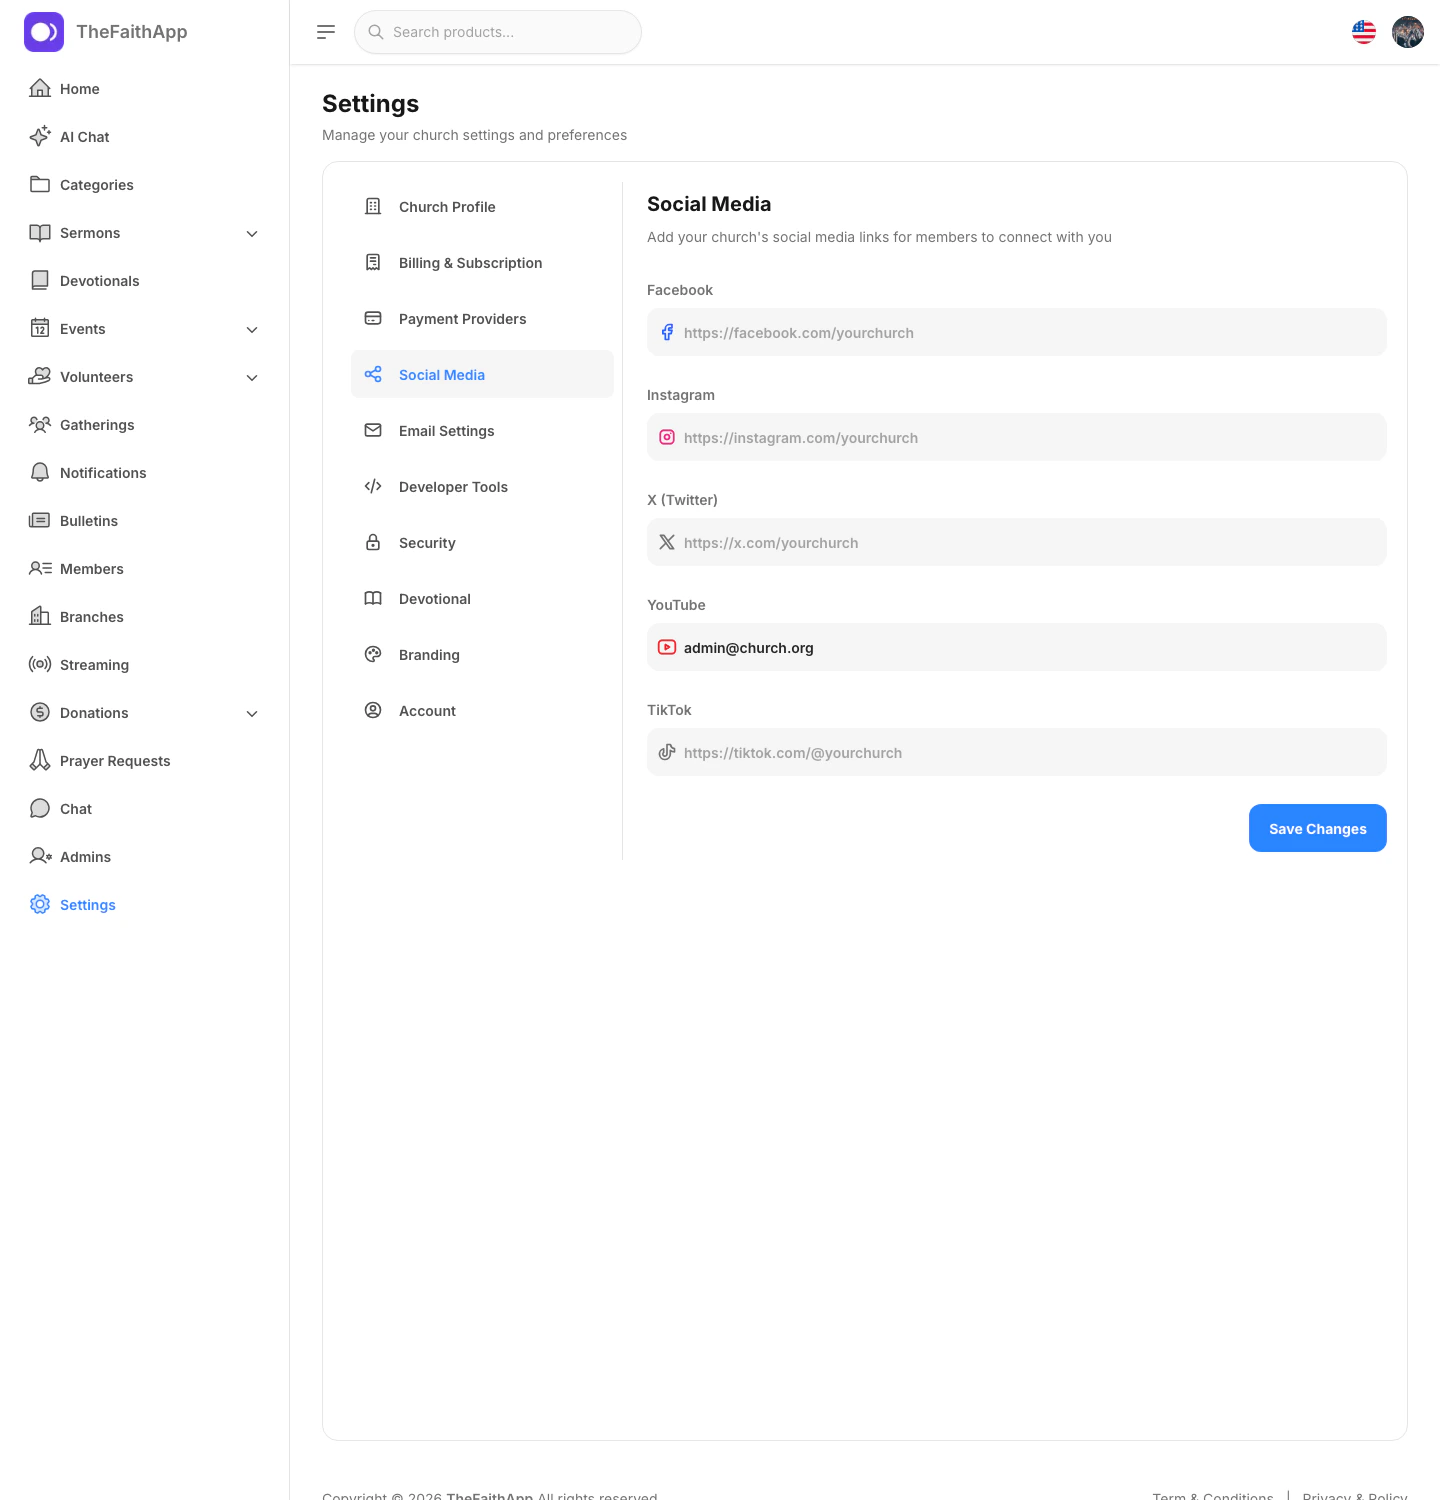
What You Can Do
- Add or update Facebook
- Add or update Instagram
- Add or update X
- Add or update YouTube
- Add or update TikTok
Steps
- Open
Settings. - Click
Social Media. - Paste the links you want to publish.
- Click
Save Changes.
Notes
- Use full public profile links so members are sent to the right page.
Email Settings
Use email settings to control the sending address and delivery provider used for church emails.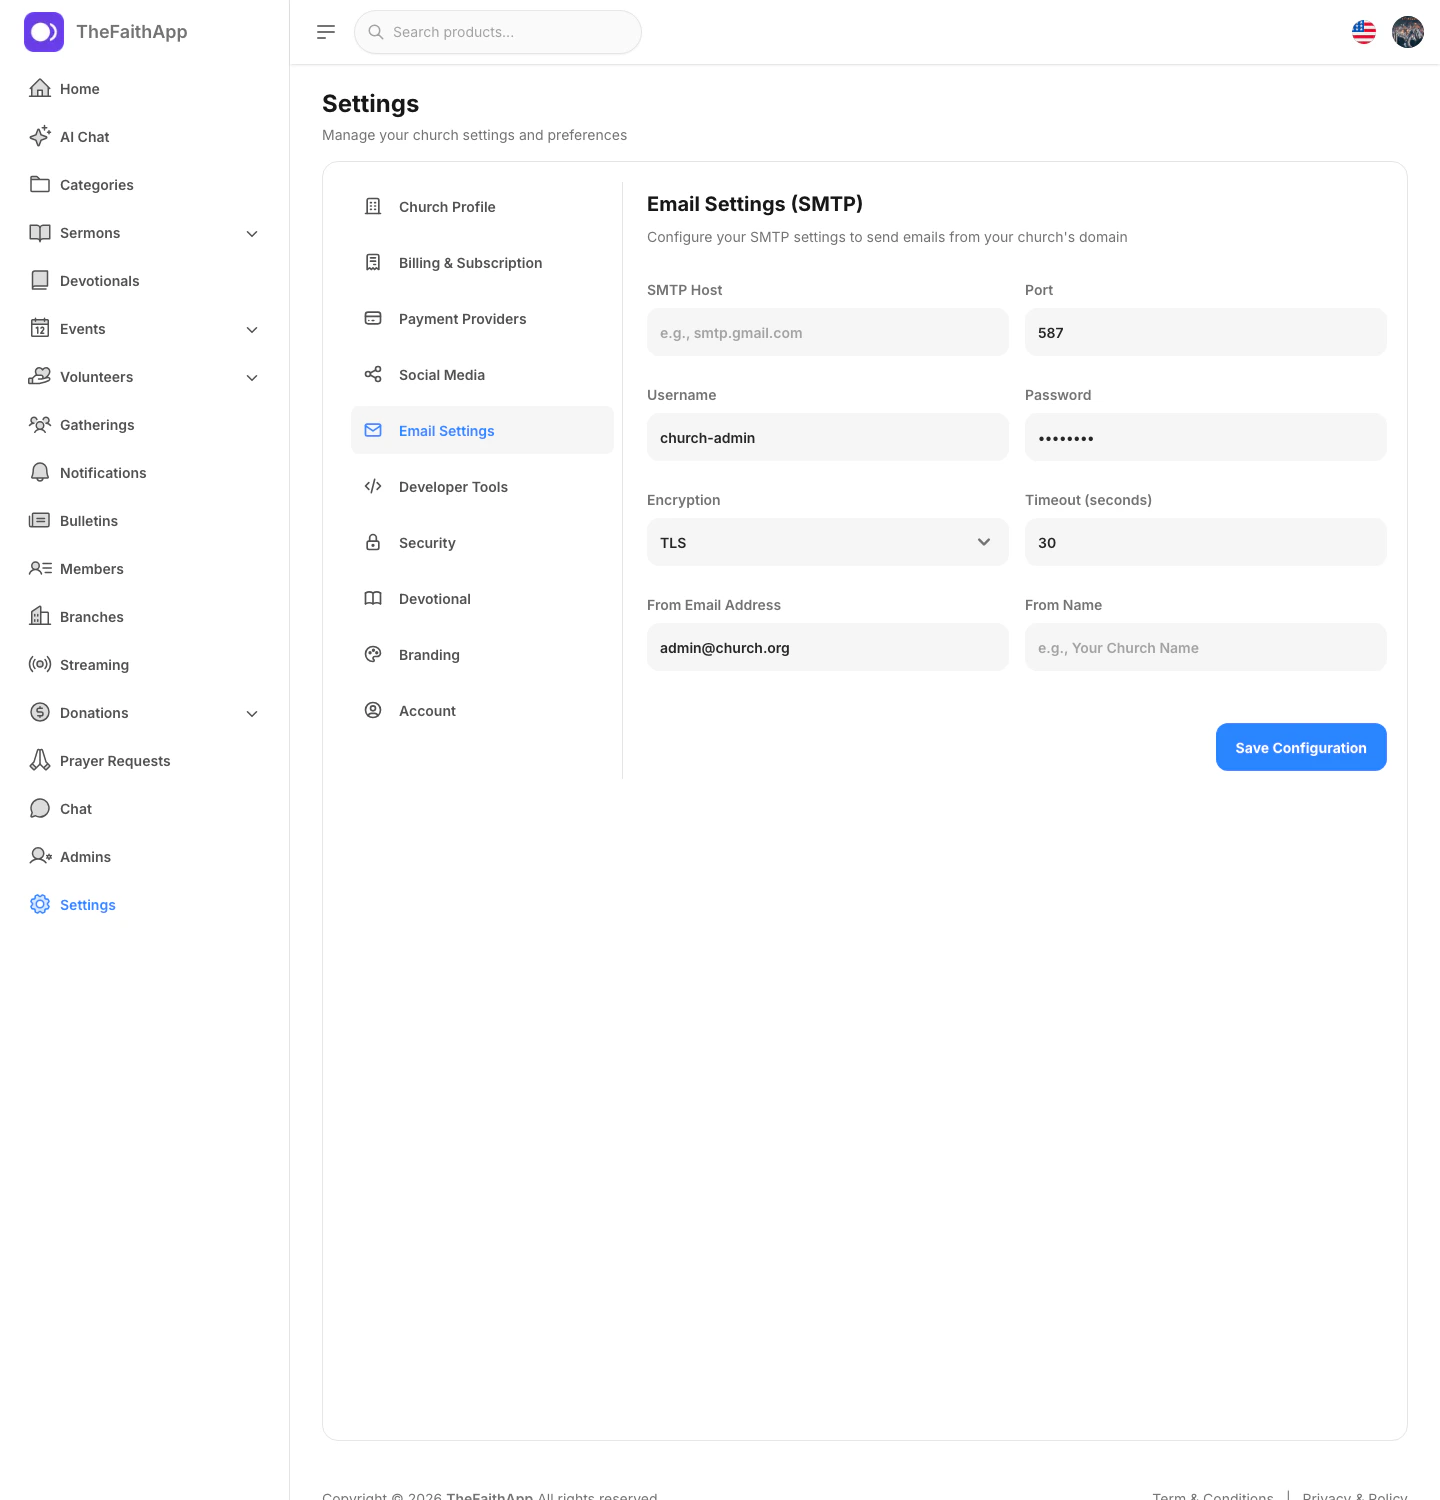
What You Can Do
- Enter the SMTP host
- Set the port and encryption method
- Add the email username and password
- Set the sending email address
- Set the sender name
- Adjust the timeout when needed
Steps
- Open
Settings. - Click
Email Settings. - Enter the SMTP details from your email provider.
- Set the
From Email AddressandFrom Name. - Click
Save Configuration.
Notes
- This page is usually completed with details supplied by your email provider or technical team.
Developer Access
Use Developer Access when connecting an external app to TheFaithApp member sign-in and API access.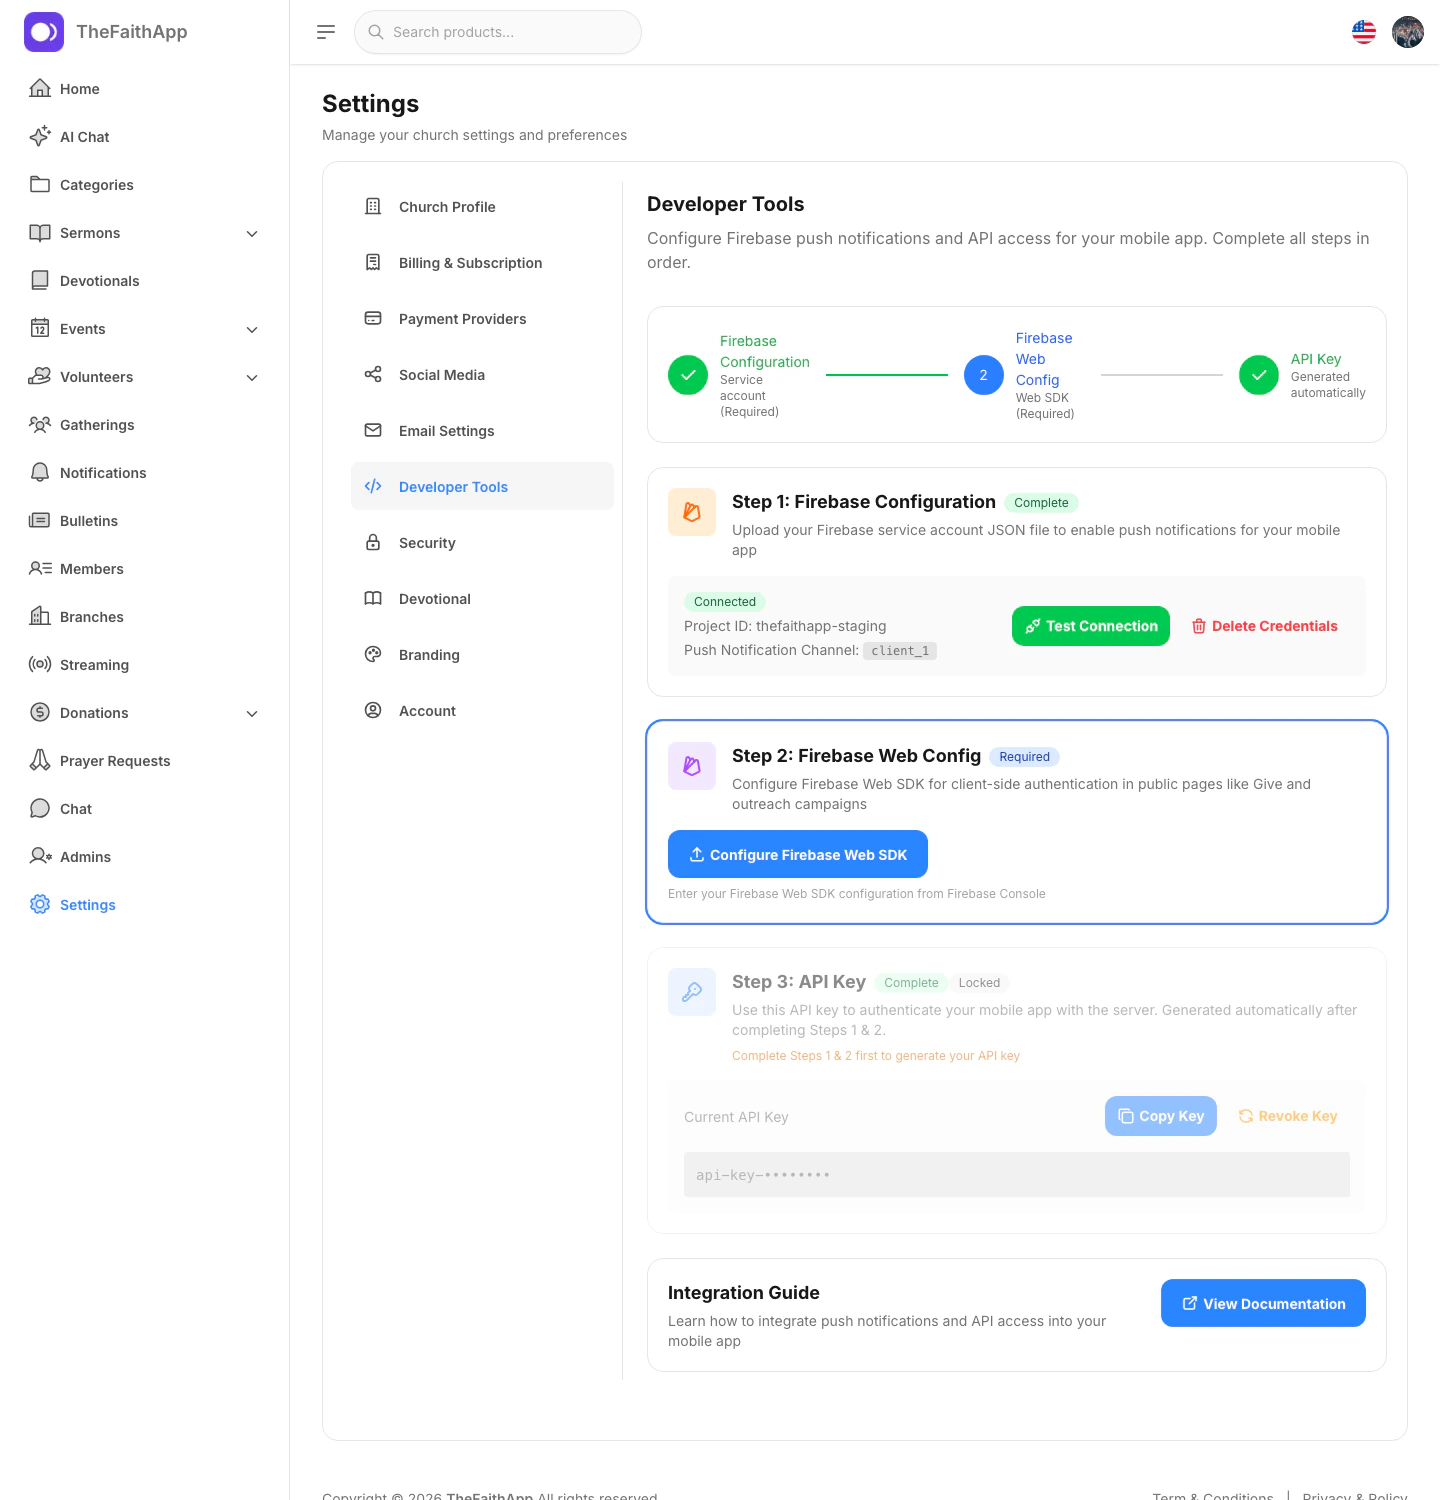
What You Can Do
- Copy or rotate the client key
- Register Flutter and React Native apps with guided package-name forms
- Add Redirect URLs for web callbacks and mobile deep links
- Copy a hosted member sign-in link
- Open the hosted sign-in page for testing
Steps
- Open
Settings. - Click
Developer Access. - Copy the client key.
- For a Flutter app, click
Add Flutter app, enter the package name ending in.thefaithapp, and clickAdd app. - For a React Native or Expo app, click
Add React Native appand follow the same package-name pattern. - Add any other redirect URL that should receive member sign-in codes.
- Copy or test the hosted member sign-in link.
- Rotate the client key only when you are ready to update connected apps.
Notes
- This area is usually handled together with a technical owner.
- Flutter and React Native apps return directly to the installed app, so a separate callback website is not required.
- Hosted member sign-in runs through TheFaithApp, even when your church uses a custom public domain.
- Client keys are public church-app identifiers, not authentication secrets. Member access still requires a signed-in member token.
White-Label Branding and Domains
Use white-label branding to replace default app branding with your church identity and connect a public domain.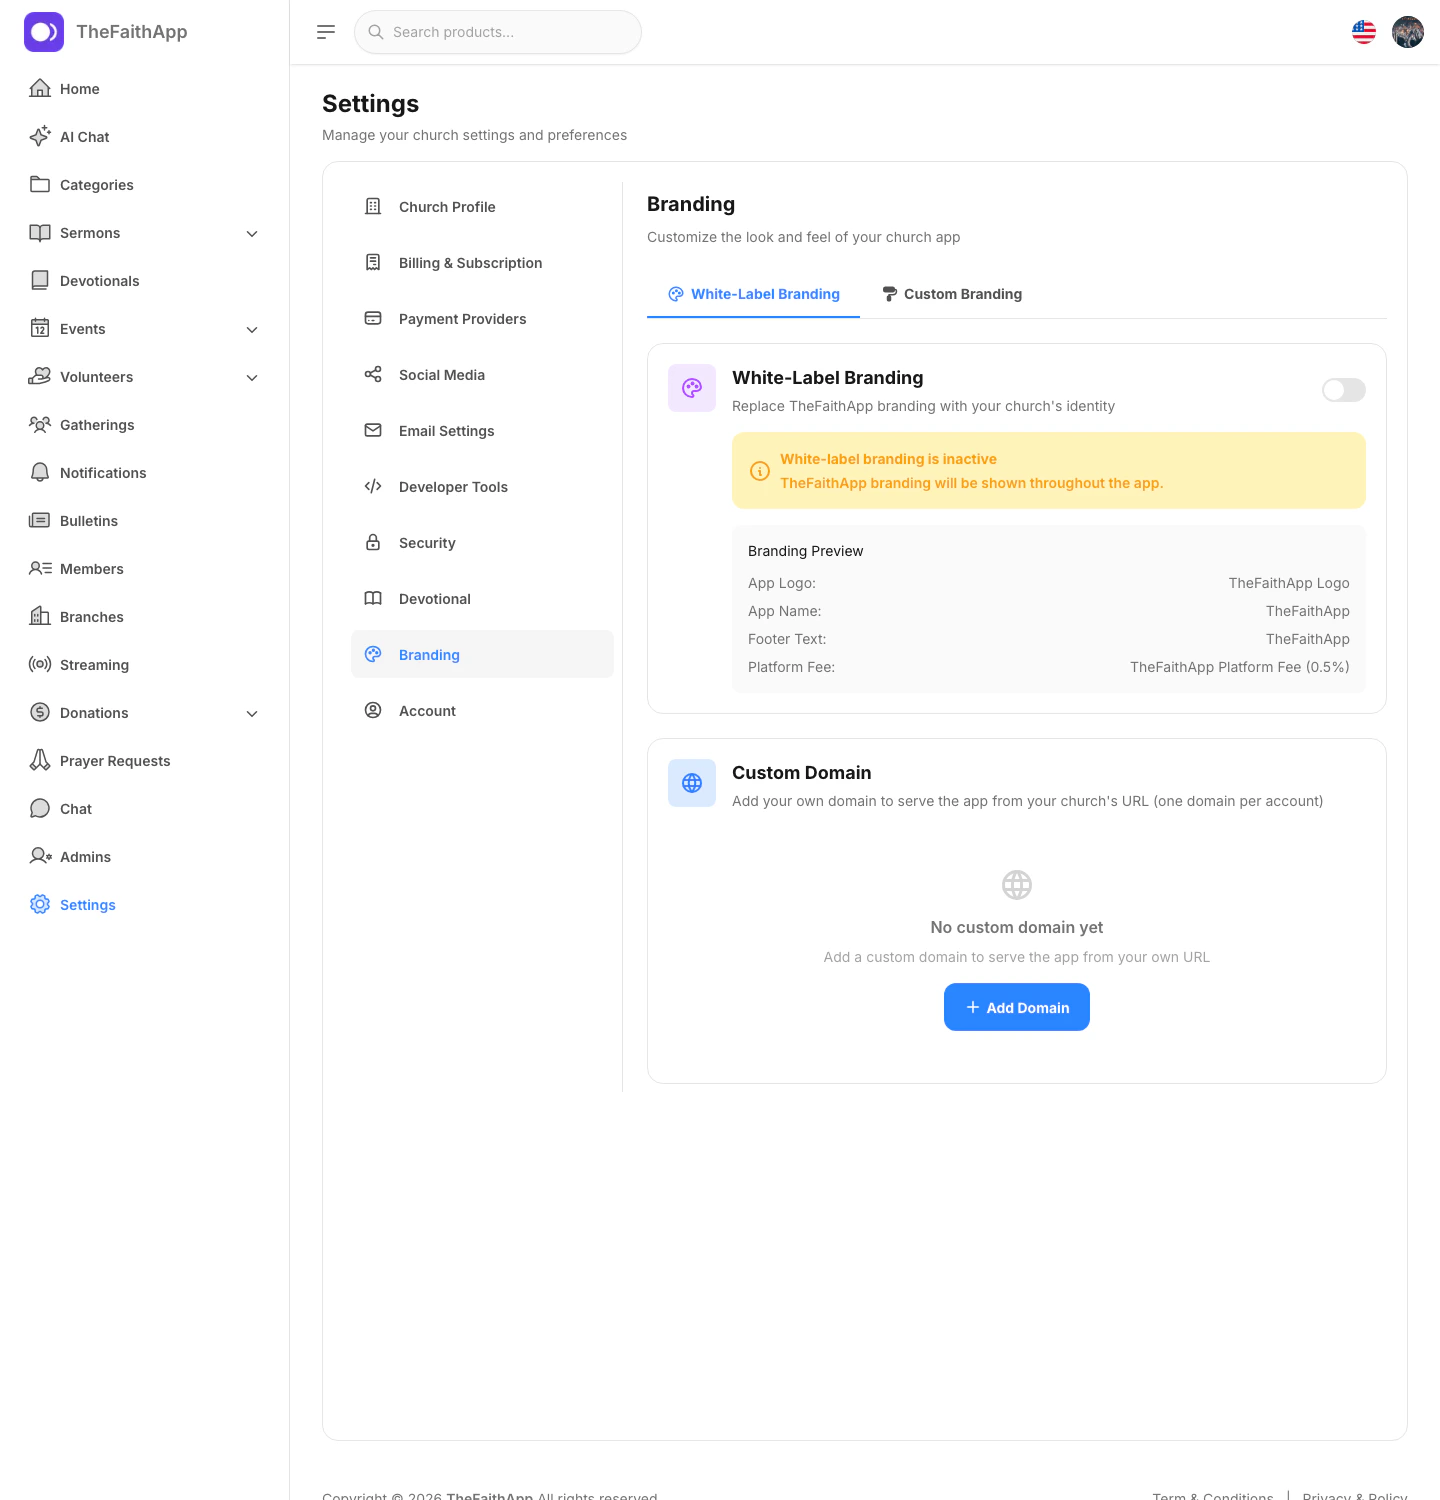
What You Can Do
- Turn white-label branding on or off
- Review the branding preview
- Add a custom domain
- Remove a domain when it is no longer needed
Steps
- Open
Settings. - Click
Branding. - Stay on
White-Label Branding. - Turn white-label branding on when you are ready to show your own identity.
- Review the preview area.
- Click
Add Domainwhen you want the app served from your own church URL.
Notes
- The page currently supports one custom domain per account.
- Domain setup may still require DNS or provider-side work outside TheFaithApp.
- After the domain is registered, TheFaithApp automatically recognizes it for secure dashboard-to-service requests. You do not need to ask support to add the domain to a separate browser access list.
Custom Branding by Page
Use custom branding when you want specific public pages to have their own colors and visual styling.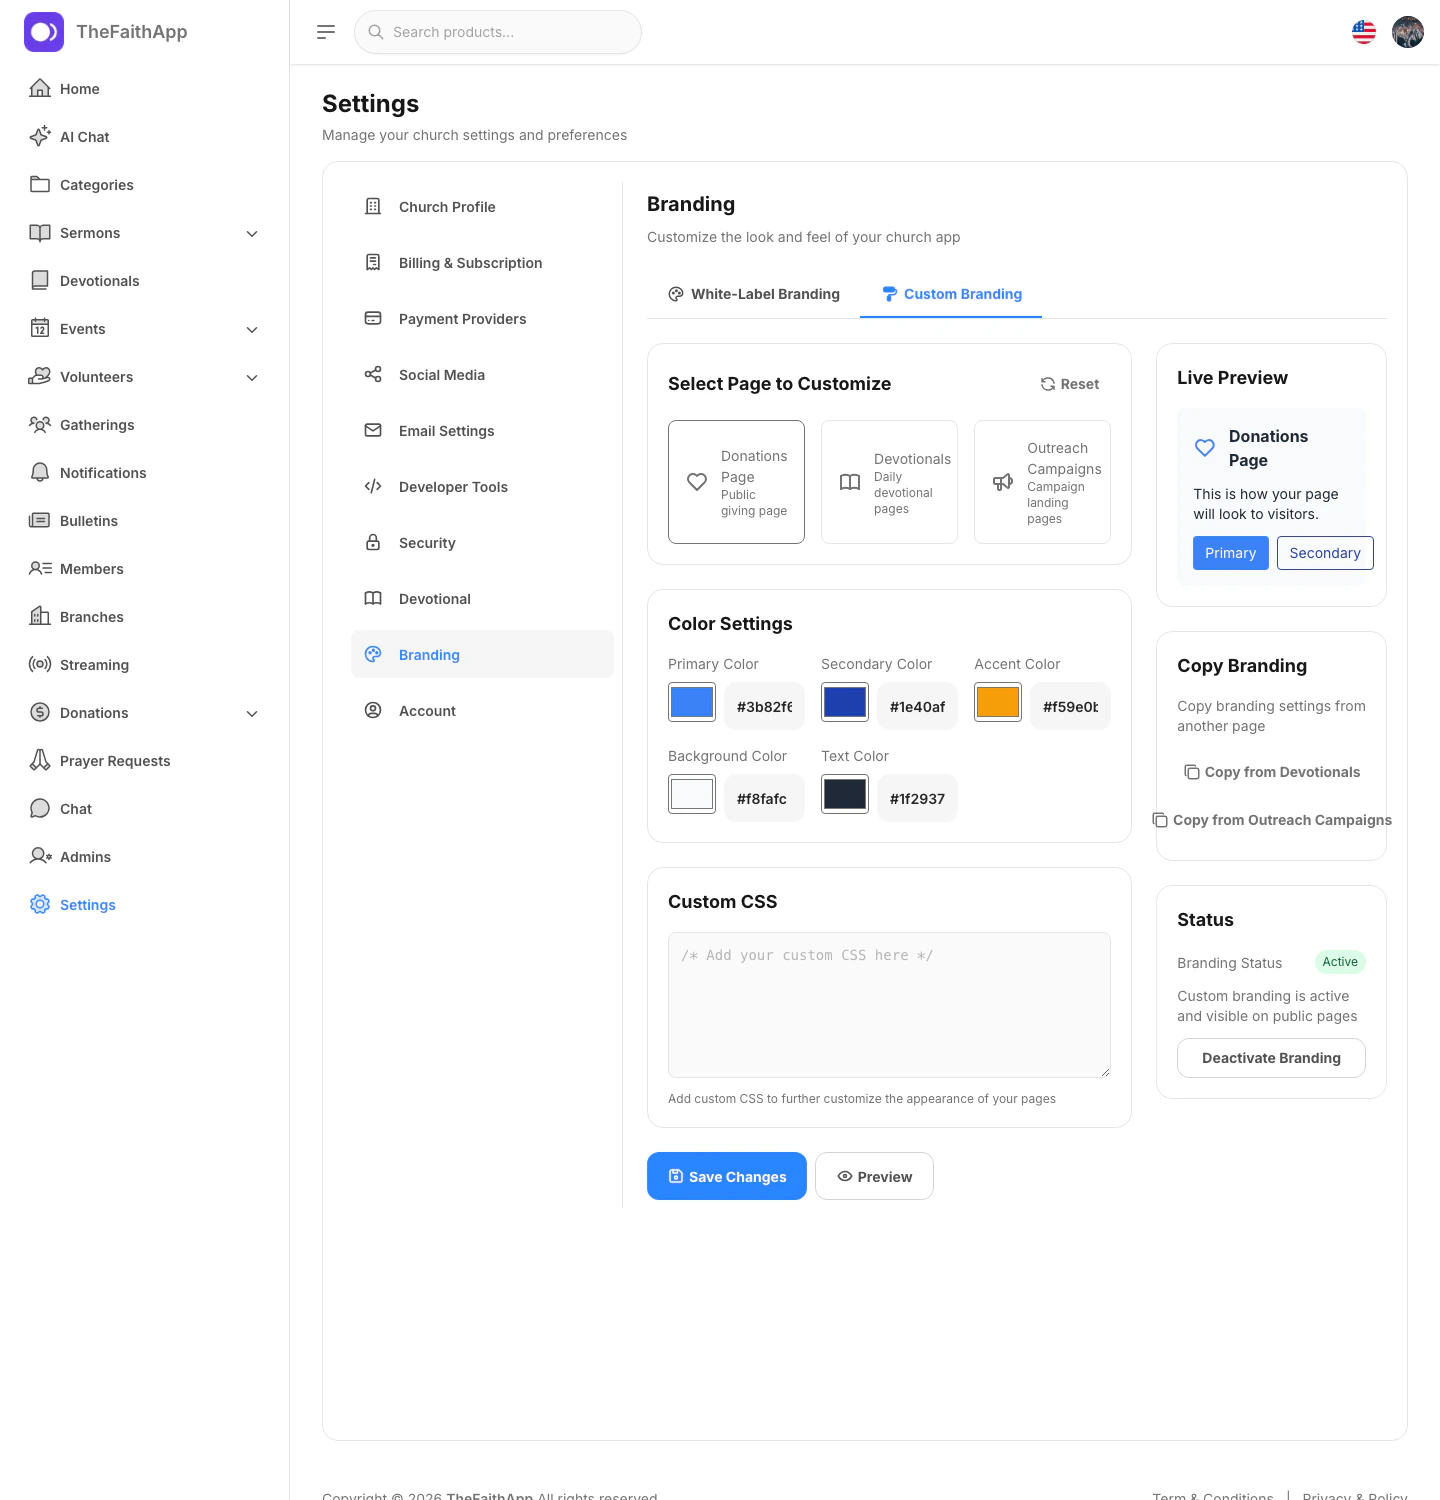
What You Can Do
- Choose a page type to customize
- Change the page color palette
- Add custom CSS
- Preview the public page look
- Copy branding from another page type
- Turn custom branding on or off
Available Page Types
- Donations page
- Devotionals
- Outreach campaigns
Steps
- Open
Settings. - Click
Branding. - Open the
Custom Brandingtab. - Choose the page type you want to style.
- Update colors or custom CSS.
- Use
Previewto review the result. - Click
Save Changes.
Notes
- This section affects public pages, not the main admin dashboard.
- Each supported page type can have its own visual treatment.
Brand and Theme
Use Brand & Theme to control the global design language for the app customization workspace.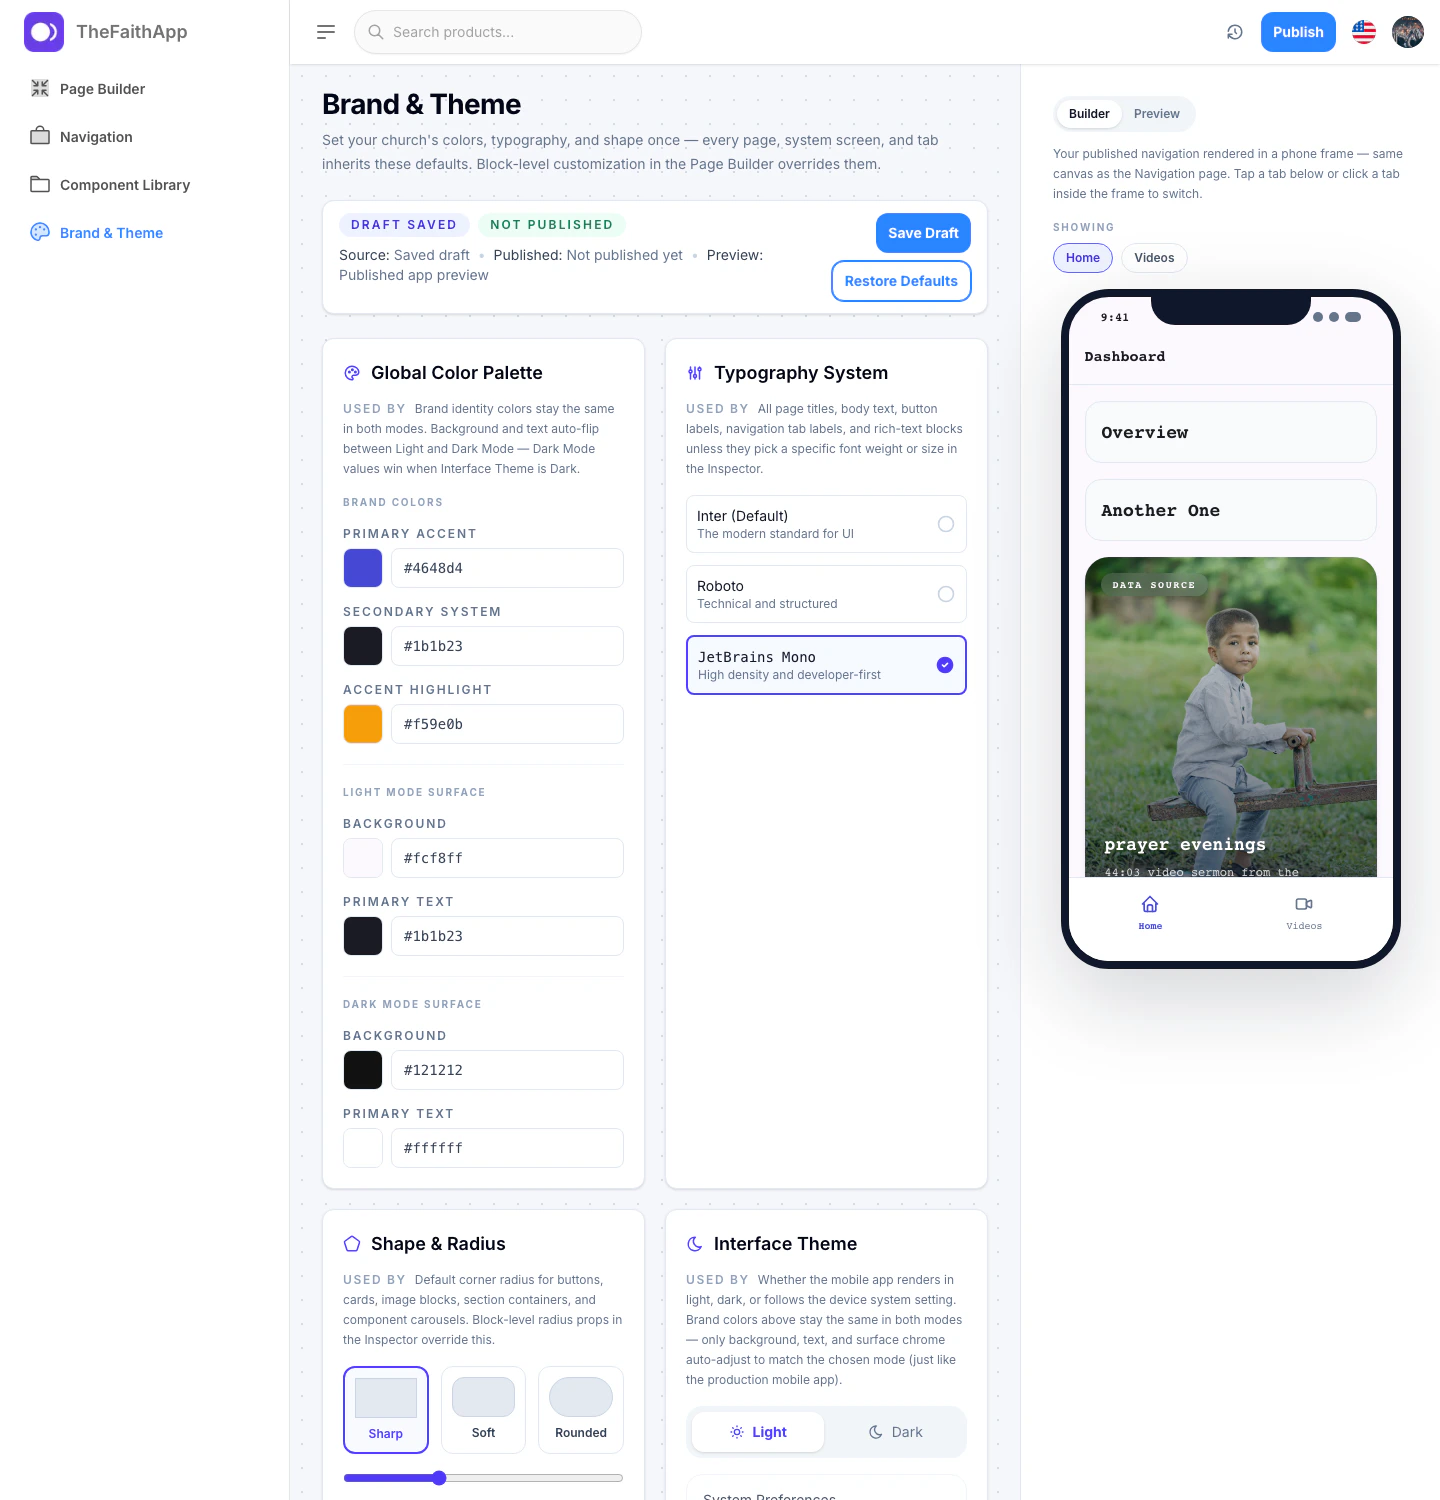
What You Can Do
- Set the global color palette
- Choose the main typography style
- Adjust the default corner radius
- Choose the interface theme behavior
- Save a draft
- Restore the default design settings
- Preview the published app structure
Steps
- Open
App Customization. - Click
Brand & Theme. - Update the colors, typography, radius, or theme settings.
- Click
Save Draft. - Use the preview panel to review how the current design feels.
- Publish when you are ready for the design to become part of the next release.
Notes
- These settings act as the shared visual base for navigation, custom pages, and reusable components.
Navigation Builder
Use the navigation builder to control the app tabs members can see and where each tab should go.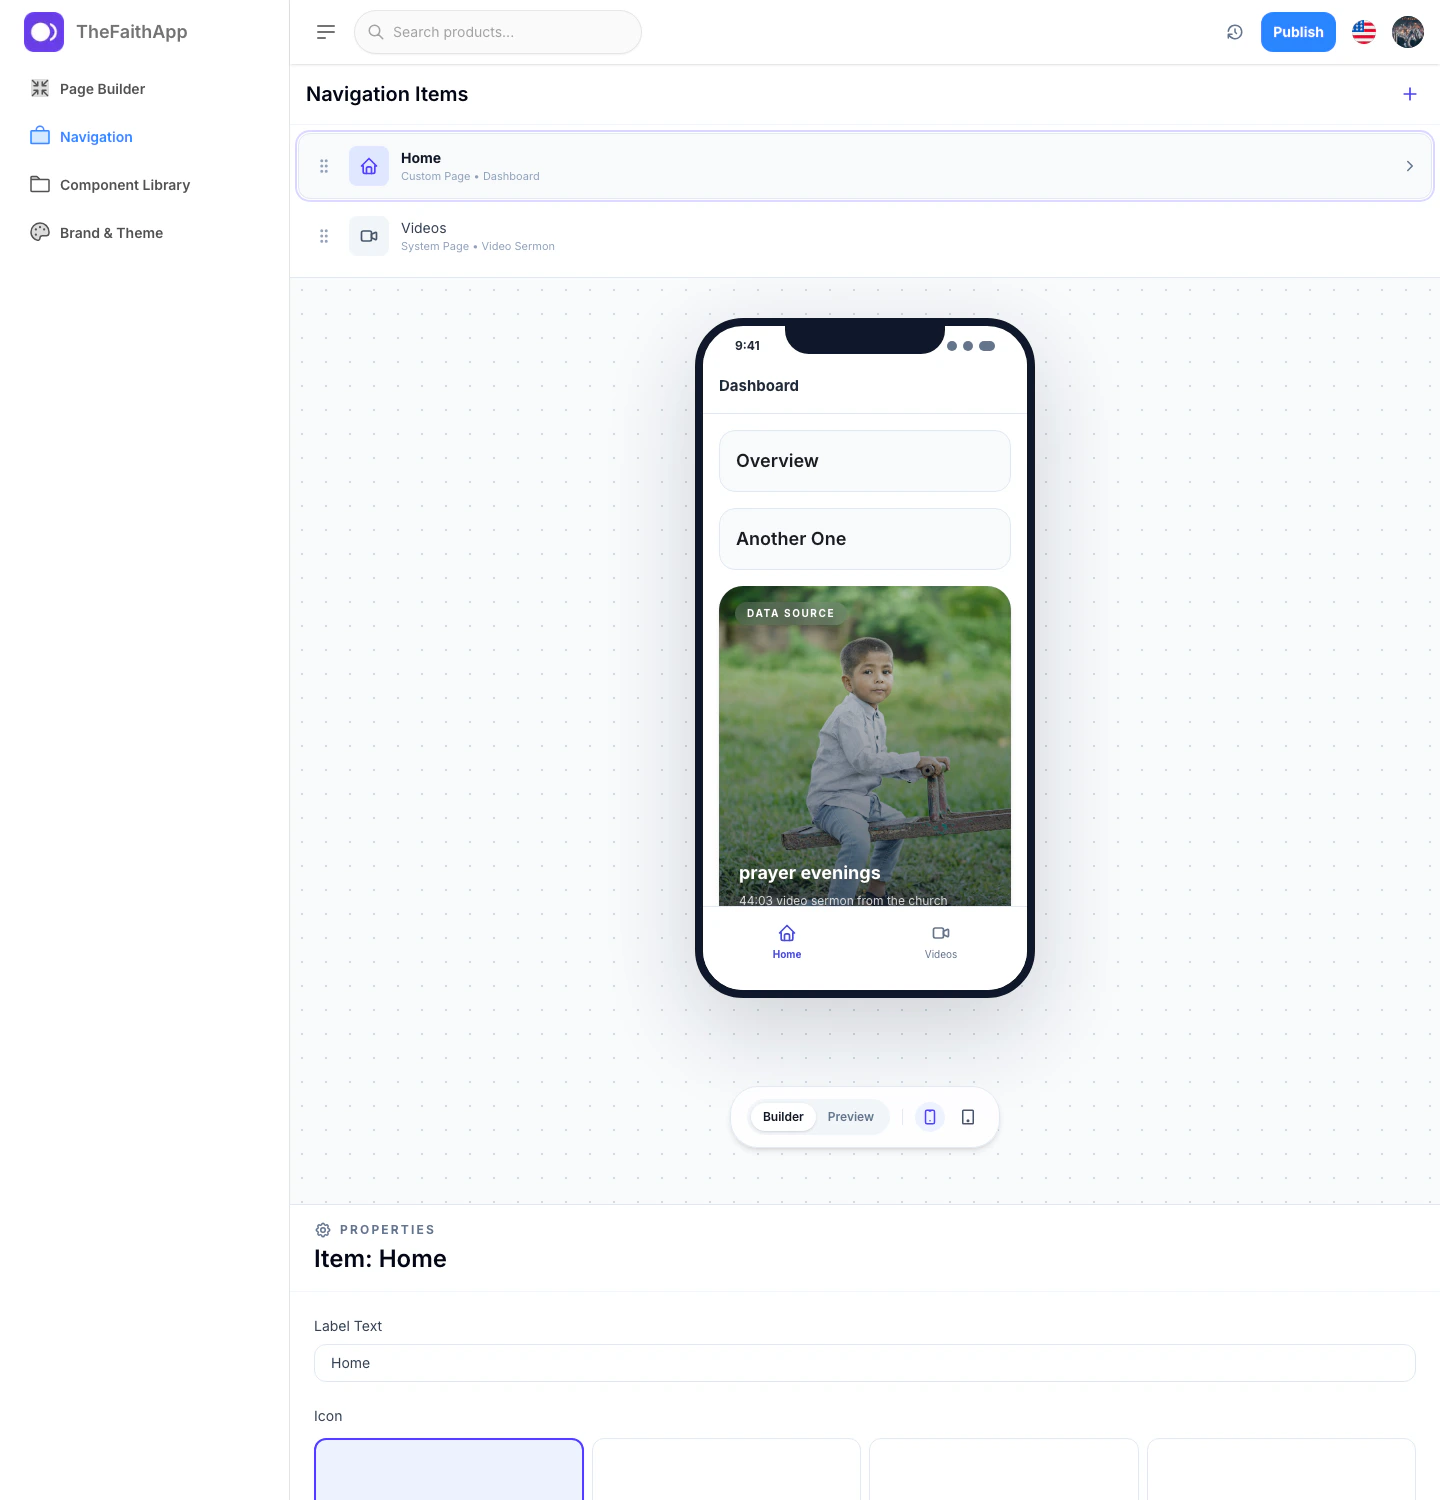
What You Can Do
- Rename navigation items
- Change navigation icons
- Reorder items
- Point items to system pages or custom pages
- Hide or show individual items
- Save a draft navigation setup
- Publish navigation changes
Steps
- Open
App Customization. - Click
Navigation. - Select the item you want to edit.
- Update its label, icon, target, or visibility.
- Reorder items when needed.
- Click
Save Draft. - Click
Publish Navigationwhen you are ready to use the updated structure.
Notes
- Published navigation is used by other app customization previews.
Page Builder
Use the page builder to create and update custom mobile app pages.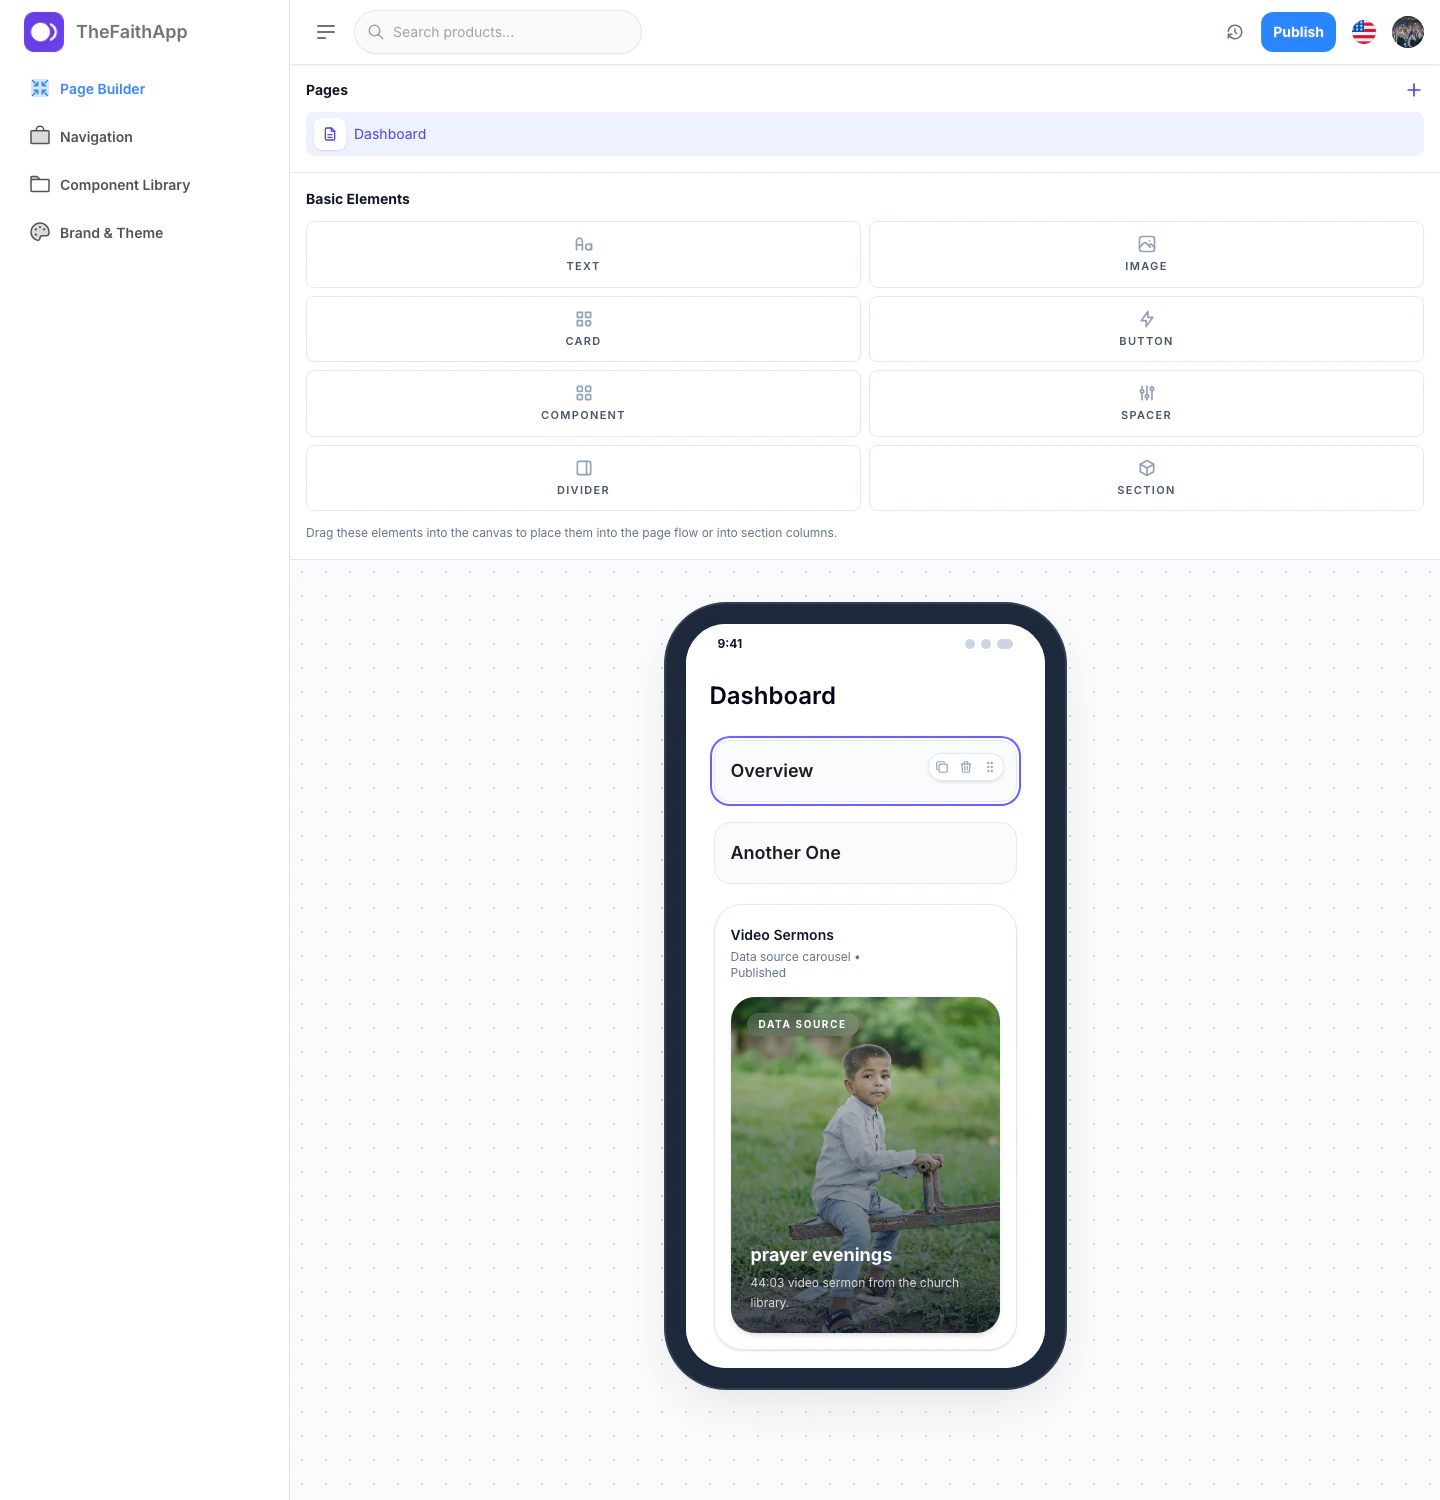
What You Can Do
- Create or select a custom page
- Add text, images, cards, buttons, spacers, dividers, sections, and reusable components
- Edit page details and route information
- Inspect and update individual blocks
- Upload an app bar logo for the page
- Save draft changes
- Publish a page
- Duplicate or delete a page
Steps
- Open
App Customization. - Click
Page Builder. - Select the page you want to edit.
- Add or update blocks in the canvas.
- Use the right-side inspector to change content and styling.
- Click
Save Draft. - Click
Publishwhen the page is ready.
Notes
- Published reusable components can be inserted into custom pages from this builder.
- Use the preview mode to check the page before publishing.
Component Library
Use the component library to create reusable content blocks that can be placed in custom pages later.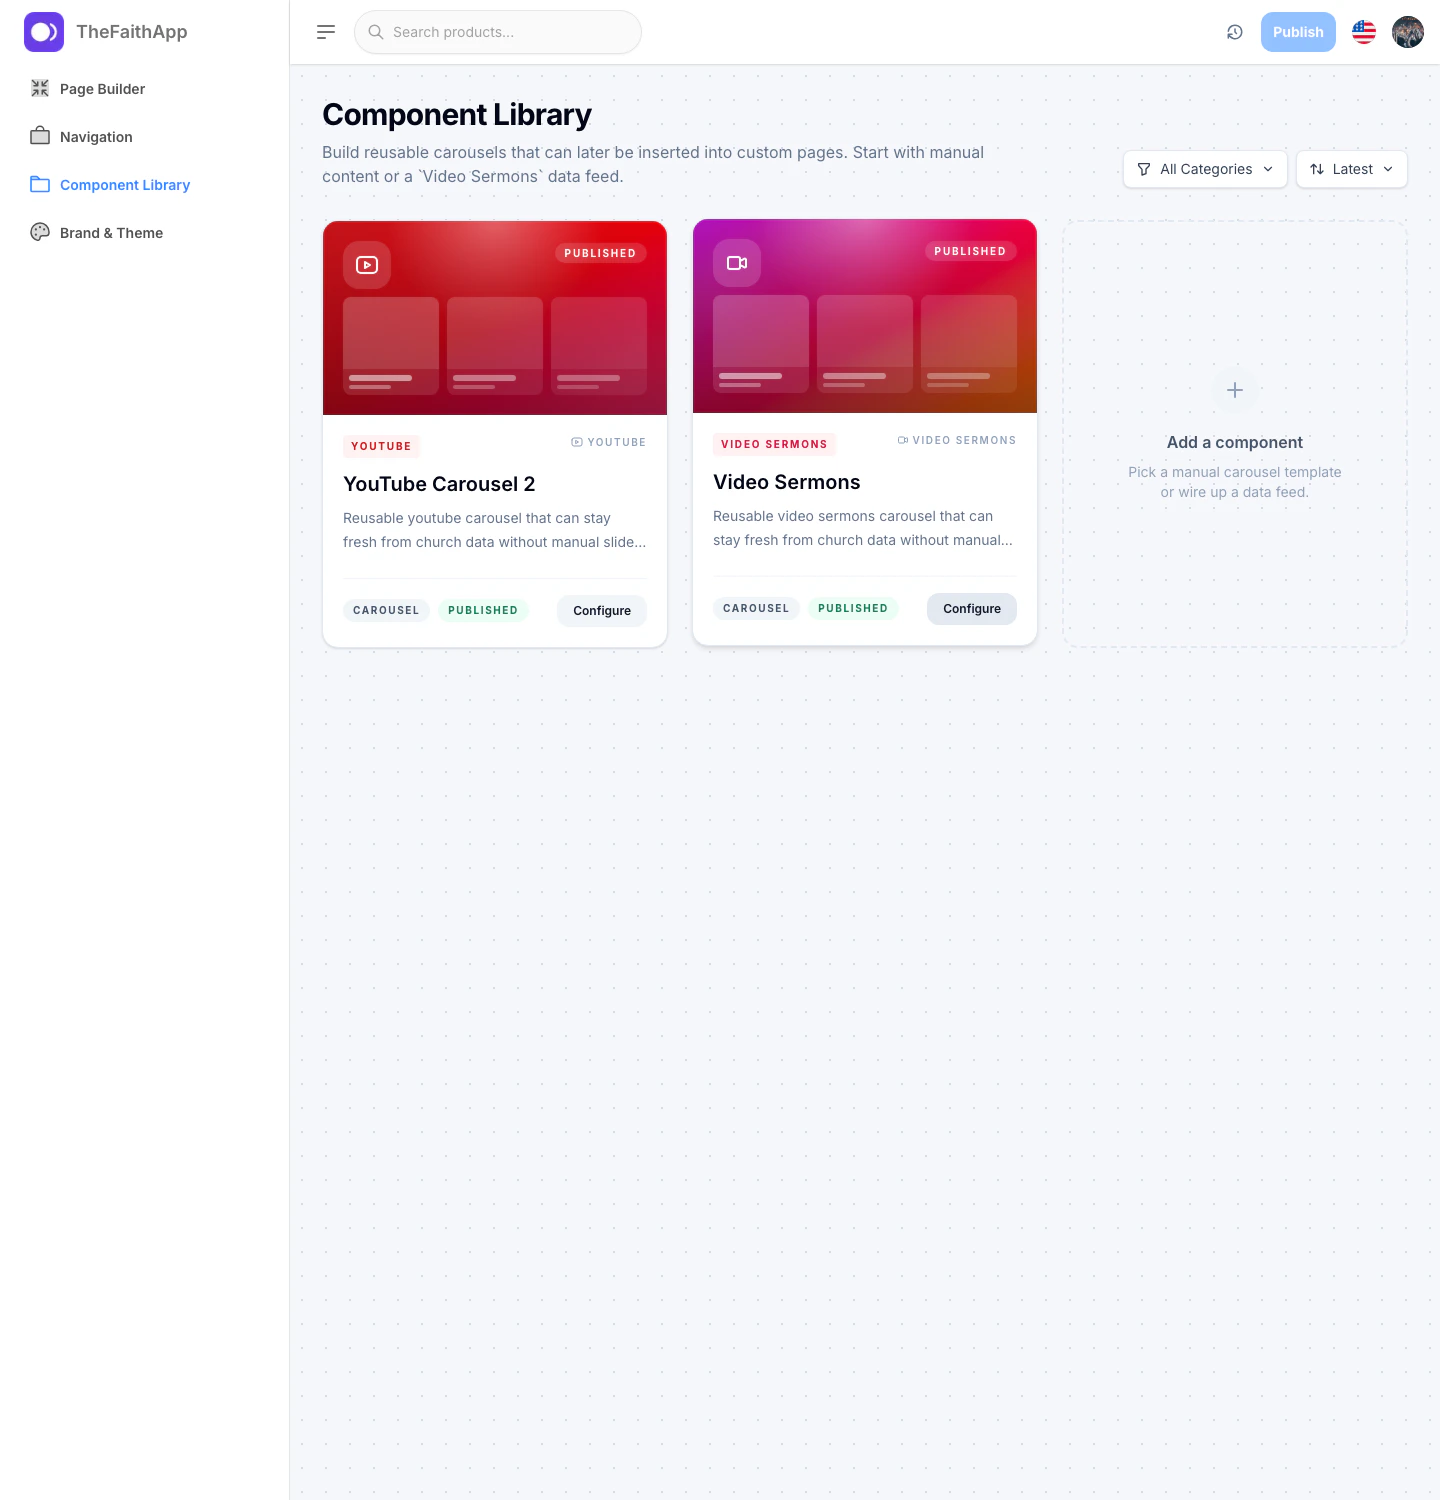
What You Can Do
- Create reusable carousels
- Use manual content or a data source
- Review published components
- Open and configure existing components
- Publish reusable components for page-builder use
Steps
- Open
App Customization. - Click
Component Library. - Review the existing components or click
Add a component. - Choose a template or data source.
- Configure the component content and behavior.
- Save and publish the component.
Notes
- Reusable components help keep shared layouts consistent across custom pages.
Customization Releases
Use releases to decide when published customization changes should become the live app experience.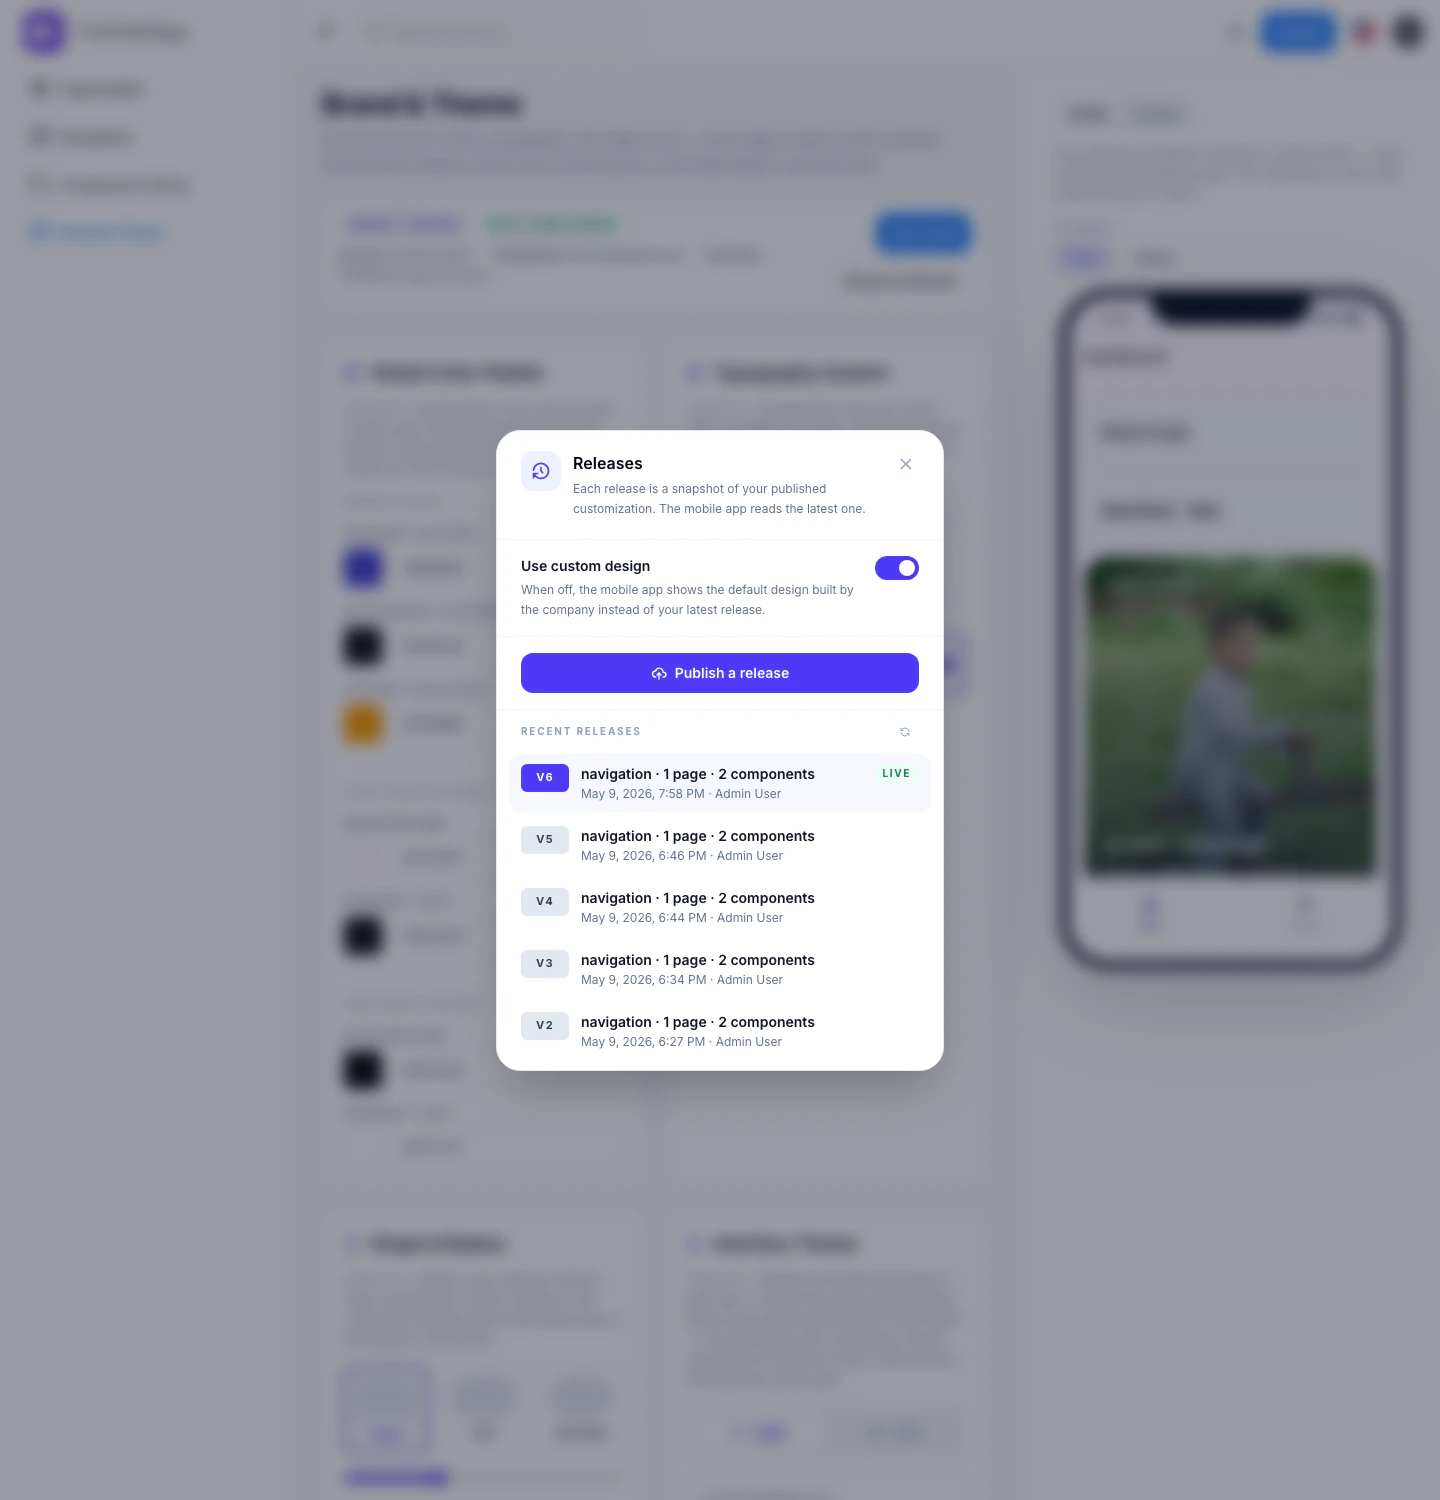
What You Can Do
- Review recent release history
- See which release is live
- Turn
Use custom designon or off - Publish a new release
Steps
- Open
App Customization. - Click the
Releasesbutton in the top bar. - Review the recent release list.
- Turn
Use custom designon when you want the app to use your released customization. - Click
Publish a releasewhen the currently published design, navigation, pages, and components are ready to go live.
Notes
- A release is a snapshot of the customization that has already been published inside the editor.
- Releases help your team control when customization changes reach the live app.
Current Product Notes
Settings > Brandingcontrols white-label and public-page branding, whileApp Customizationcontrols the mobile app design workspace.- Saving or publishing inside
Brand & Theme,Navigation,Page Builder, orComponent Libraryprepares customization content, but the live mobile app reads the latest release from theReleasesdialog whenUse custom designis turned on.