
Giving
Giving is a root product for receiving gifts, reviewing payment activity, managing recurring gifts, and organizing funds. It keeps charitable giving separate from the subscription billing your church uses to pay TheFaithApp. These tools include:- Donations
- Recurring donations
- Funds
- Public donation links
- Payment providers
- Received, pending, failed, and cancelled payment status
- Gift acknowledgements and delivery history
- Period and year-end giving statements
- Manual gift batches, deposit reconciliation, and finance approvals
- QuickBooks and Xero accounting export profiles, previews, and history
- Church-authorized QuickBooks and Xero connections for live account selection and balanced journal delivery
- Campaign goals, member pledges, reviewed impact updates, and annual reports
- Relational sponsorship and moderated letters
- QuickBooks reconciliation sync
- Time, presence, professional, Legacy Letter, and in-kind generosity tools
Before You Start
- Sign in to your admin account.
- Open
Givingfrom the product menu or left sidebar for gift activity and funds. - Open
Settingsfor payment providers, billing plans, payment methods, and AI billing. - Some billing or payment actions depend on the payment providers already connected to your account.
Donations Overview
Use the overview tab to monitor received gifts across the payment currencies already active in your church account. Pending, failed, and cancelled payment attempts do not increase these totals.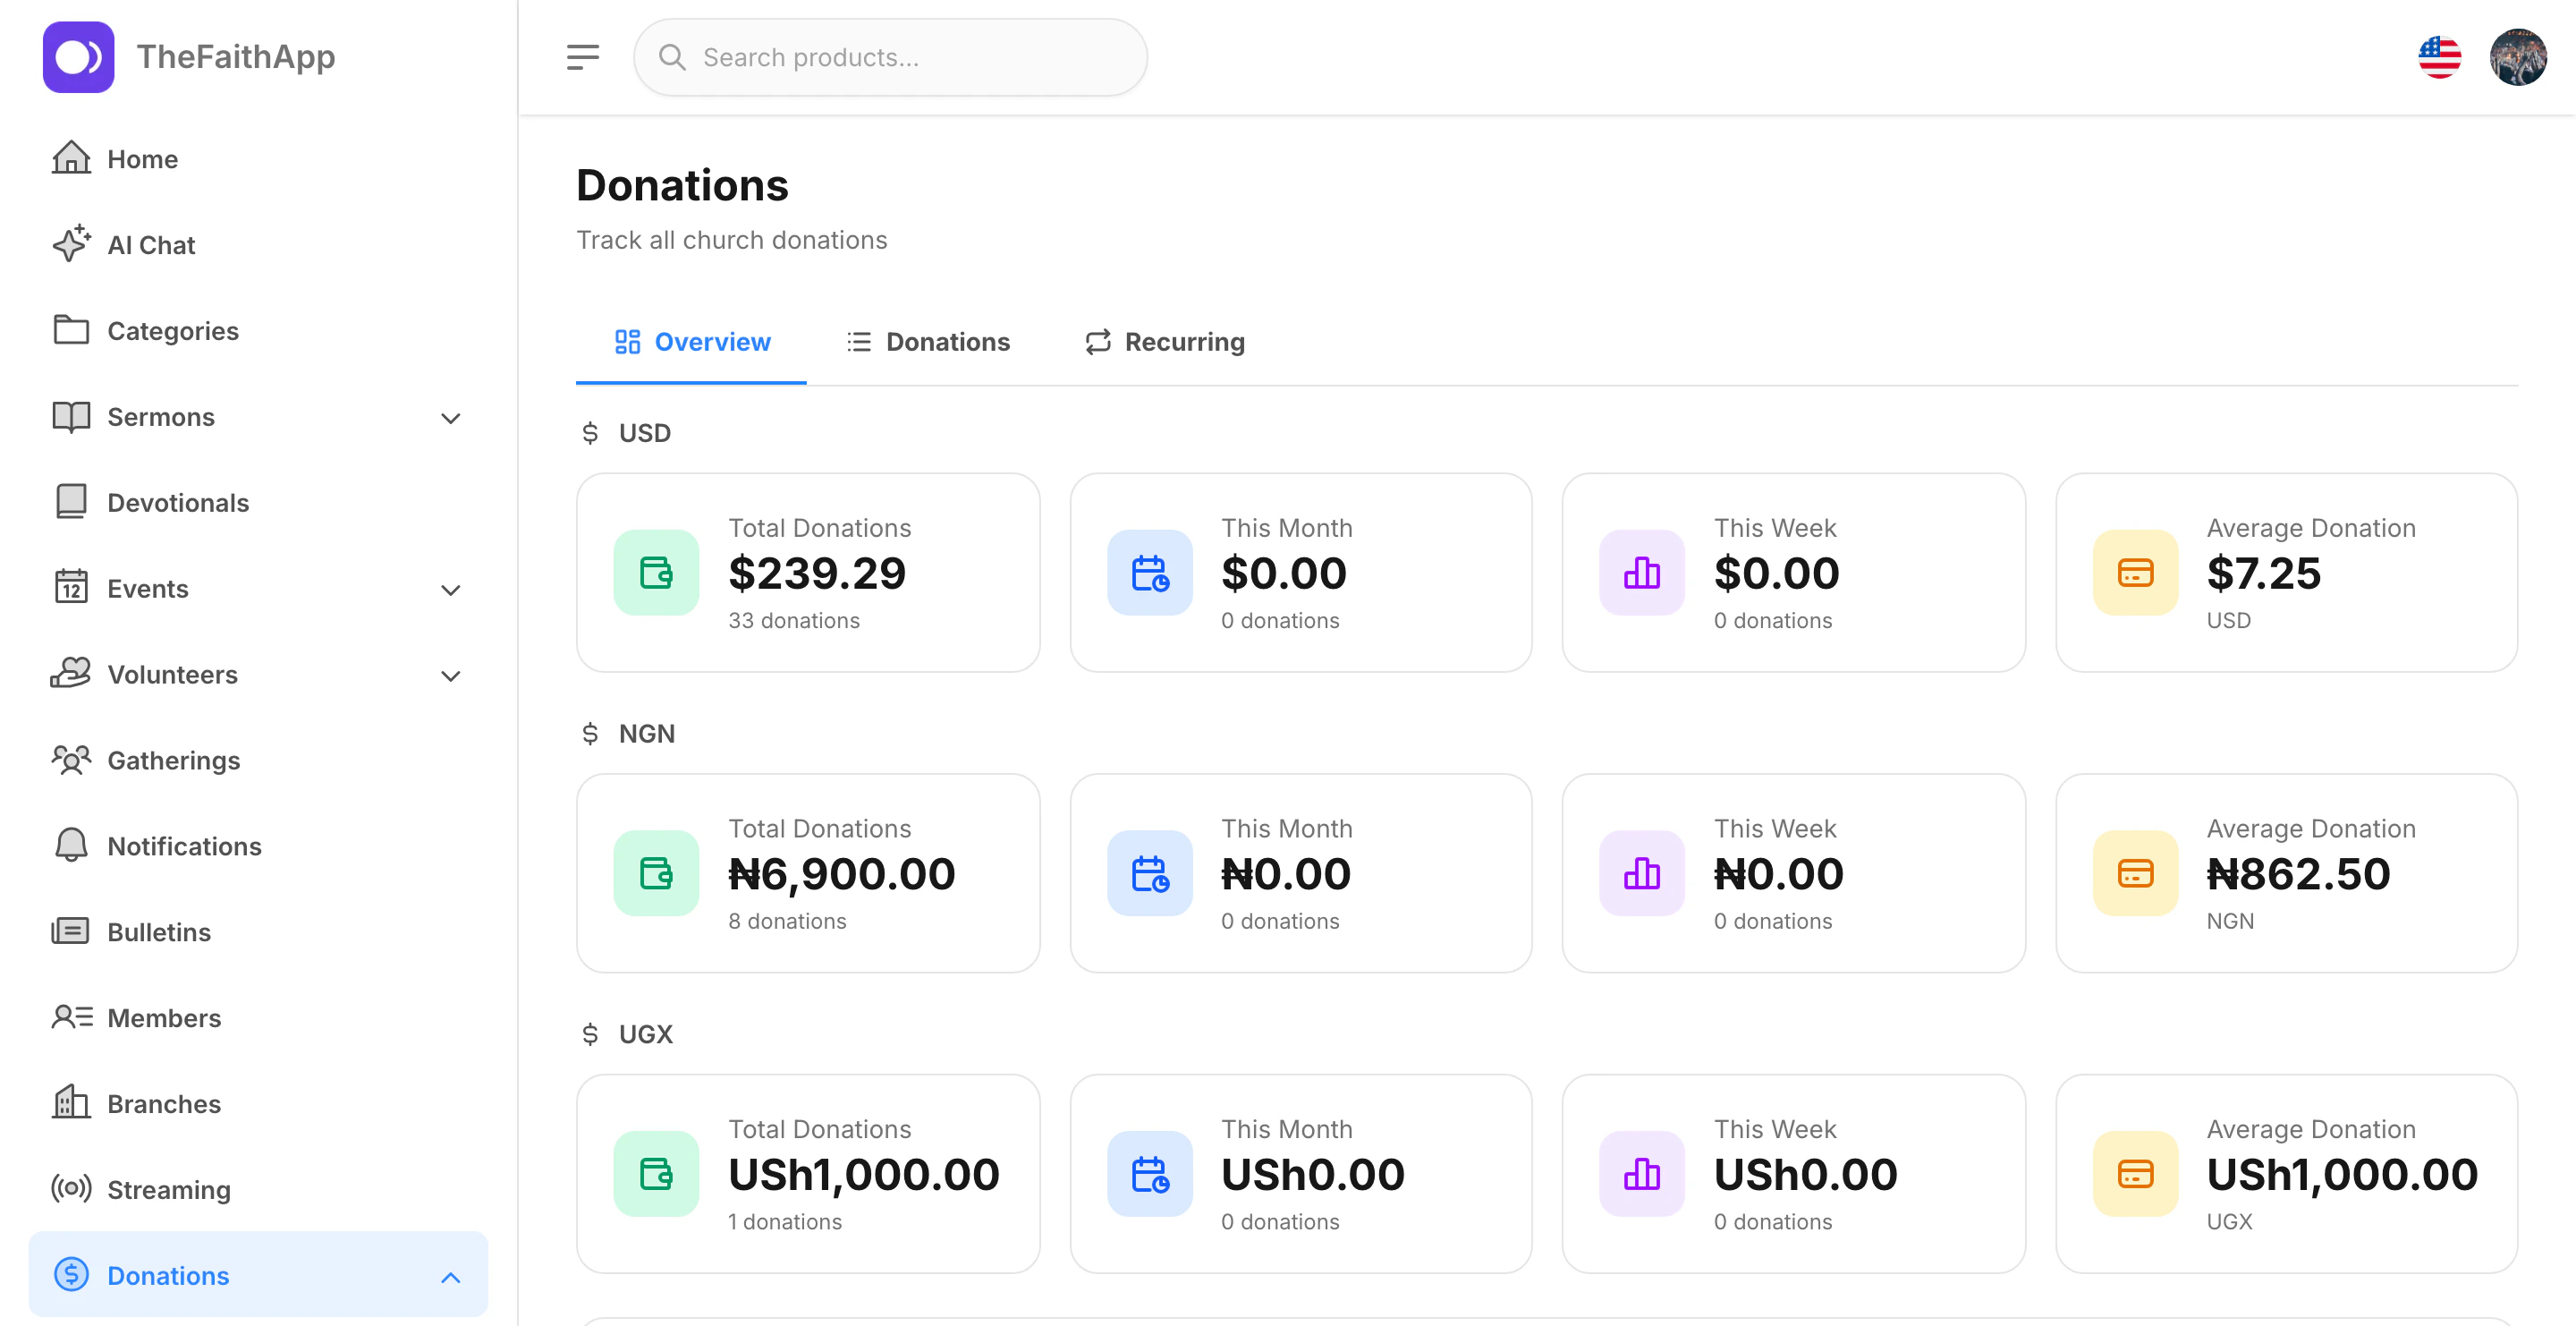
What You Can Do
- Review received gifts by currency
- Compare this month and this week at a glance
- See the average donation amount
- Use the overview before exporting or reviewing individual gifts
Steps
- Open
Giving. - Stay on the
Overviewtab. - Review the cards for each available currency.
- Switch to the other tabs when you need deeper detail.
Donation Records
Use the donations list when you need to search, review, or export individual giving records.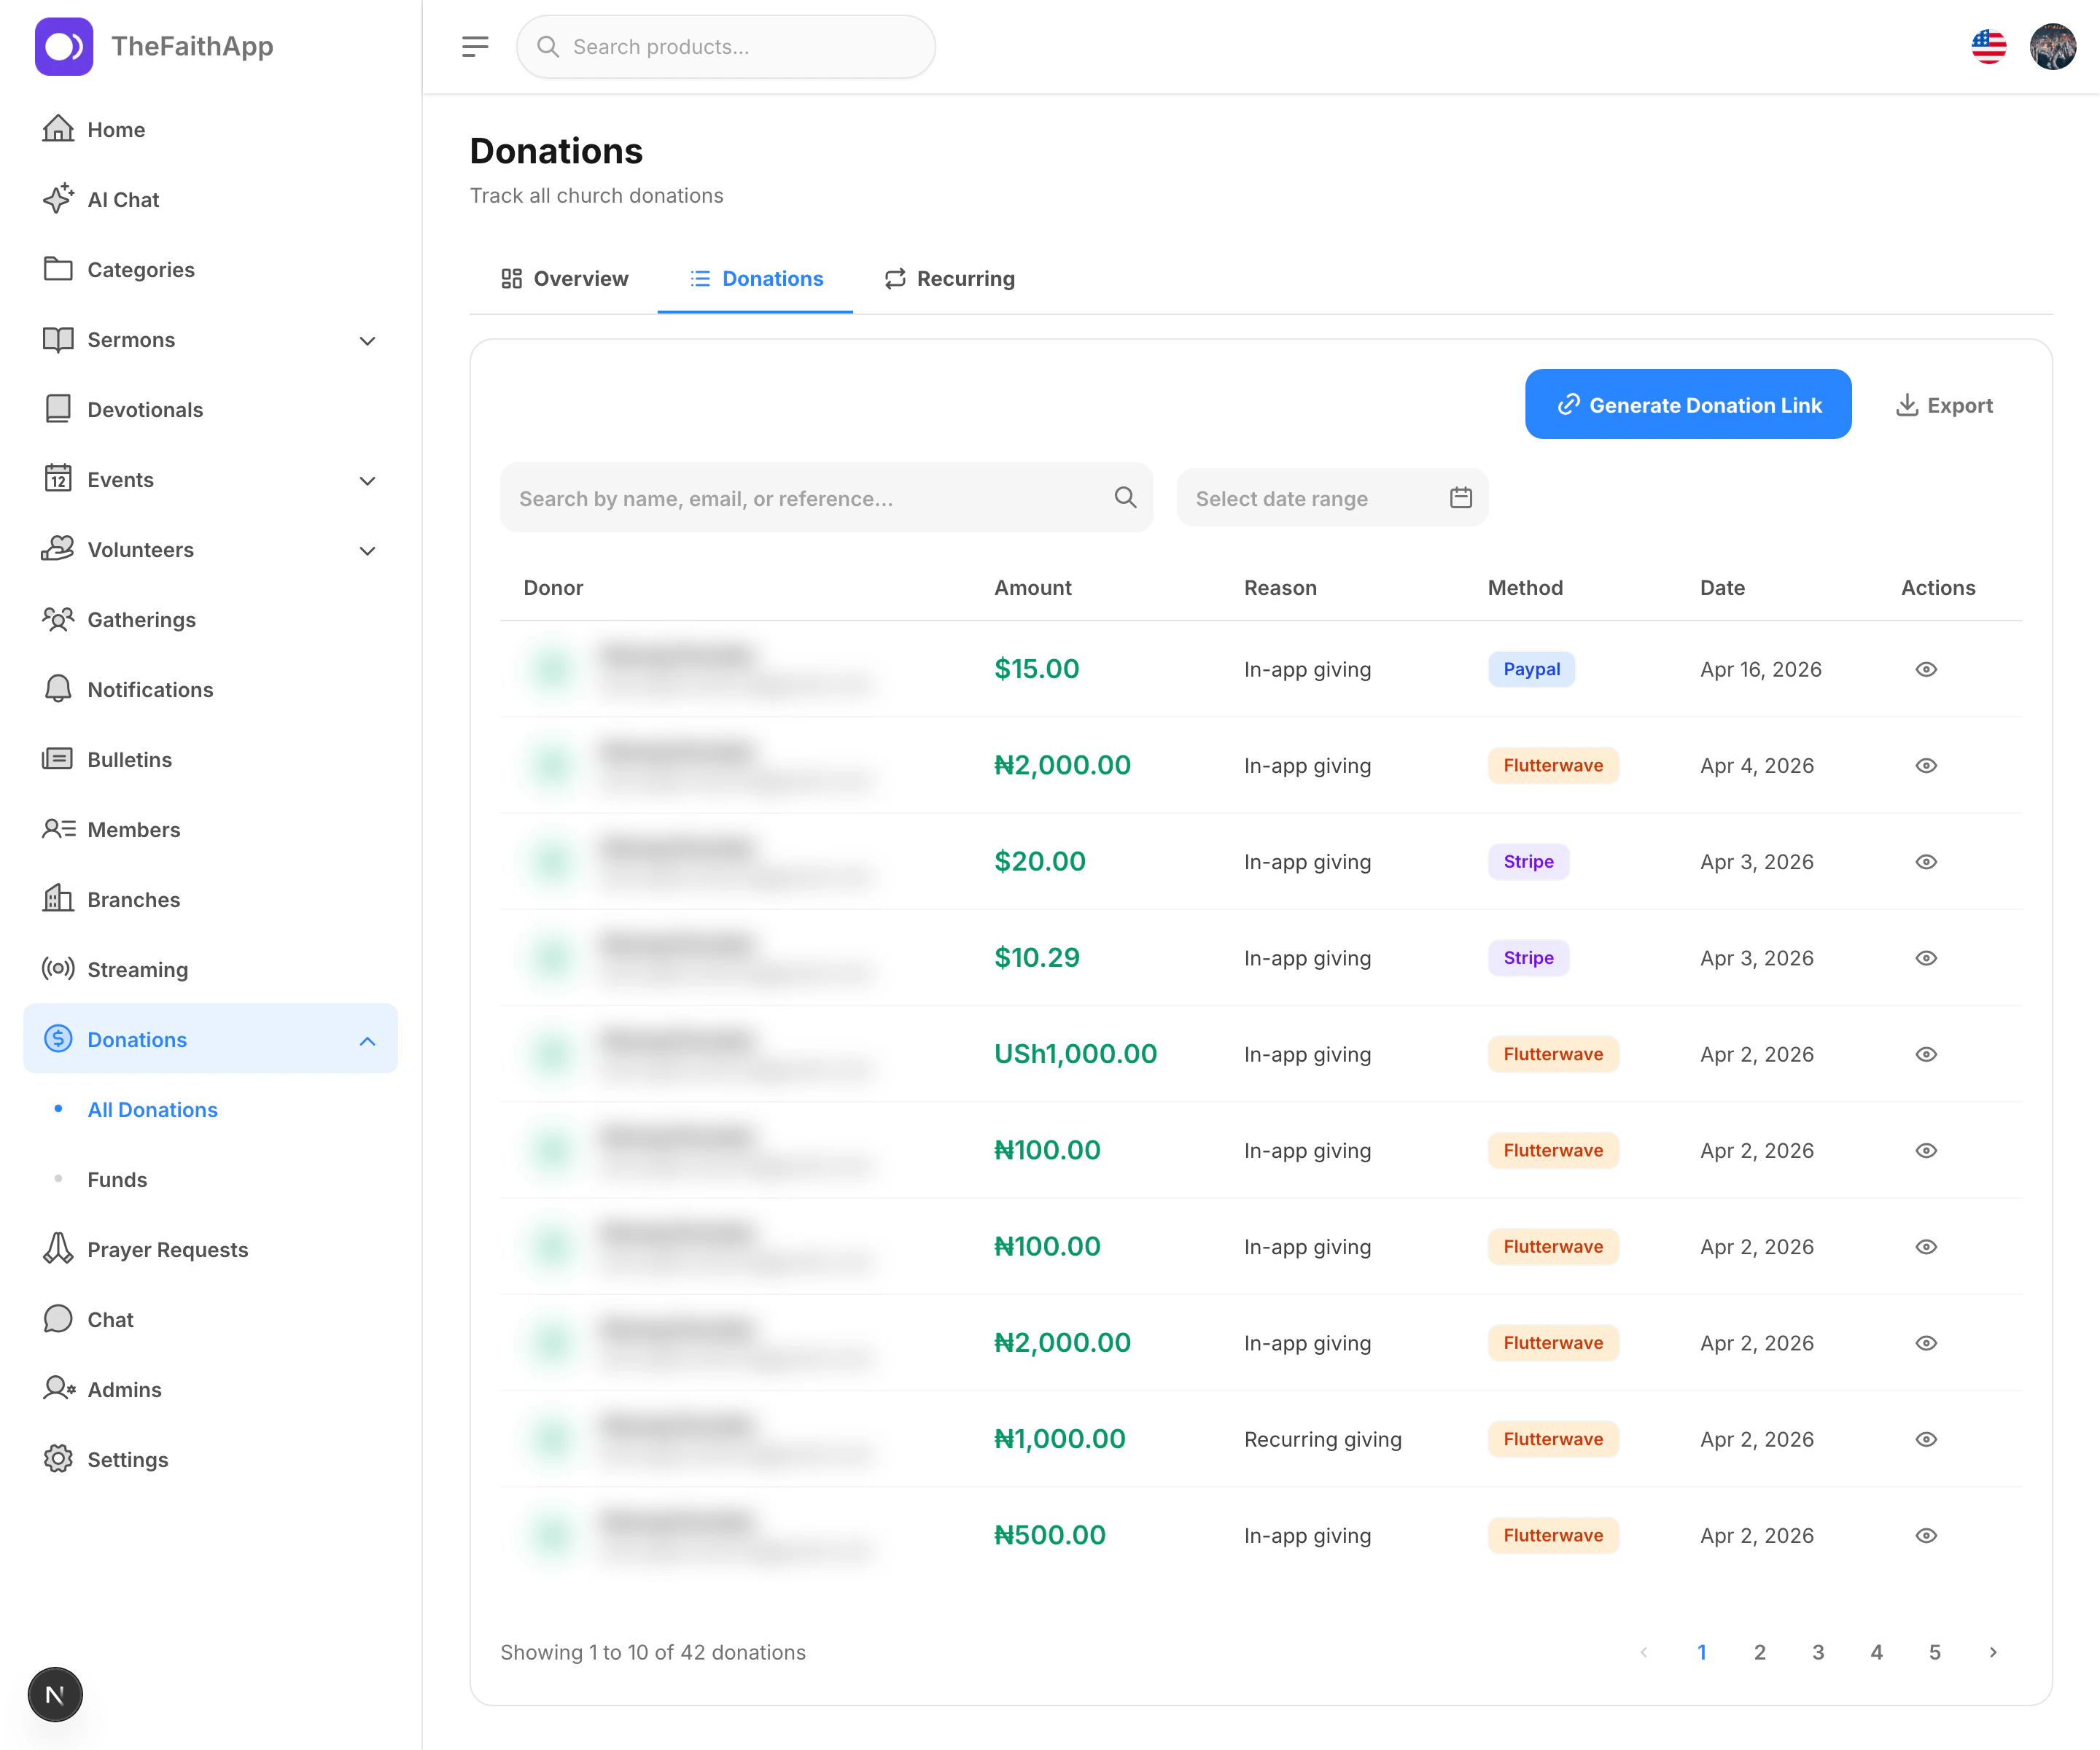
What You Can Do
- Search donations by donor details or reference
- Filter records by received, pending, failed, or cancelled status
- Filter donations by date range
- Review gift amount, reason, method, status, and date
- Open an individual donation record
- Review general and Outreach Campaign gifts together while keeping their source visible
- See gift, gross, fees, refunds, disputes, and net settlement separately
- Record an audited correction or reversal when authorized
- Export a provider-neutral finance file with allocations, fees, settlement, and deposit fields
Steps
- Open
Giving. - Click the
Donationstab. - Use search, status, or the date range filter to narrow the list.
- Review the donation rows.
- Click the view icon when you need the full donation details.
- Click
Exportwhen you want to download the current set of records.
Notes
- Exports include received gifts by default. Pending, failed, and cancelled attempts stay out of finance totals and ordinary exports.
- Donation rows show both the payment method and payment status.
- A received gift cannot be edited or deleted in place. Authorized finance staff submit a reasoned correction or reversal instead. A different authorized person must approve it before the value changes, and the original record remains visible in the audit trail.
- Access to donor details, exports, manual entries, recurring support, funds, adjustments, statements, reconciliation, and provider settings can be granted separately.
Public Donation Links
Use the donation link tool when you want to share a direct public giving page outside the admin dashboard.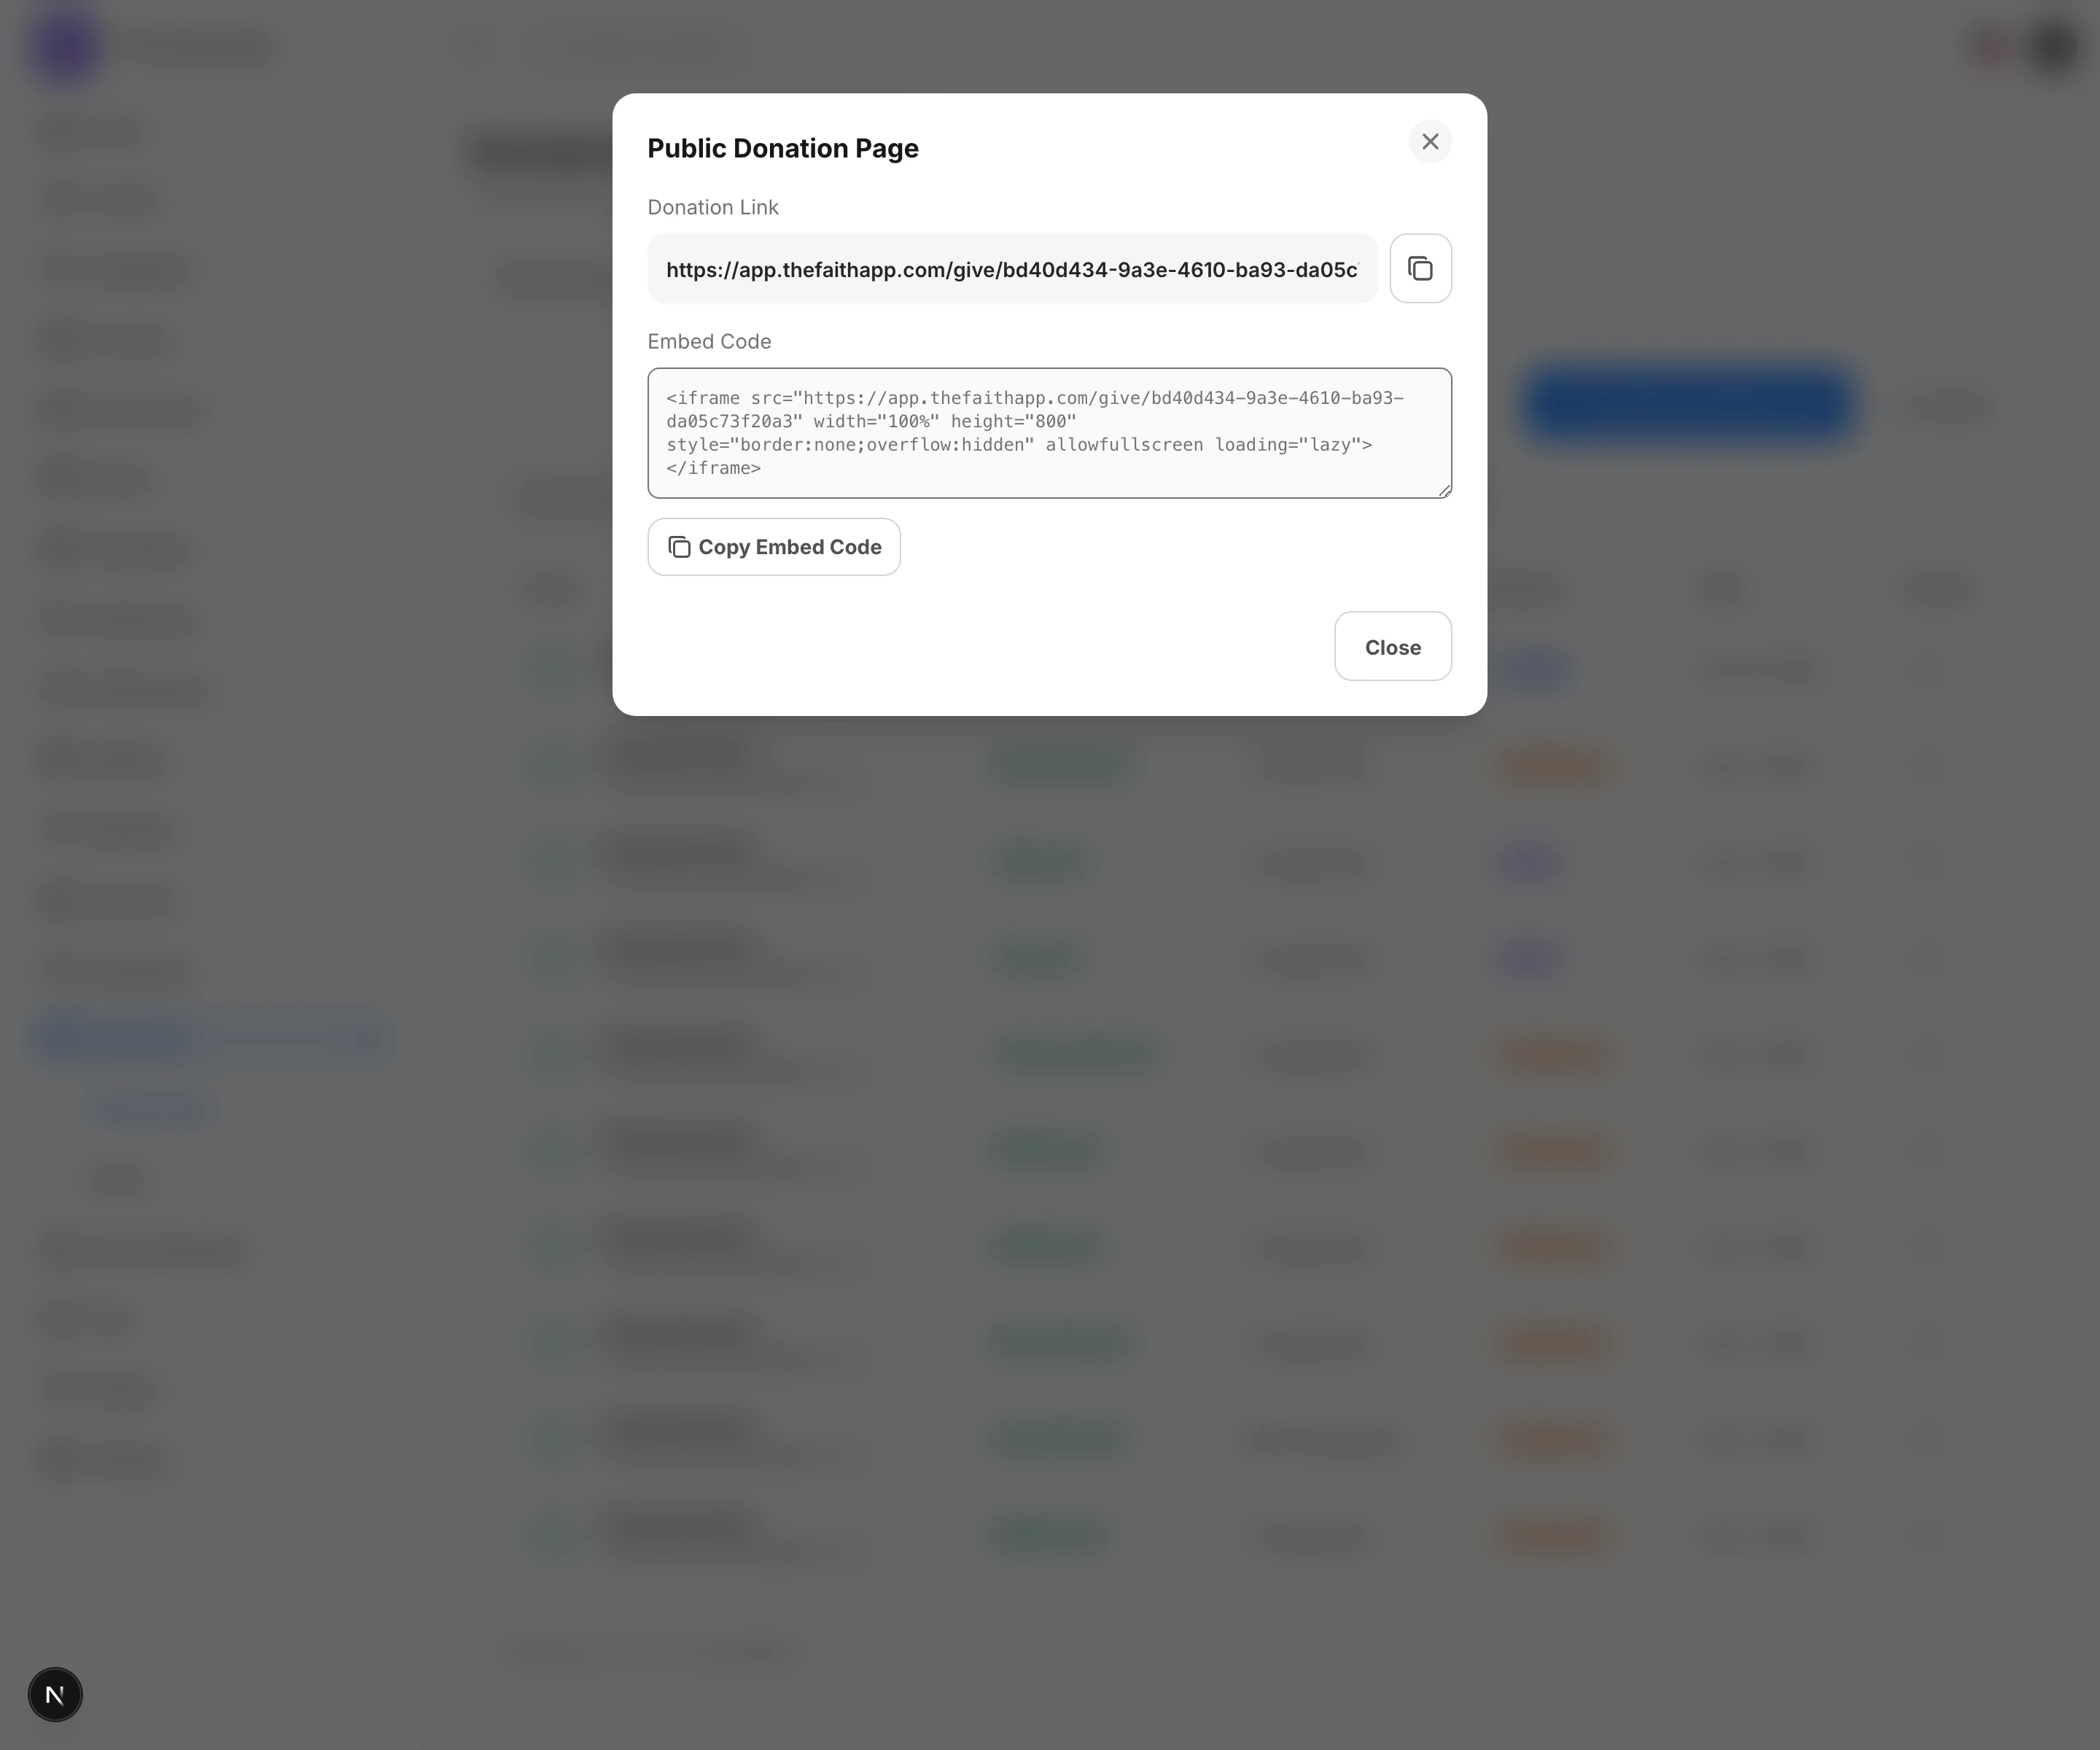
What You Can Do
- Generate a public giving link
- Copy the direct donation page URL
- Copy embed code for websites or landing pages
Steps
- Open
Giving. - Click the
Donationstab. - Click
Generate Donation Link. - Copy the link or embed code you want to share.
- Send the link to members, supporters, or website managers.
Notes
- The generated link opens a secure public giving experience for your church.
- Use the embed option when you want the giving form placed inside another website.
Public Giving Page
Use the public giving page when you want supporters to give through a church-branded page outside the admin dashboard.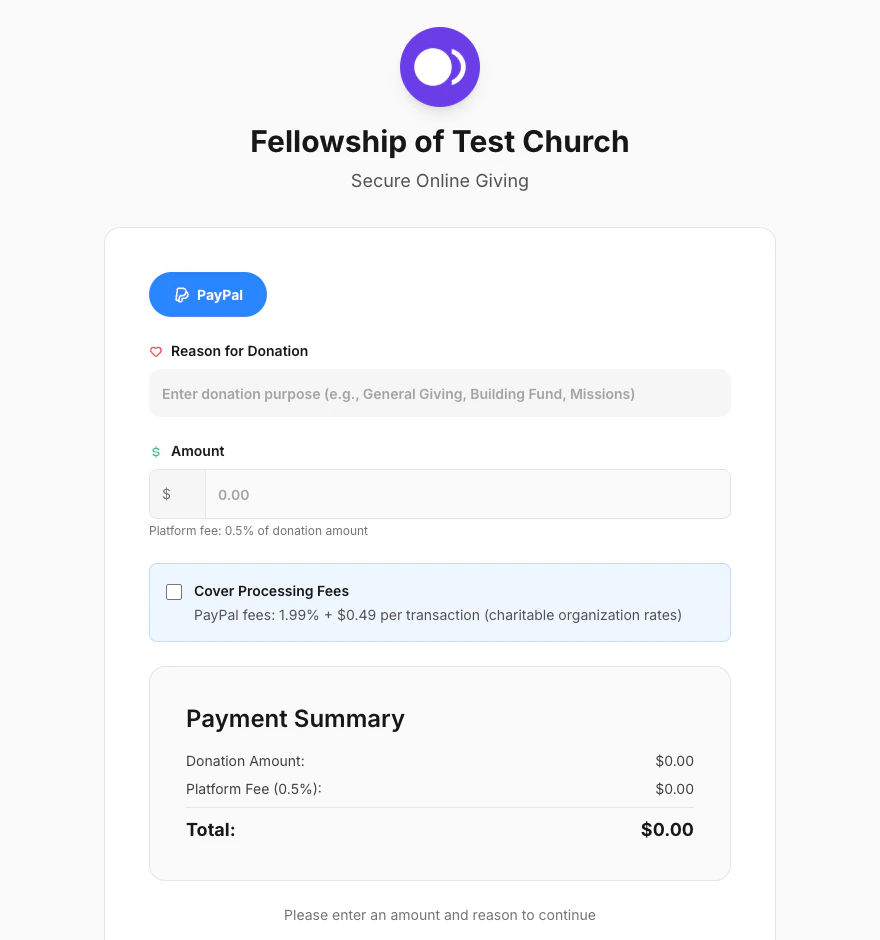
What Supporters Can Do
- Choose the available payment option
- Enter a donation reason and amount
- Decide whether to cover processing fees
- Review the payment summary before continuing
Steps
- Generate the public donation link from
Giving. - Open the link to confirm the church branding and page title.
- Share the link with supporters.
- Ask supporters to sign in from the public page.
- After sign-in, choose the payment option shown on the page.
- Enter the donation purpose and amount.
- Turn on
Cover Processing Feesif the supporter wants to include them. - Review
Payment Summaryand continue to payment.
Notes
- The screenshot above shows the public giving form after the supporter has already signed in.
- The current public giving experience starts with sign-in before the donation form appears.
- Connected payment providers control which payment options appear after sign-in.
- If the church has set a default payment provider, supporters may see only that option instead of multiple tabs.
QR, NFC, and Text-to-Give Access
OpenGiving and choose Giving Access when you want to share general giving
or a particular active fund without collecting payment details in a message.
QR and NFC
- Choose
General givingor an active fund. - Copy the public URL, download the QR image, or download the NFC record.
- Place the QR image in a reviewed church publication, or use a compatible NFC
writing tool to write the
.ndefURI record to a tag. - Scan or tap the finished asset before publishing it.
Text-to-Give Links
- Confirm that the church’s Twilio inbox is connected and signed webhooks are active.
- Add a unique keyword, such as
GIVEorBUILD. - Choose general giving or an active fund and set a short link-expiry window.
- Optionally add a short introduction for the automated reply.
- Publish the keyword together with the church’s inbound SMS number.
Campaigns, Pledges, and Impact
OpenGiving and choose Campaigns & Impact to extend an existing Outreach
Campaign with stewardship details. This keeps campaign content and financial
records connected without creating a second campaign system.
Configure a Campaign Goal
- Choose an active Outreach Campaign.
- Select
General,Capital, orMissionsas the campaign type. - Add the monetary goal and its currency.
- Choose the funding status and allocation policy.
- Add a short current-phase label when the project has clear stages.
- Keep public totals off until the church has reviewed the numbers and wants to publish them.
- Save the campaign settings.
Member Pledges
Members can open a cash campaign in the app and chooseMake a pledge — no charge. They select an amount, commitment frequency, and optional reminder
cadence. An authorized adult primary household contact may choose household
roll-up and must confirm that authorization.
A pledge records voluntary intent. It does not charge a payment method,
schedule an automatic payment, or replace the normal giving checkout. Members
can review settled-gift progress, turn reminders off, or cancel the pledge
without changing gifts already received. If a member later chooses to give
toward the pledge, the regular provider checkout remains a separate step.
Publish Impact Updates
- Open the
Impact Updatestab. - Choose a campaign or fund and the type of update.
- Enter the title, display date, and update text.
- Confirm documented subject consent before using a story or testimony.
- Save the item for review.
- Have an authorized reviewer approve and publish it.
Annual Generosity Reports
UseAnnual Reports to generate a year snapshot from settled gifts and
reviewed impact content. The report keeps currencies separate and does not
include donor identities. A draft stays private until an authorized user
publishes it, and a new version does not rewrite an earlier snapshot.
Stock, Asset, and Legacy-Giving Inquiries
Members can request a private conversation with the authorized giving team fromPledges & impact in the app. Staff review these requests under Giving → Campaigns & Impact → Stock & Legacy Inquiries.
The inquiry is for information and follow-up only. Do not request or enter
asset values, brokerage or account numbers, passwords, private keys, copies of
wills, or other legal documents. TheFaithApp does not take custody of an asset
through this workflow.
Relational Sponsorship
OpenGiving, choose Campaigns & Impact, then open the broader generosity
tools. Authorized staff can create a sponsorship program and a masked
beneficiary profile. A minor cannot be added without recorded guardian consent.
Members choose a beneficiary in the Giving app and link an active recurring
gift. A different authorized person reviews the match before it becomes active.
Letters from either side are encrypted and wait for independent moderation.
Members may use AI to translate or lightly polish their own draft, but the
result is not saved or sent until they review it and submit it normally.
Progress updates also require documented consent and a different reviewer
before publication. Sponsor dashboards show settled support, approved updates,
and the masked beneficiary identity; private legal names and safeguarding
notes never appear there.
Generosity Beyond Money
The same workspace helps a church coordinate generosity without treating every contribution as money:- Micro-time records small, bounded time commitments with a monthly cap.
- Presence uses a private invitation tied to a consented Pastoral Care relationship. Quiet relationships nudge only the assigned care owner.
- Professional offers require credential and scope review before approval.
- In-kind needs include a before-you-donate gate and clear pickup or delivery ownership.
- Legacy Letters remain member-controlled and encrypted. Clergy can open a released letter only after prior member consent, a funeral-care record, and a recorded death; every access is logged.
- Non-financial statements summarize only the member’s own confirmed activity and are never a leaderboard, tax receipt, or measure of spiritual worth.
Recurring Donations
Use recurring donations to review active scheduled gifts and confirm what supporters have set up to repeat automatically.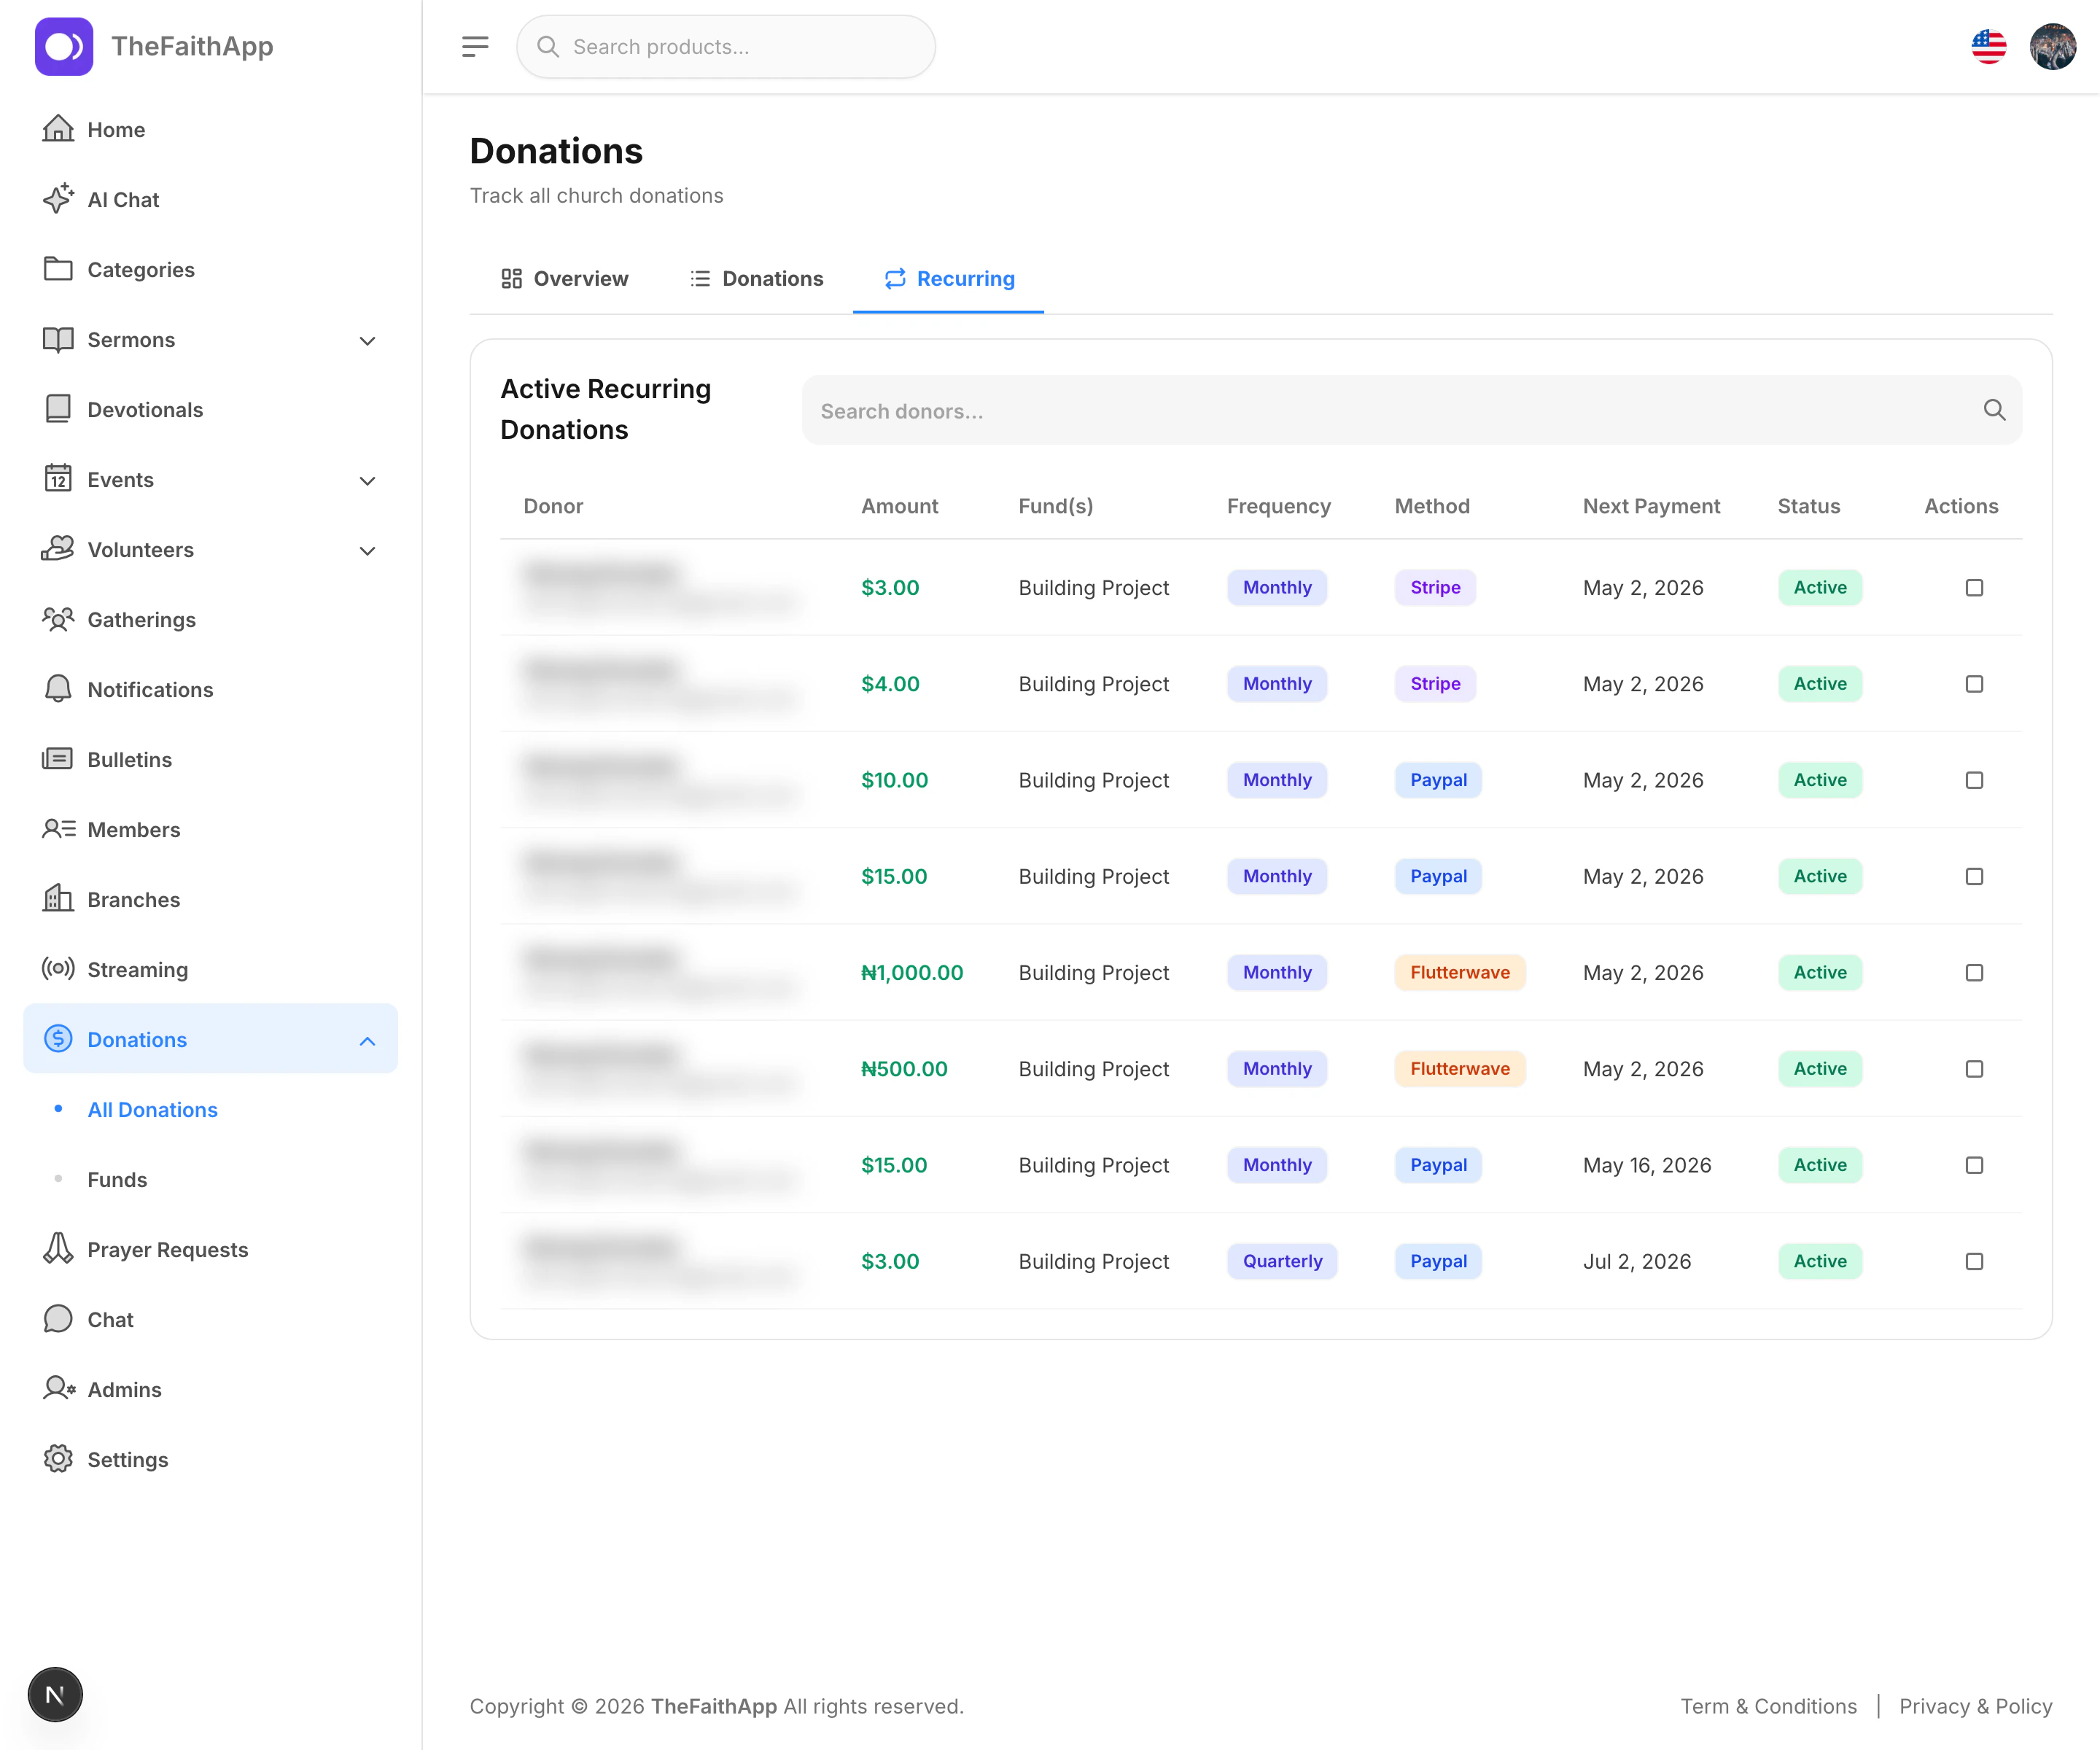
What You Can Do
- Review active recurring gifts
- Search recurring donations
- See the fund, amount, frequency, method, and next payment date
- Identify retrying, paused, and action-required gifts
- Help a member pause, resume, or change the future amount, frequency, or fund in the mobile app
- Cancel a recurring donation when needed
Steps
- Open
Giving. - Click the
Recurringtab. - Search for a donor or recurring record if needed.
- Review the next payment date and current status.
- Use the action menu when you need to cancel an active recurring gift.
Notes
- The recurring table is best for finance follow-up and supporter support requests.
- Status helps your team confirm whether a recurring gift is still active.
- Changes affect future scheduled gifts and never rewrite an earlier received gift.
- When a saved payment method cannot be recovered, Giving says that a payment method update is required instead of pretending the recurring gift resumed.
- PayPal recurring gifts can be paused, resumed, or cancelled from Giving. Changing their amount or schedule requires cancelling the current gift and approving a new one in PayPal.
Receipts and Acknowledgements
Every received general or Outreach Campaign cash gift can have an immutable acknowledgement. The acknowledgement records the amount, currency, designation, issue date, and each email delivery attempt.- Open
Giving, then open a received gift. - Find
Receipts and acknowledgements. - Review the issue and delivery history.
- Use
Resend receiptwhen an authorized recipient needs another copy.
Mobile Checkout Safety
Closing a Stripe, PayPal, or Flutterwave payment screen does not complete a gift. Giving records that the checkout was left and shortens its pending window, while still allowing a valid provider confirmation that was already in flight. If a card is declined, a later successful provider confirmation can complete the same gift without losing its fee and settlement breakdown. Flutterwave recurring giving appears only after Flutterwave has approved the church account for automated tokenized card charges and the capability has been enabled in TheFaithApp. Until then, members can make one-time Flutterwave gifts without being offered a recurring schedule that the account cannot run. PayPal uses a hosted approval screen for both one-time and recurring gifts. Recurring choices appear only when the connected church has PayPal’s partner Subscriptions capability. After the member approves, the subscription belongs to the church’s PayPal account; PayPal collects each scheduled gift, manages payment retries, and sends the result back to Giving. A gift is never created against TheFaithApp’s platform account.Funds
Use funds to control the giving categories donors can choose from.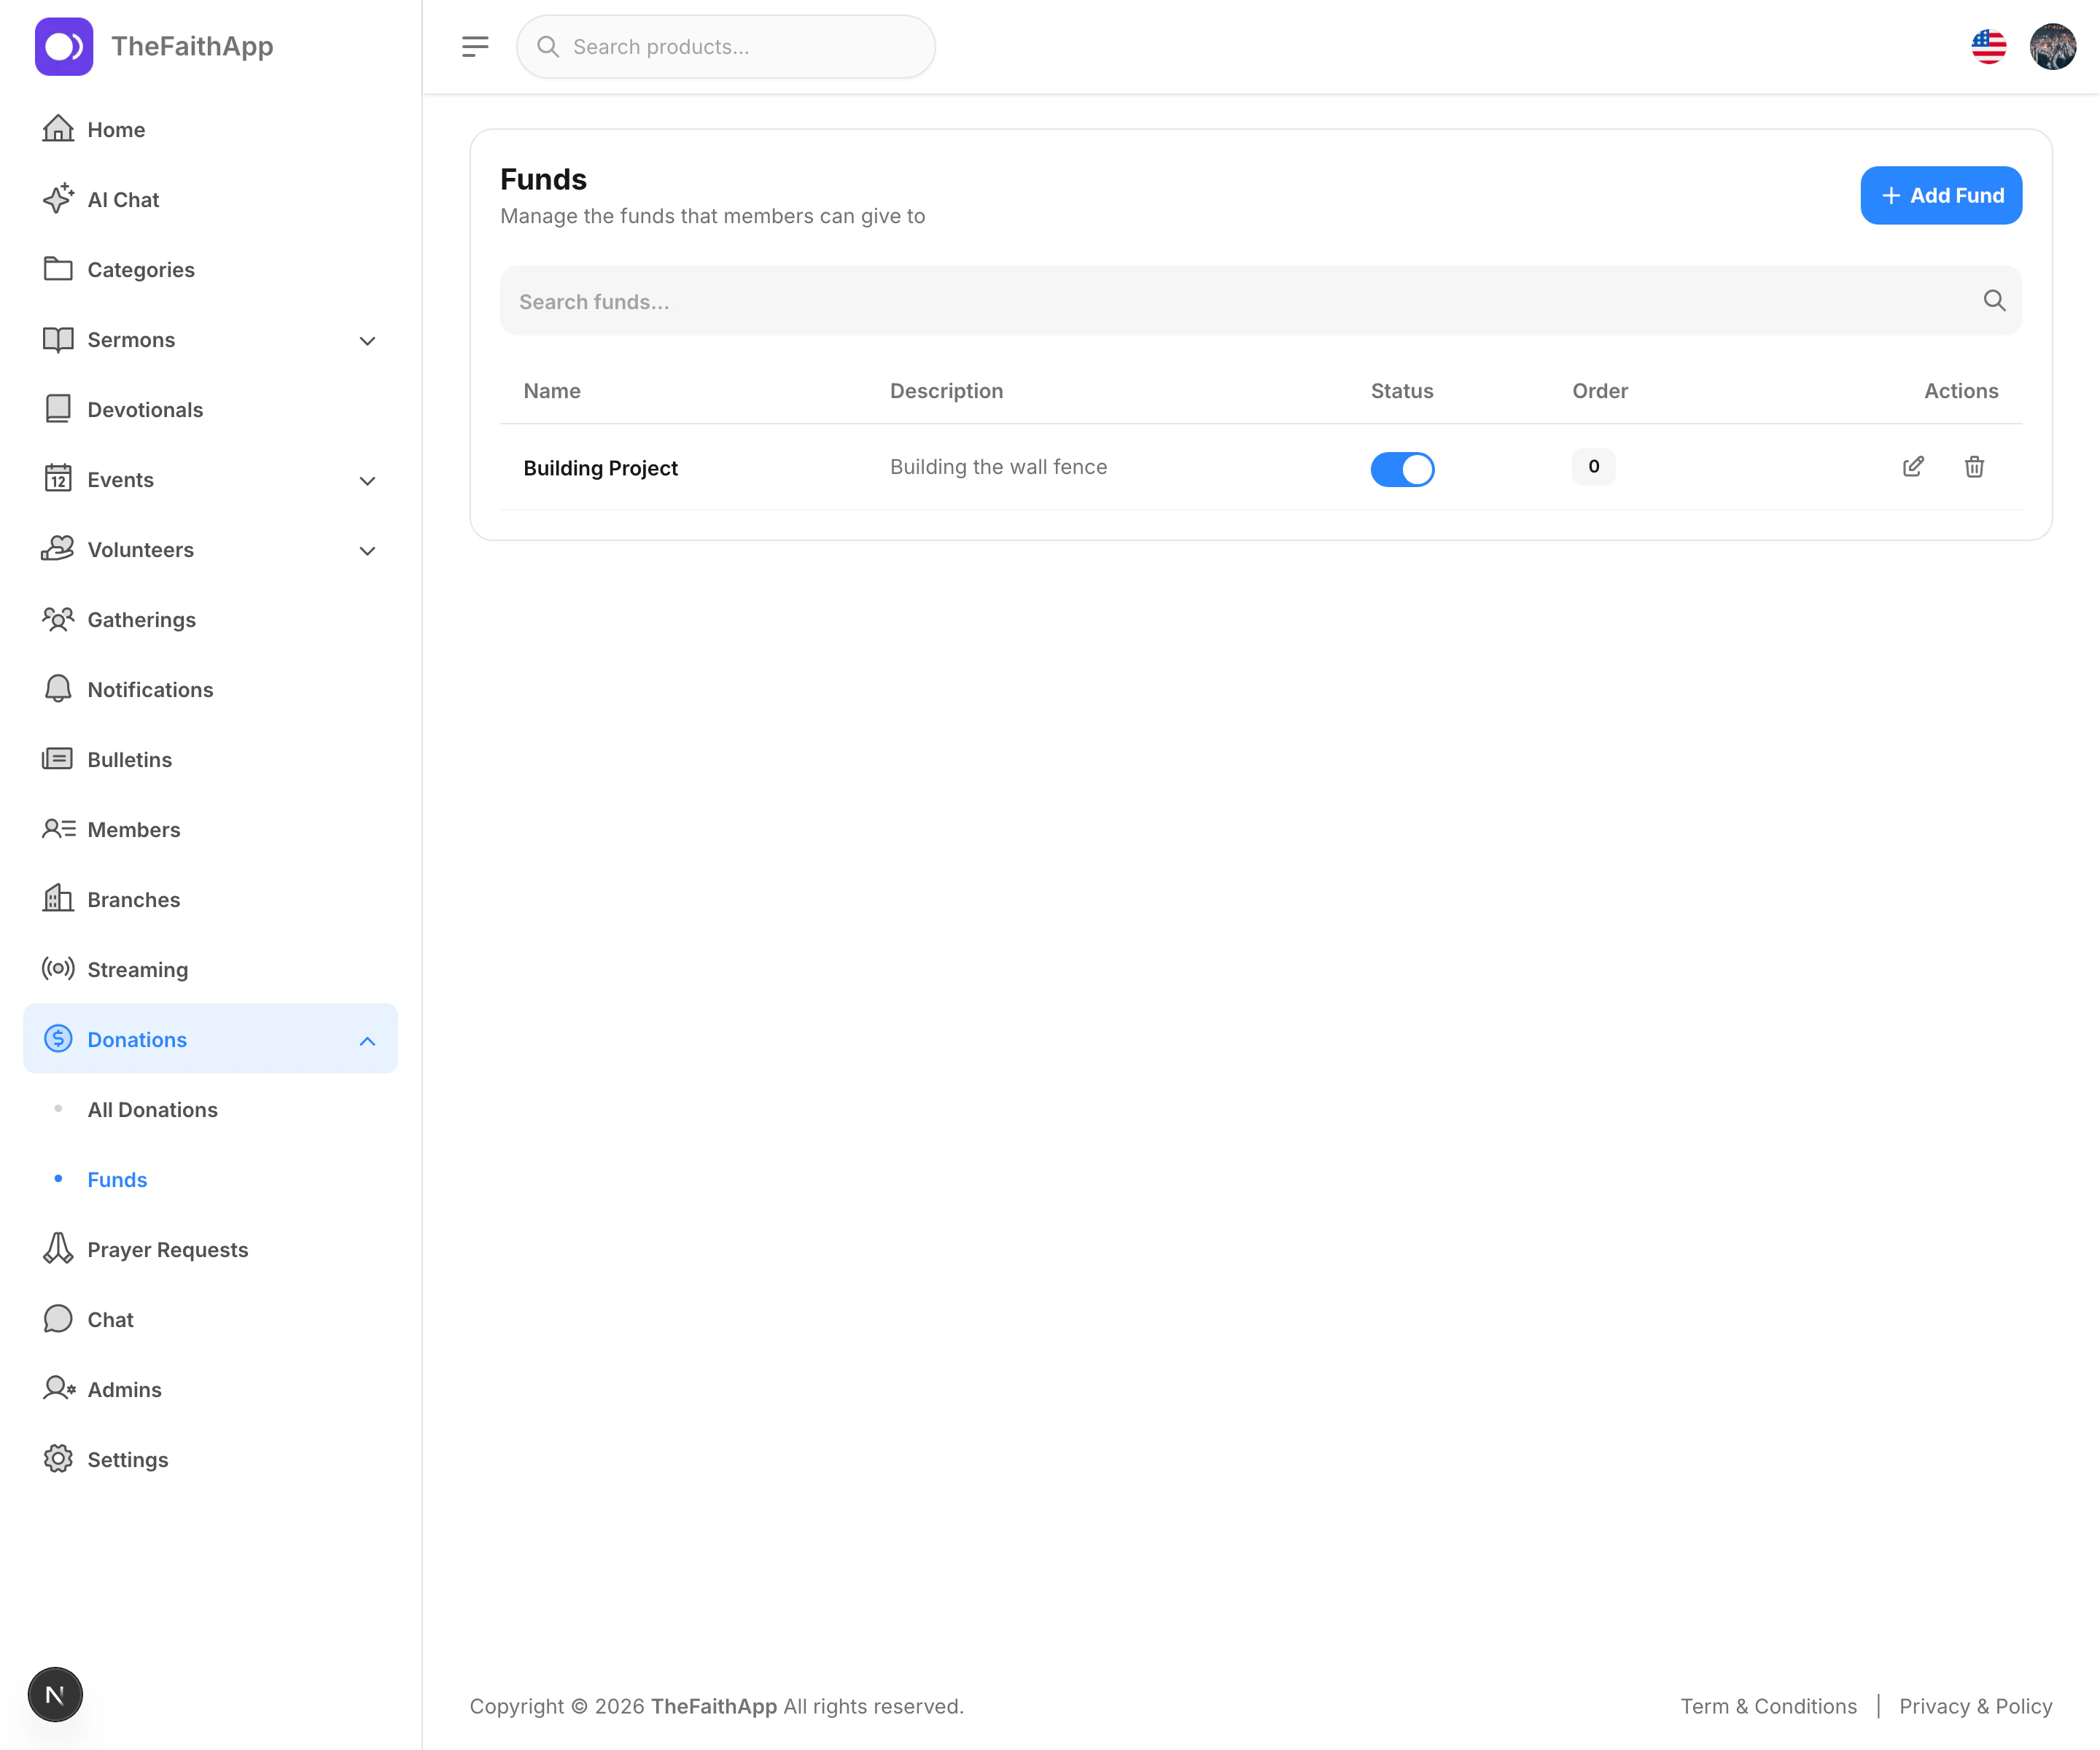
What You Can Do
- Create a fund
- Add a short description
- Mark a fund restricted, temporarily restricted, or unrestricted
- Set the one default fund and optional availability dates
- Turn a fund on or off
- Close a used fund without deleting its history
- Add an optional accounting code, account name, and class for finance export
- Search funds
- Edit or delete a fund
Examples
- Building fund
- Missions
- General giving
- Youth ministry
Steps
- Open
Giving. - Click
Funds. - Click
Add Fund. - Enter the fund name and optional description.
- Save the fund.
- Use the toggle or actions in the list when you need to update it later.
Notes
- Active funds are available in the giving experience.
- Closing a fund requires second-person approval. Closed and inactive funds remain available for historical reporting without staying visible to donors.
Giving Statements
OpenGiving and choose Statements to prepare period or year-end statements
from received gifts. Pending, failed, cancelled, reversed, and otherwise
unsettled attempts are not included.
Configure Statements
- Review the church legal name, jurisdiction, registration details, address, and statement wording.
- Keep the general wording factual. It should acknowledge gifts without promising a tax treatment that has not been legally reviewed.
- Enable year-end statements only after the church has confirmed the required details and wording for its jurisdiction.
- Save the settings before issuing a year-end statement.
Issue and Deliver a Statement
- Click
Issue statement. - Select the member and reporting period.
- Choose individual giving unless the household has explicitly authorized a household statement and the recipient is an authorized adult contact.
- Review the per-currency totals and included gifts.
- Download the PDF or send it to the authorized recipient.
Corrections
An issued statement is never edited in place. Authorized staff enter a reason for the correction, and a different authorized person approves or rejects the new version. Approval supersedes the earlier version while keeping both in the financial history. A statement waiting for approval is not available to the member.Finance Operations
OpenGiving and choose Finance Operations to prepare manual gifts and match
bank or provider deposits.
Manual Gift Batches
- Click
New batchand enter an independent expected gift count and total. - Add each cash, check, or bank-transfer gift and its fund.
- Confirm that the entered count and total match the declared controls.
- Submit the batch with a control note.
- A different authorized person reviews and closes the batch. Until then, its gifts remain pending and do not increase received-gift totals.
Deposit Reconciliation
- Click
New depositand copy the gross amount, processor fee, net amount, date, provider, currency, and reference from the deposit record. - Match received general or Outreach Campaign gifts by their Giving record ID.
- Submit only when matched gift value equals the deposit gross amount.
- A different authorized person reviews and closes the reconciliation.
QuickBooks and Xero Exports
You can prepare an accounting file without connecting TheFaithApp to an accounting provider.- In
Finance Operations, clickNew export profile. - Choose QuickBooks or Xero and give the profile a recognizable name.
- Map the contribution, processing-fee, refund, and settlement accounts. QuickBooks uses the account names from your chart of accounts. Xero uses account codes.
- Open
Giving>Fundsand add fund-specific accounting details where a fund should not use the profile’s default contribution account. Reconciled deposits can also use their own accounting deposit account; that account takes priority over the profile’s default settlement account. - Return to
Finance Operations, choose the profile, date range, currency, and gift source, then clickPreview export. - Review record and row counts, balanced debits and credits, warnings, and sample rows. Correct every validation error before continuing.
- Click
Generate and download. The completed file stays in export history so an authorized finance user can download the same file again.
Connect and Send to QuickBooks or Xero
An authorized finance user can connect the church’s QuickBooks company or Xero organization without leavingFinance Operations.
- In the QuickBooks or Xero connection card, click
Connect. - Sign in to the provider and choose the church-owned company or organization you intend to use. For Xero testing, choose the Demo Company.
- Confirm the connection. The card shows the company name and whether the connection is using a test or production environment. Xero also shows the organization’s base currency.
- Create or edit an export profile for the connected provider. Choose each account from the connected chart of accounts instead of typing it manually. For Xero, choose a non-bank clearing account for settlement lines because Xero does not allow manual journals directly against bank accounts.
- Preview the date range and correct every mapping, class, balance, or currency error. Xero manual journals must use the organization’s base currency.
- Click
Generate and send to QuickBooksorGenerate and send to Xero, or send a completed run from export history. - Confirm the sent status, then review the journal entries in the connected accounting product.
Disconnect when the church no longer wants live delivery. Disconnecting
revokes that provider’s authorization and removes the stored access tokens; it
does not delete earlier exports or accounting records. If authorization
expires, use the provider’s Reconnect action before retrying a failed
delivery. Neither QuickBooks nor Xero needs to be connected to generate CSV
files.
Where both staff accounts can be linked to member households, the reviewer
must also be from a different household. Finance actions remain visible in the
approval history whether approved or rejected.
Payment Providers
Use payment providers to connect the services your church will use to accept online gifts.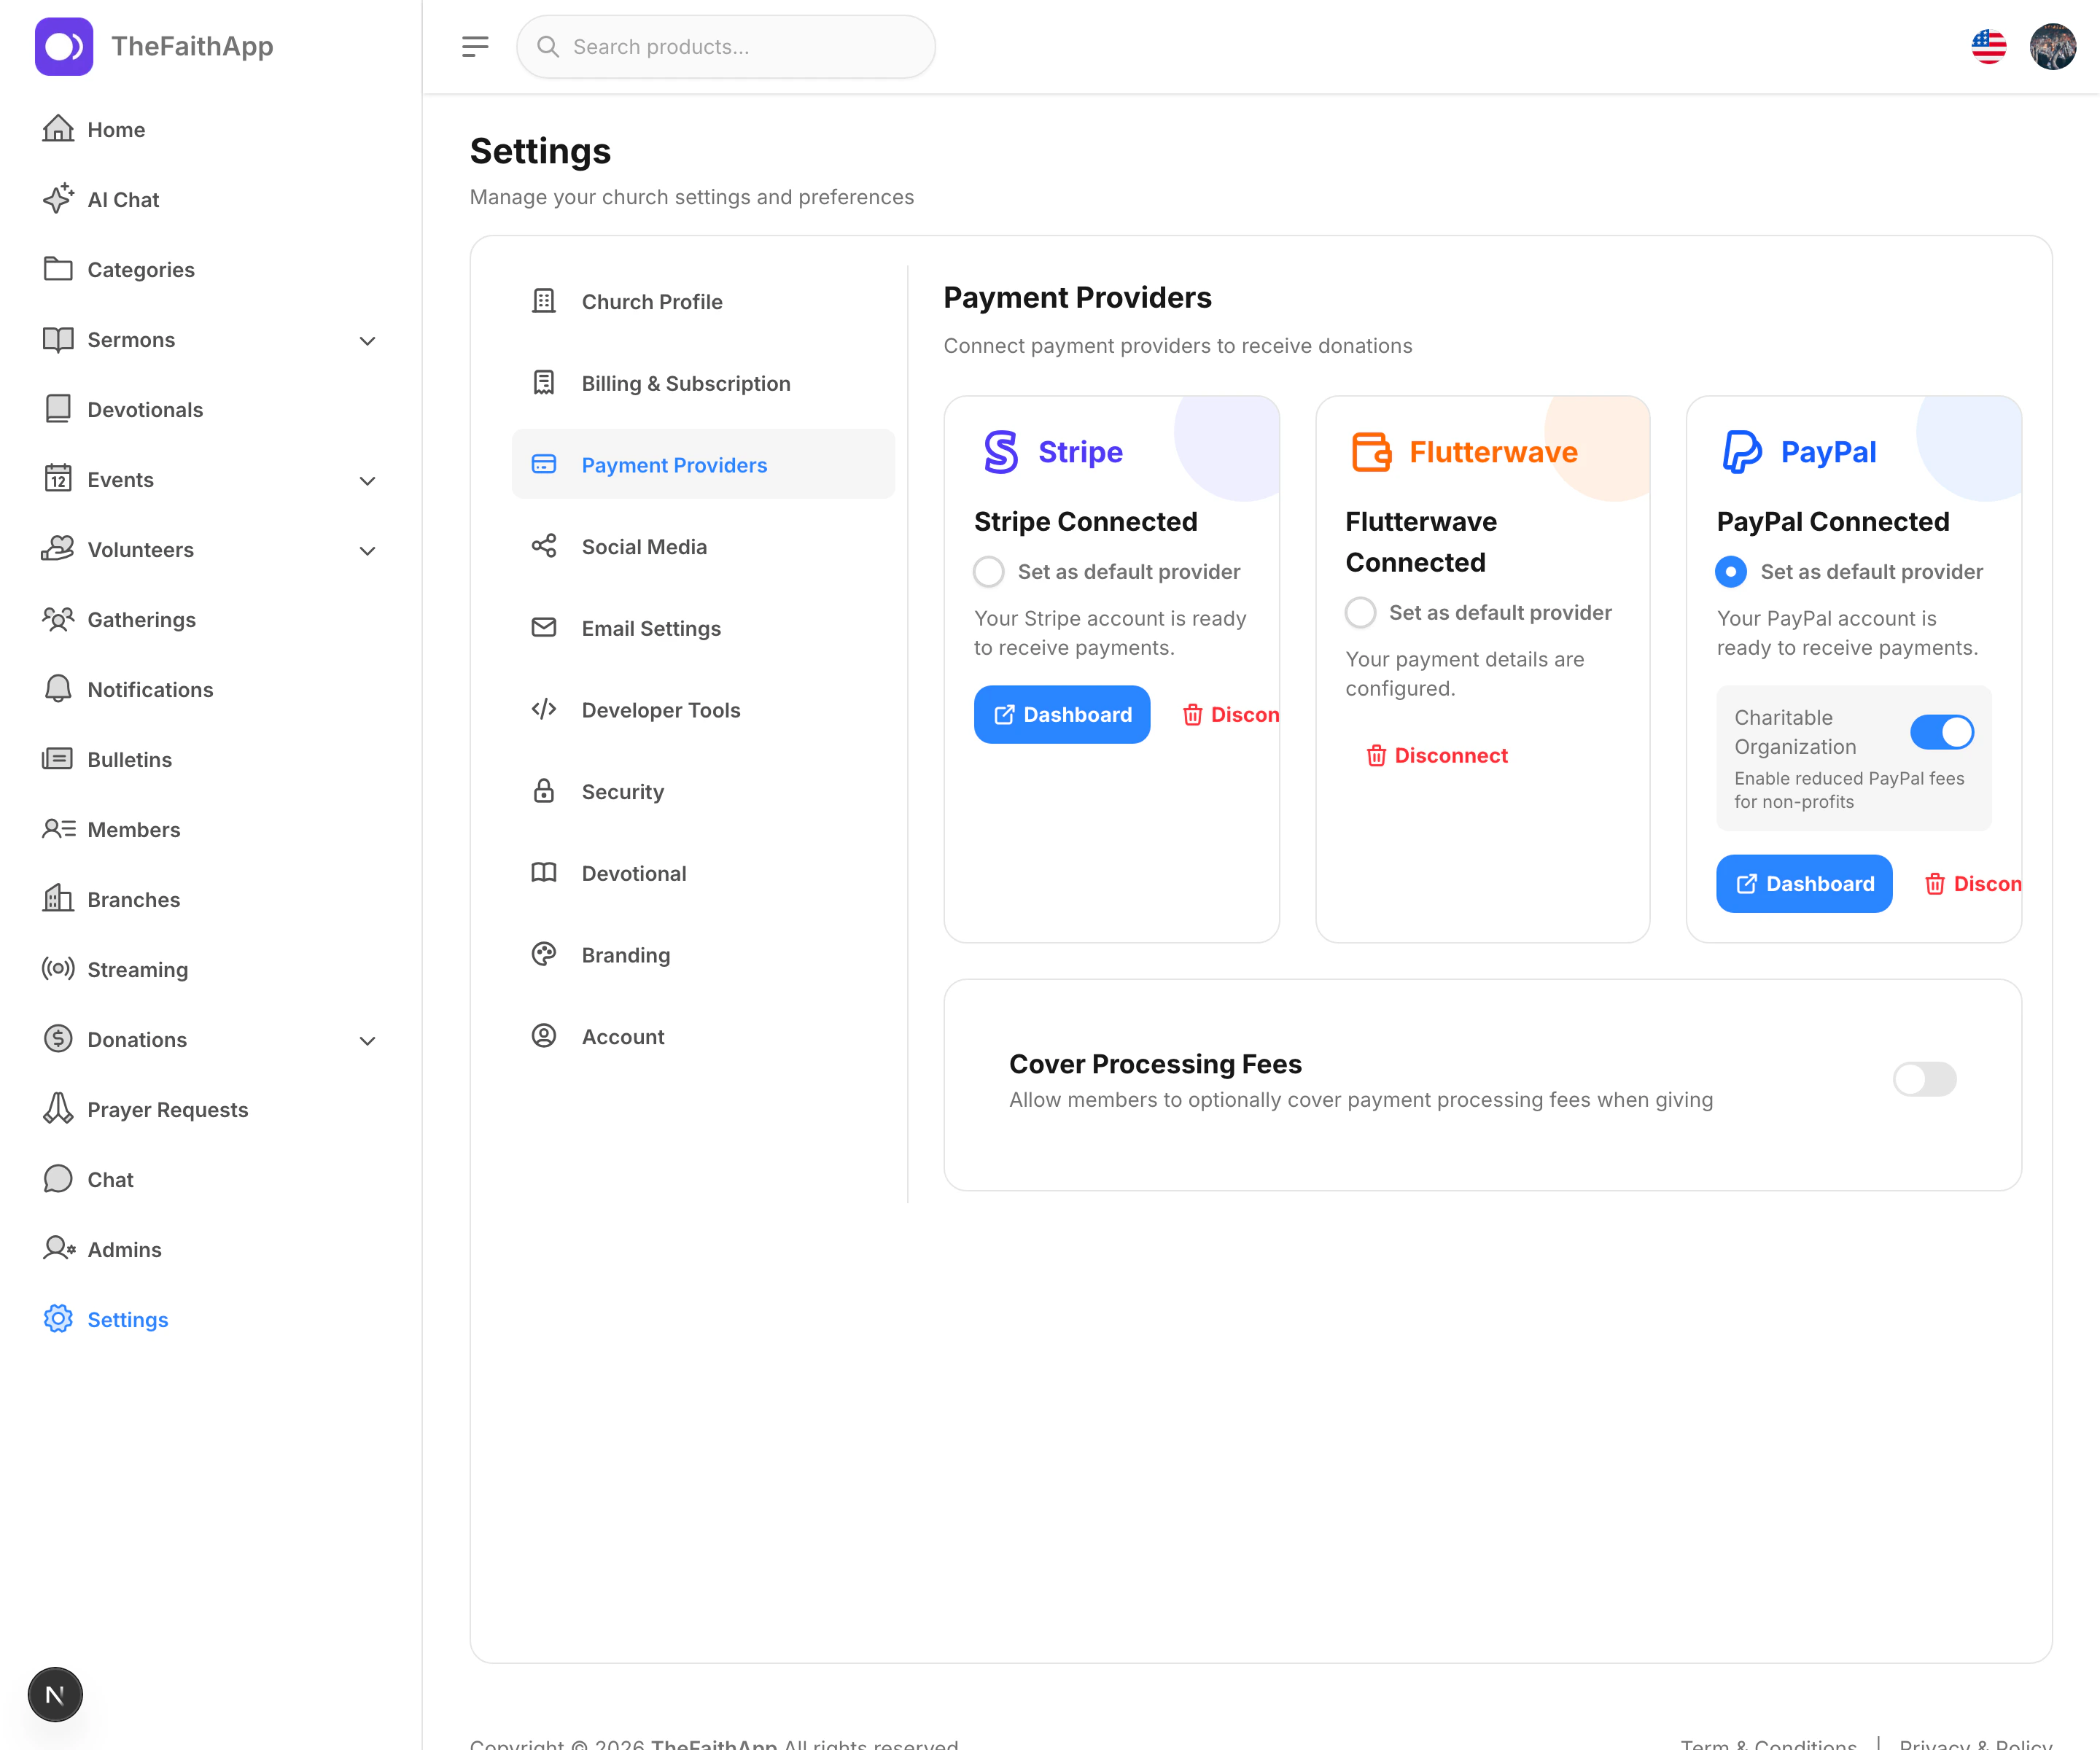
Available Providers
- Stripe
- Flutterwave
- PayPal
What You Can Do
- Connect a payment provider
- Disconnect a provider
- Set the default provider
- Turn on charitable PayPal fees where applicable
- Allow donors to cover processing fees
- Enable Stripe wallet or ACH rails when the connected account is eligible
Steps
- Open
Settings. - Click
Payment Providers. - Connect the provider you want to use.
- Set a default provider if more than one is available.
- Turn on
Cover Processing Feesif your church wants to offer that option during giving. - Save or confirm any provider changes.
Connect Stripe
Choose Connect with Stripe in Payment Providers. Stripe lets you sign in and select an existing Standard account, or create a new Standard account. Authorize TheFaithApp to complete the connection. Your church keeps its own Stripe account and dashboard in either case. If the connection option is unavailable, contact support to complete the Stripe connection setup. There is no separate account-creation flow in TheFaithApp. An unfinished connection shows Resume connection. Stripe may still need information before your account can receive payments. A pending connection stays unavailable for giving until Stripe confirms it can accept charges and receive payouts. Open your Stripe dashboard to finish any outstanding steps. An account controlled by another platform may not be eligible to connect. Existing connections are kept in place; connecting a different account does not move Stripe customers, subscriptions, or payment history. Plan any account change before disconnecting an account used for recurring gifts. Disconnecting revokes TheFaithApp’s access before removing the connection. It does not delete your church’s Stripe account. Some accounts have platform controls and require your platform administrator to remove the connection in the Stripe Dashboard. If that step is required, the connection stays in place and the dashboard explains what to do next.Notes
- Stripe, Flutterwave, and PayPal can support different payment needs depending on your region and ministry setup.
- The default provider is the main option used when multiple providers are connected.
- Flutterwave accounts need separate approval for automated tokenized card charges before recurring Flutterwave giving can be enabled. One-time Flutterwave giving remains available without that capability.
- PayPal accounts can accept one-time hosted gifts. Recurring choices become available after the connected church has the partner Subscriptions capability enabled in TheFaithApp.
- Stripe ACH stays pending until Stripe reports settlement. Apple Pay and Google Pay appear only after the required merchant and domain configuration is active for the church and device.
- Fee covering uses the configured provider, rail, currency, percentage, and fixed component to estimate the gross amount needed for the intended gift.
Billing and Subscription
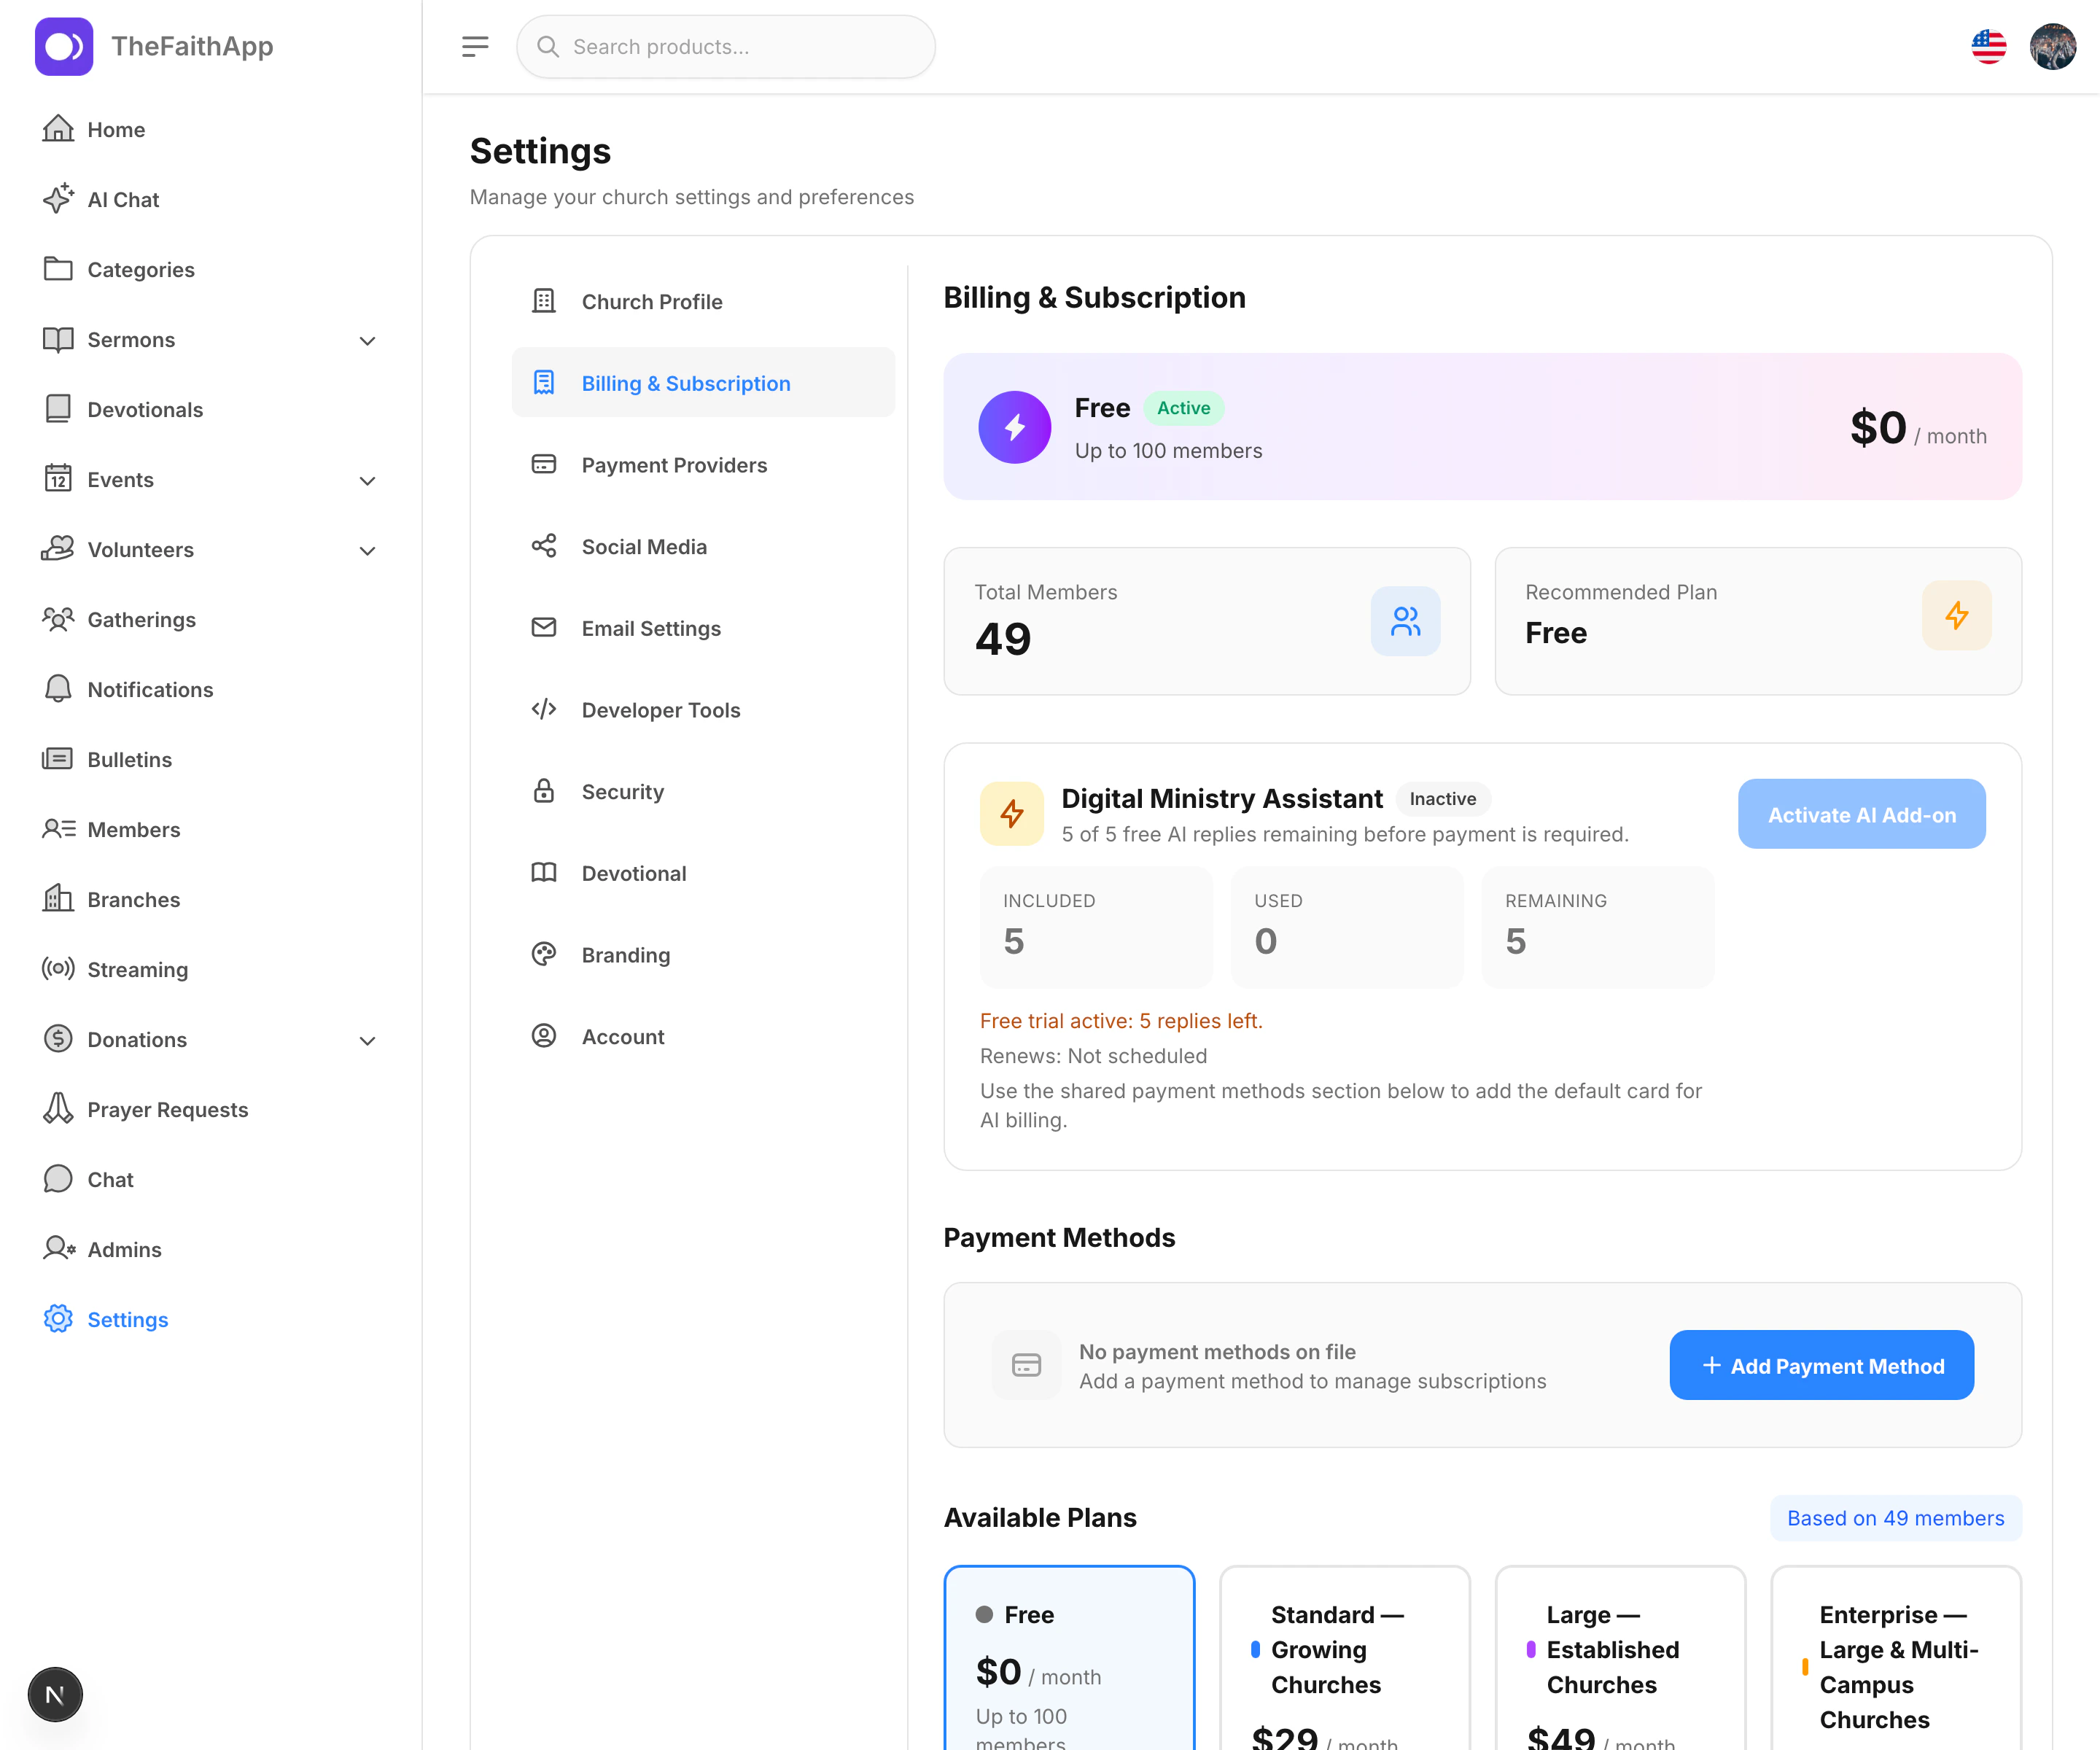
TheFaithApp account billing is separate from Giving. Use the billing page underSettings to manage the plan your church pays for, review recommended plans,
and keep subscription billing organized.
What You Can Do
- Review your current plan
- See the recommended plan based on member count
- Compare available plans
- Add and manage payment methods
- Review billing history
Steps
- Open
Settings. - Click
Billing & Subscription. - Review the current plan summary.
- Compare the available plans below.
- Click
Switch Planwhen you are ready to move to a different subscription tier. - Review the billing history section for past charges.
Notes
- Recommended plans are based on the member count in your church account.
- The billing page also shows the products, feature access, and allowances for the current plan.
- Full data export remains available on every plan.
- A downgrade preserves existing records. Work above the new allowance becomes read-only after the applicable grace period rather than being deleted.
How the Plans Differ
The Free plan includes people, households, groups, events, care, teaching
content, one branch, three staff administrators, and full export. It also
includes starter allowances for Giving, Forms, Marketing, Outreach, Children &
Youth, Discipleship, Analytics, Operations, and App Customization. The billing
page shows the exact allowance before a team reaches it.
Paid plans also use clear operating allowances instead of an open-ended
“unlimited” promise. Standard includes 10 administrators, 10 active Forms,
1,000 monthly Form responses, 5 monthly campaigns, and 10 active scheduled
reports. Large expands those limits for multi-branch ministry and includes up
to 5 active webhook endpoints. Enterprise expands capacity again, including
100 administrators, 20 branches, 50,000 monthly Form responses, and 25 active
webhook endpoints. Existing records remain available when a church reaches a
limit.
Payment Methods
Use payment methods to add the card used for subscription billing and other paid add-ons.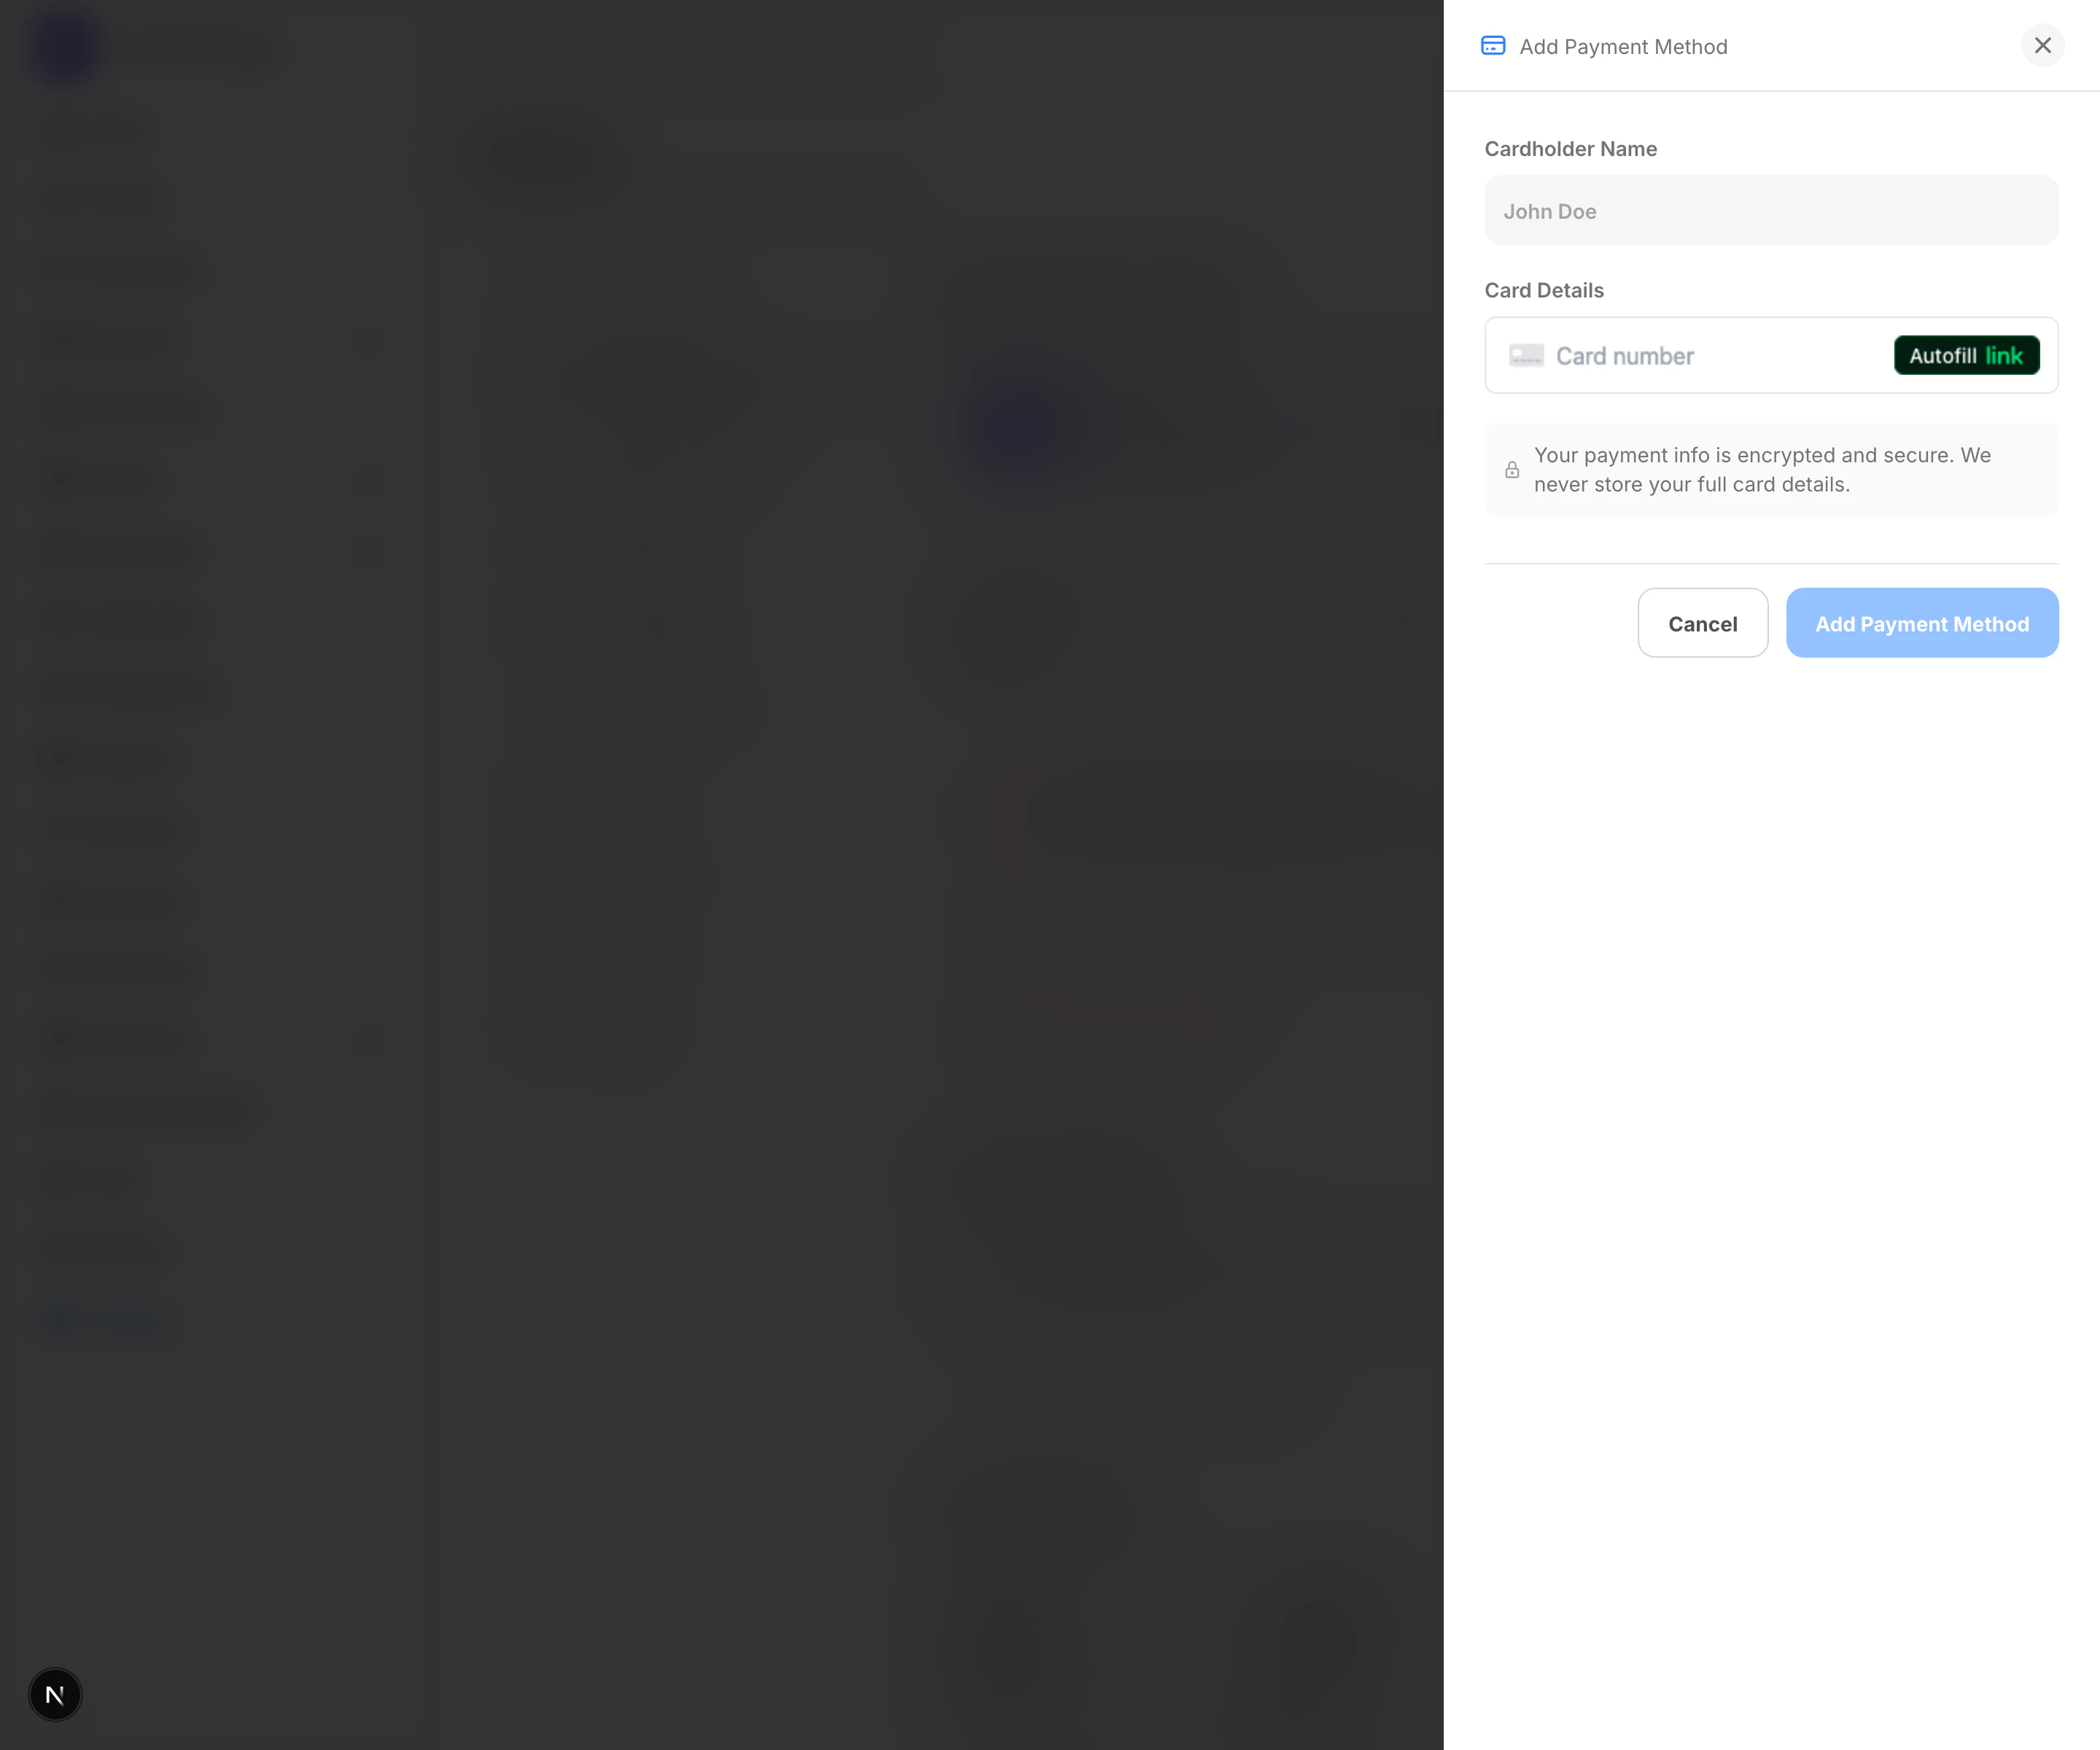
What You Can Do
- Add a payment method
- Set a default card
- Remove a payment method when it is no longer needed
Steps
- Open
Settings. - Click
Billing & Subscription. - In
Payment Methods, clickAdd Payment Method. - Enter the cardholder name and card details.
- Save the payment method.
Notes
- Add a payment method before activating paid add-ons or switching to paid plans.
- The billing page uses the saved payment methods section for subscription charging.
AI Add-On Billing
Use the AI section on the billing page to manage access to the Digital Ministry Assistant add-on.What You Can Do
- Review free AI replies remaining
- Activate the AI add-on
- Choose whether members can use Ask your church
- See included, used, and remaining usage
- Cancel the add-on when needed
Steps
- Open
Settings. - Click
Billing & Subscription. - Find the
Digital Ministry Assistantsection. - Review the current status and usage totals.
- Add a payment method first if required.
- Click
Activate AI Add-onwhen you are ready to continue with paid AI usage. - Turn on
Allow members to use Ask your churchif the church wants members to share the paid reply allowance.
Notes
- The billing panel shows whether the AI add-on is active, inactive, past due, or canceled.
- Free usage can run out before activation is required, depending on the account state.
- Digital Ministry Assistant costs $29 per month and includes 200 assistant replies each month, plus the included sermon and prayer-room AI tools.
- Member access is off by default, does not use the five-reply staff trial, and is limited to five questions per member per day.
- Member and staff replies draw from the same church-paid monthly allowance.
- Only billing administrators can change member access, and each change is recorded in the church’s audit history.