
Events and Volunteers
This guide covers the main tools used to manage events and volunteer coordination in TheFaithApp. For team rosters, recurring schedules, availability, wellbeing, training, and worship plans, continue to Volunteers and Serving Teams. These tools include:- Events
- Event categories
- Event registration setup
- Attendee management and check-in
- Public event pages
- Volunteer ministries
- Volunteer categories
- Volunteer skills
- Volunteer opportunities
- Volunteer signups
Before You Start
- Sign in to your admin account.
EventsandVolunteersare in the left sidebar.- Some create, edit, or delete actions depend on your admin permissions.
Event Categories
Use Event Categories to organize events by theme, audience, or purpose.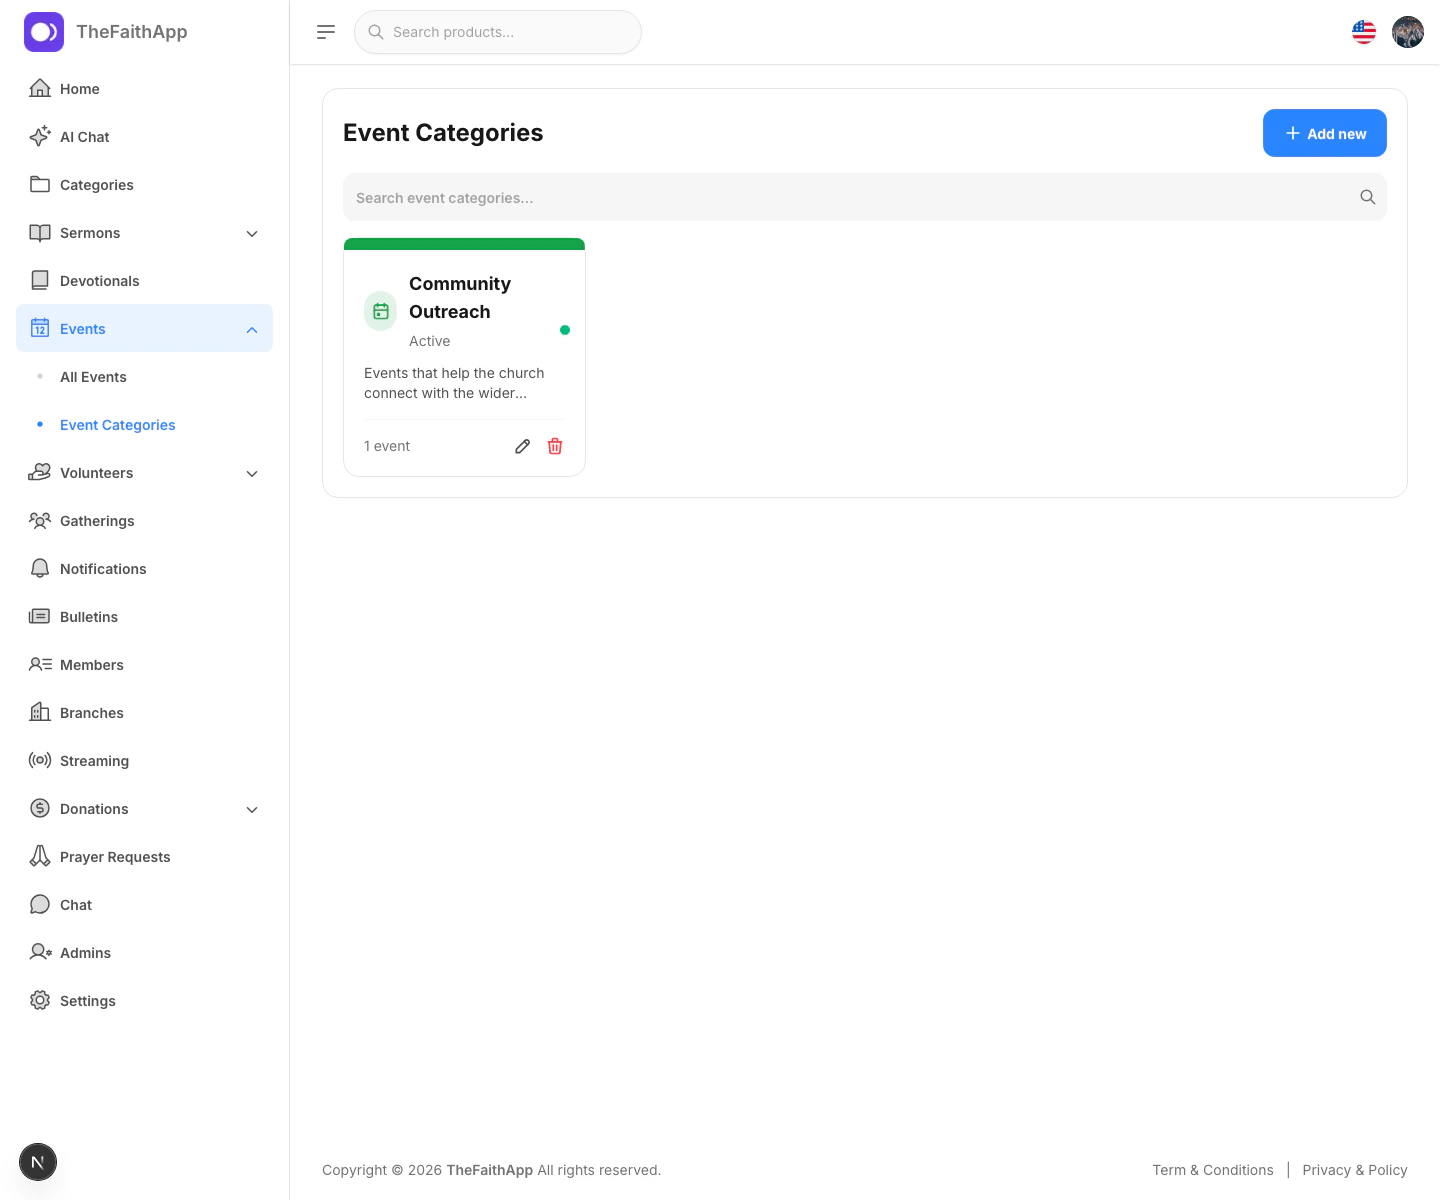
What You Can Do
- Create a new event category
- Add a description and color
- Mark a category as active or inactive
- Search categories
- Edit or delete existing categories
Steps
- Open
Events. - Select
Event Categories. - Click
Add new. - Enter the category name, description, and color.
- Set the category status if needed.
- Save the category.
Tips
- Use category names that make event filtering easier for your team.
- Keep inactive categories for older event types you do not want to remove yet.
Events
Use Events to plan services, groups, classes, rehearsals, outreach programs, conferences, and other church activities.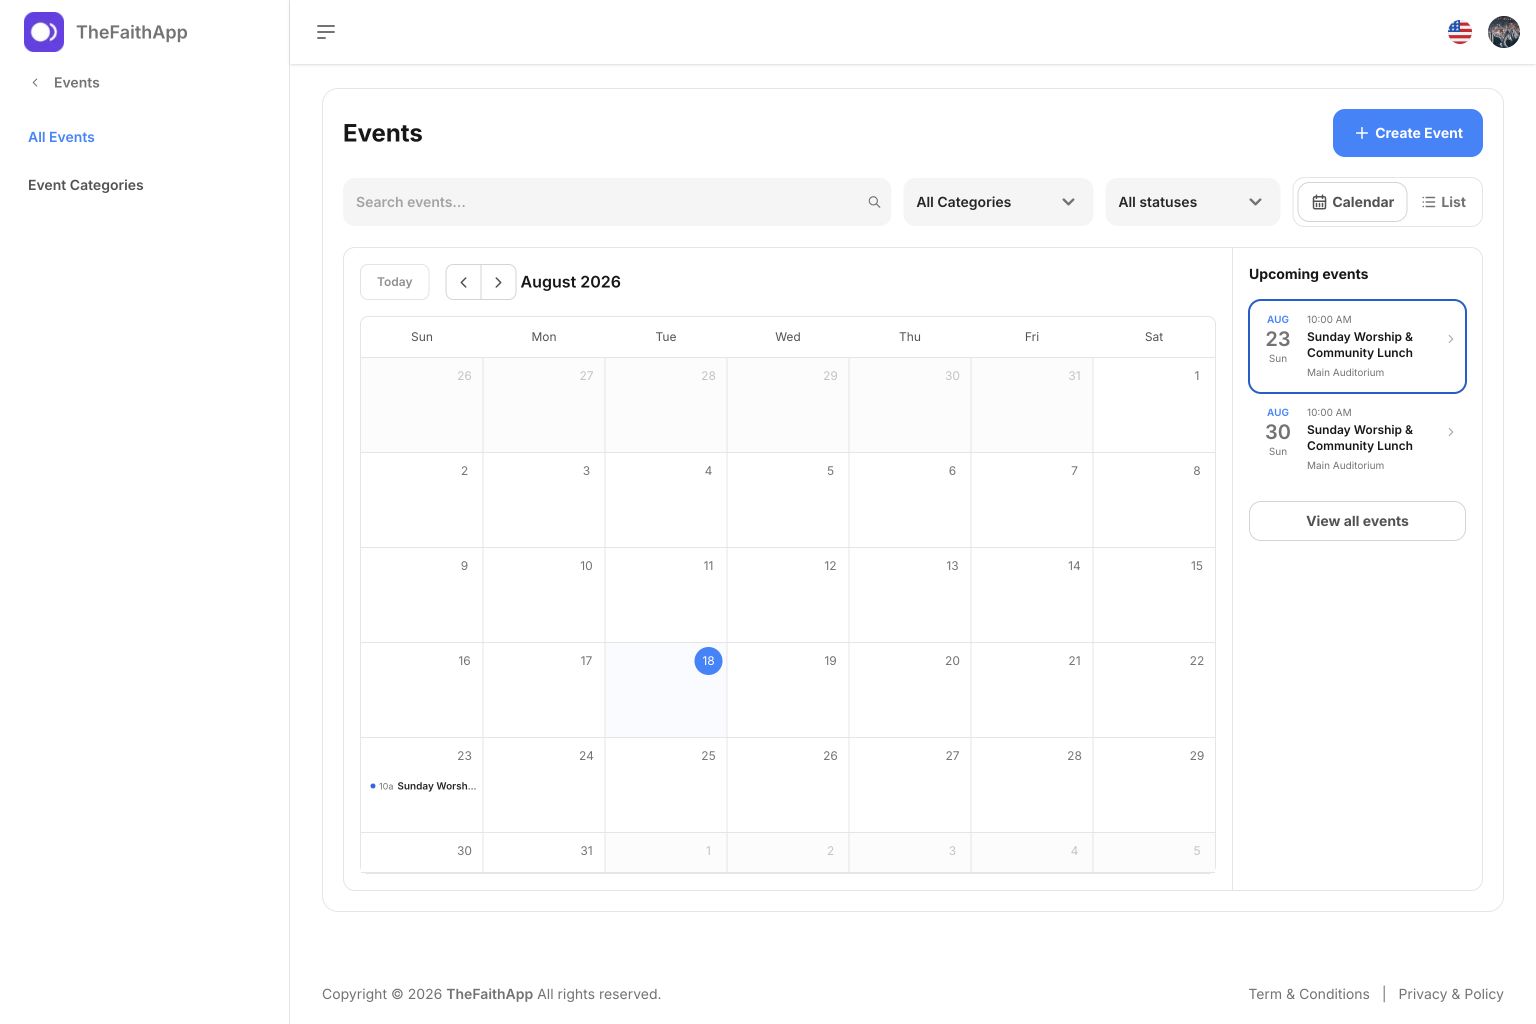
What You Can Do
- Create a new event
- Add a cover image, date, time, and location
- Assign the event to a category
- Switch between a list and a calendar
- Search and filter events by category or publication status
- Open an event details drawer without leaving the calendar
- Review registrations or run check-in from the same event workspace
- Review the next occurrence of a recurring event
- Edit or delete existing events
- Repeat an event daily, weekly, every two weeks, monthly, or yearly
- Publish an invite-friendly public event page
Event Details
- Event title
- Event description
- Date and time
- Cover image
- Category
- Location name and address
- Recurring or multi-day options
- Registration, reminder, and check-in settings
Steps
- Open
Events. - Click
Create event. - Enter the event title and description.
- Add the date, time, and cover image.
- Choose the event category.
- Add the location details.
- Turn on recurring scheduling when the gathering repeats.
- Turn on
Public eventwhen people should be able to open and share its public page. - Save the event.
Notes
- Event cards show the next occurrence, location, registration state, price, capacity, and recurring status.
- Past events remain visible with a visual status change, which helps with reference and cleanup.
- Each occurrence of a recurring event keeps its own registration and attendance list.
Private Calendar Subscriptions
Use private calendar subscriptions when a trusted person or shared calendar needs a read-only schedule that stays up to date automatically. An administrator with Events access can create a named subscription for:- Published public Events
- Published or completed services for one campus
- Published or completed services for one ministry
- All published or completed volunteer services
Create and Subscribe
- Open
Eventsand findPrivate calendar subscriptions. - Select
Create subscription. - Give the subscription a recognizable name, such as
Downtown display. - Choose the calendar scope and, when requested, the campus or ministry.
- Create the subscription, then select
Reveal and copy. - Paste the copied URL into the calendar application:
- Apple Calendar on Mac: choose
File>New Calendar Subscription, paste the URL, and choose how often it should refresh. - Google Calendar on a computer: beside
Other calendars, chooseAdd other calendars>From URL, paste the URL, and add the calendar. - Outlook on the web: open Calendar, choose
Add calendar>Subscribe from web, paste the URL, and import it.
- Apple Calendar on Mac: choose
Subscribe using the URL instead of uploading an
.ics file. A subscription
receives future schedule changes; a one-time file import does not.Protect a Private URL
Treat the URL like a password. Anyone who has it can read that calendar until it is replaced or revoked. Use a separate named URL for each trusted person, display, or external calendar so access can be removed without disrupting other subscriptions.- Select
Rotate URLto replace a URL that may have been exposed. The previous URL stops working immediately, and the calendar must subscribe again with the new one. - Select
Revokewhen the calendar should stop receiving updates. A revoked subscription can later create a new URL. - Rename a subscription when its purpose changes. Renaming does not replace its URL.
Connect Google Calendar or Outlook
Open Events > Calendar subscriptions and find Connected calendars to connect a church-owned Google or Outlook account. Choose a calendar you can edit, then choose whether to include published events, serving plans, or both. The connection stays within your church and has its own sync history. TheFaithApp keeps event times, locations, and cancellations up to date in the selected calendar. Make schedule changes in TheFaithApp. Editing a copied event in the calendar does not change the church schedule, and the next sync restores the schedule details. Members can open Volunteer Hub > My schedule in the mobile app to connect their own calendar for registered events and serving assignments. Staff who also have a member profile can use Volunteers > Schedule & Teams > My schedule in the web dashboard. Choose which items to include and disconnect at any time.Serving Invitations and Responses
When a church organizer calendar is connected and a member opts into serving sync with the same calendar provider, the church can send a calendar invitation to the member’s connected account. Declining that invitation updates the serving response in TheFaithApp after synchronization. A personal calendar copy is an appointment, so it does not provide an organizer RSVP. Use the assignment’s TheFaithApp response link, or respond in the Volunteer Hub, when there is no church organizer invitation. The private response link opens your assignment’s role, date, time, timezone, and location without requiring a staff account. Choose Accept assignment, or enter a Reason for declining and choose Decline assignment. Your serving leader can see your decline reason. Opening the page does not change your response. After accepting, you can still decline if your plans change. Once declined, contact your serving leader if you need to change the response again. If the link has expired or the invitation is no longer available, review your schedule in the Volunteer Hub or contact your serving leader. Keep the response link private: anyone who has it can respond to that assignment. Removing a calendar entry is not a decline.Check a Connection
Review the last successful sync and recent run results before retrying. Select Sync now to request another run. Reconnect when authorization has expired or been revoked by the calendar provider. Provider delays can mean a response does not appear immediately. Disconnecting stops future synchronization and tries to remove the entries created by this connection before revoking access. If provider access has already expired, some entries can remain; remove them in the calendar if needed. Private calendar subscriptions remain available for read-only calendars.Event Registration Setup
Use event registration when attendees need to confirm participation before the event date.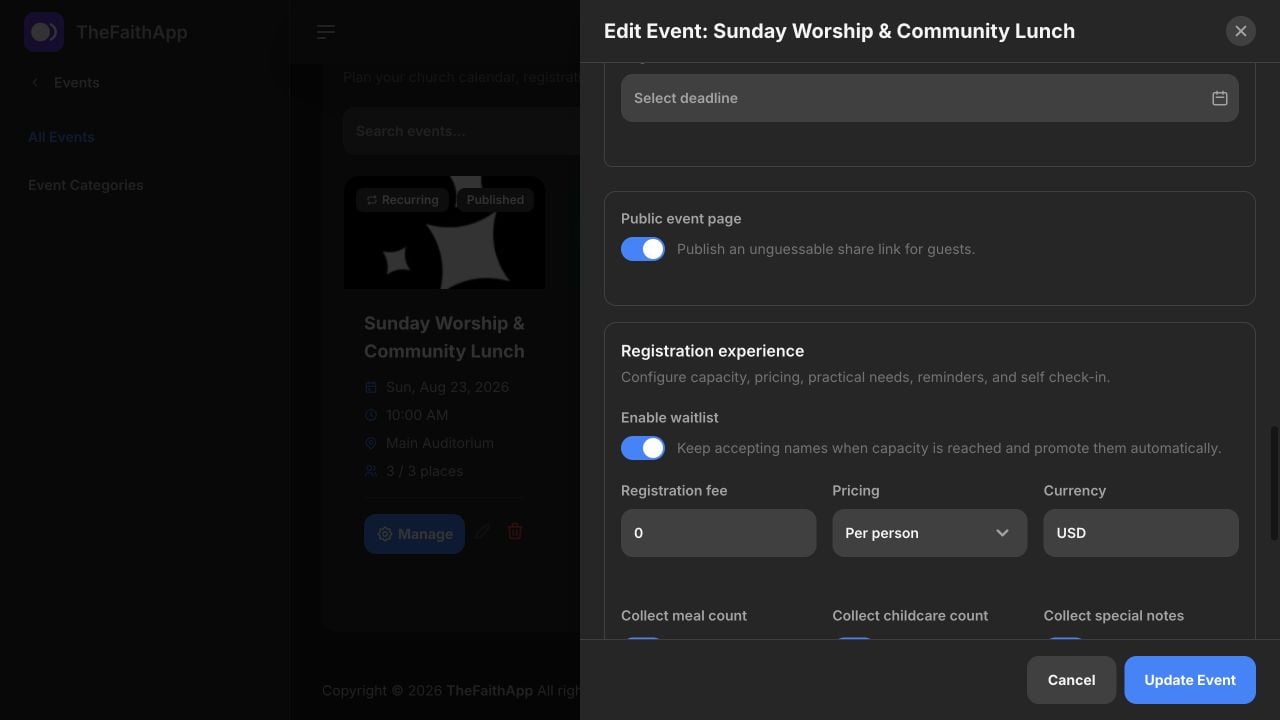
What You Can Set
- Whether registration is required
- Built-in registration or an external registration link
- Registration capacity
- Registration deadline
- Contact person name and email
- A fee per person or per registration
- A waitlist when an occurrence reaches capacity
- Meal count, childcare count, and special-note questions
- Reminder times before the event
- The member self-check-in window
Steps
- Open
Events. - Create a new event or edit an existing one.
- Turn on
Registration Required. - Choose the registration type.
- Add the capacity if you want to limit attendance.
- Turn on the waitlist if people should still be able to join after the available places are filled.
- Add a registration fee and currency when the event is paid.
- Choose any extra information your team needs, such as meals, childcare, or special notes.
- Add reminder times in minutes before the event. For example,
1440, 60sends reminders one day and one hour before it starts. - Choose when member self-check-in opens and closes.
- Set the registration deadline and contact person.
- Save the event.
Notes
- Built-in registration is best when you want attendance managed inside the platform experience.
- Use an external registration link if your church already relies on another signup tool.
- Paid registration becomes available after the church completes Stripe setup.
- Capacity counts the person registering and every additional guest in their party.
- When a registration is cancelled, the earliest waitlisted party that fits the available places is promoted automatically.
Public Event Pages
A public event page gives guests an unguessable link they can open without signing in.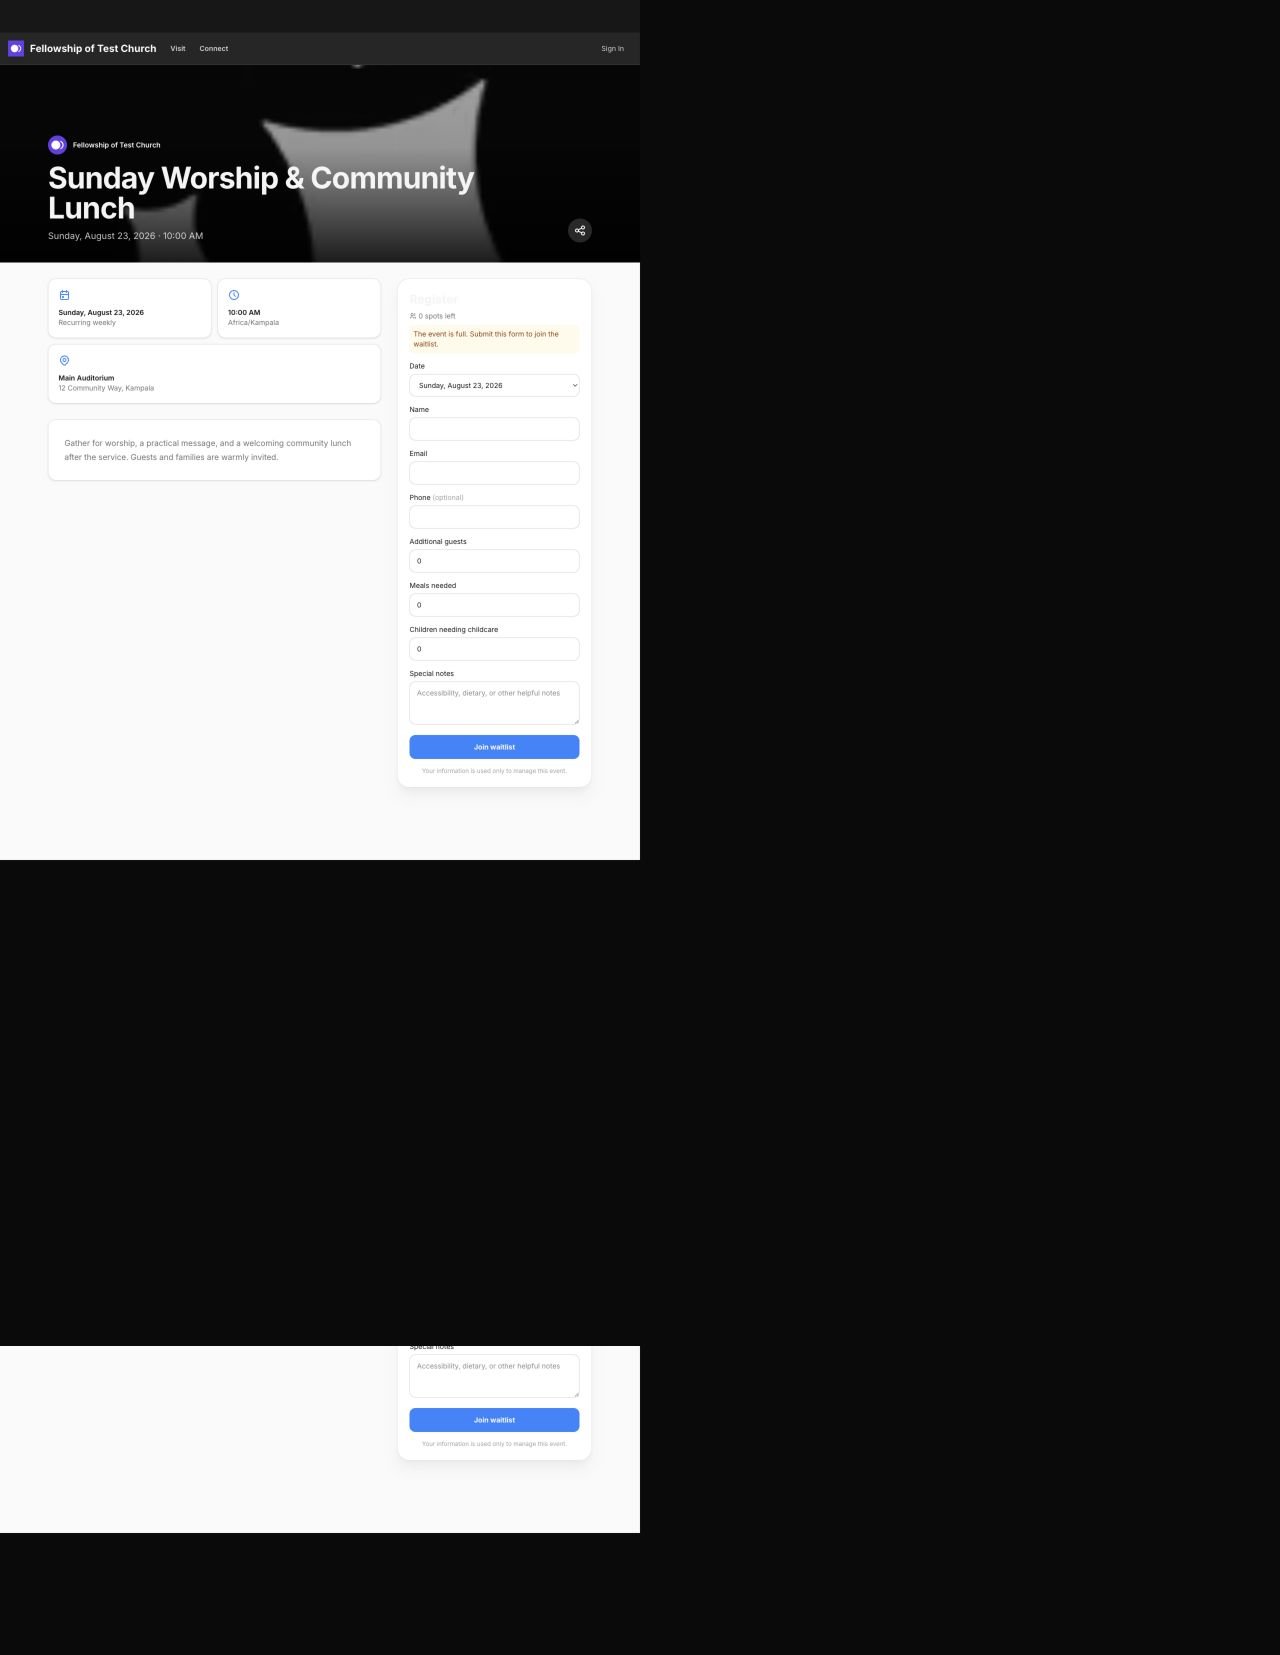
Share an Event
- Create or edit the event.
- Turn on
Public event. - Save the event.
- Select the event in the calendar or list to open its details drawer.
- Select
Copy public link. - Open the copied link once before distributing it.
Manage Attendees and Check In
Select an event in the calendar or list, then openRegistrations or Check-in in its details drawer.
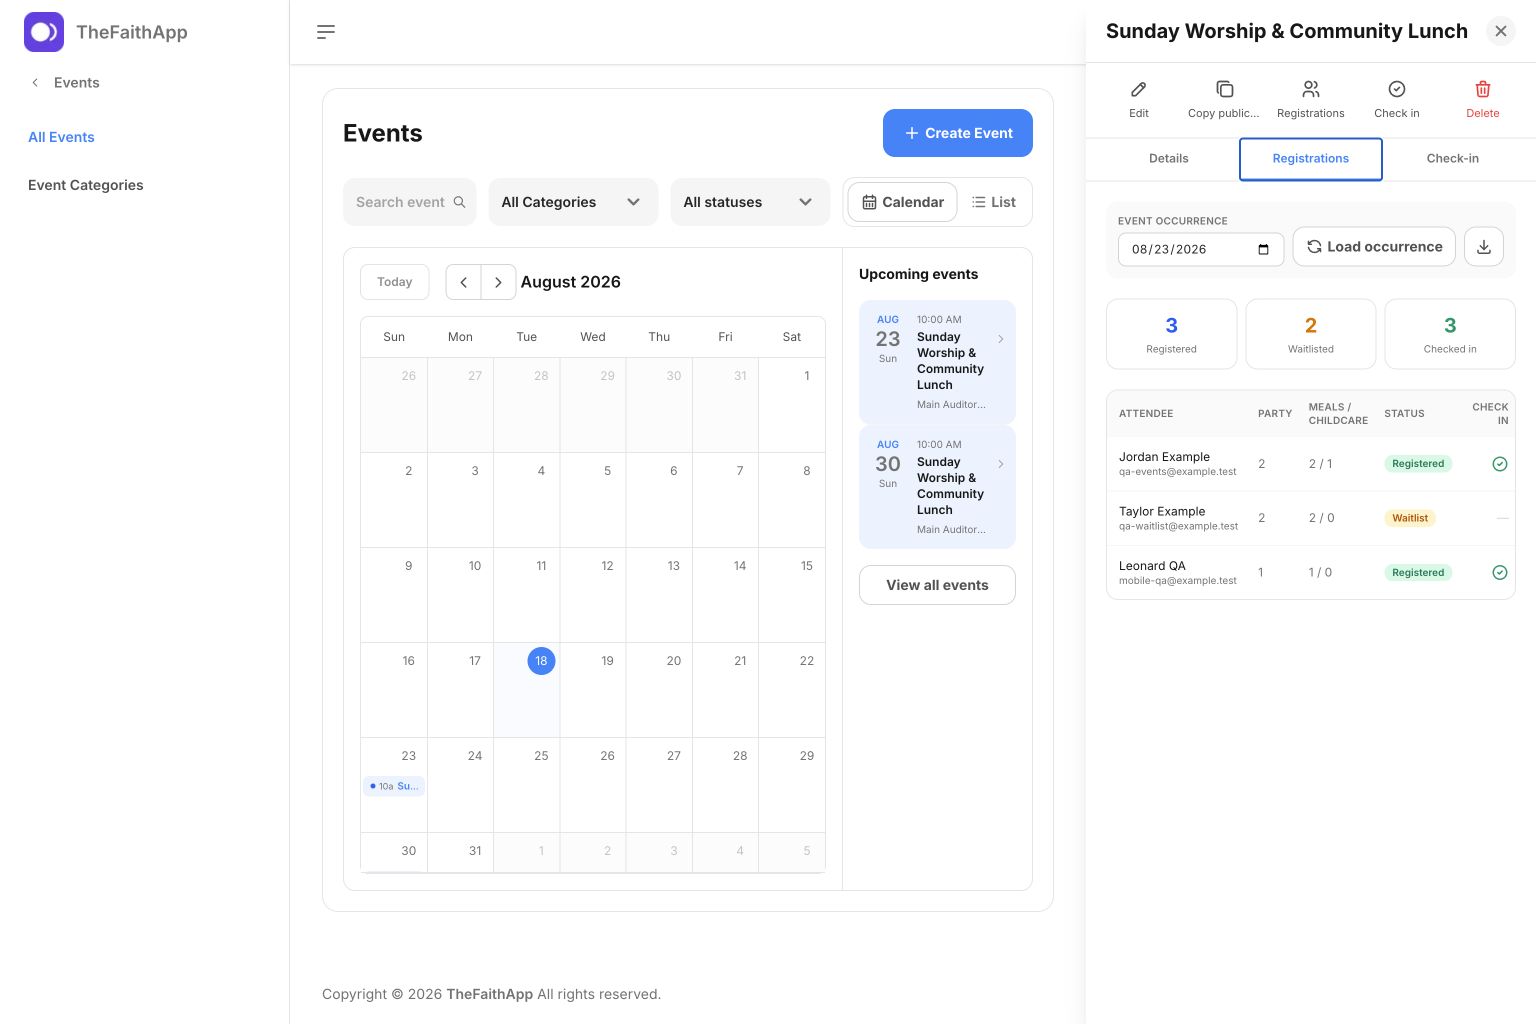
What You Can Review
- Registered and waitlisted people
- Total occupied places, including guests
- Checked-in attendance
- Meal and childcare totals
- Payment state
- Special notes
Work With an Occurrence
- Open the
Registrationstab in the event details drawer. - Choose the occurrence date.
- Select
Load occurrence. - Review the totals and attendee list.
- Select
Check inas people arrive, or switch to theCheck-intab for a focused check-in desk. - Cancel a registration only after confirming the attendee’s request.
- Select
Exportto download the occurrence list as a CSV file.
Member Registration in the Mobile App
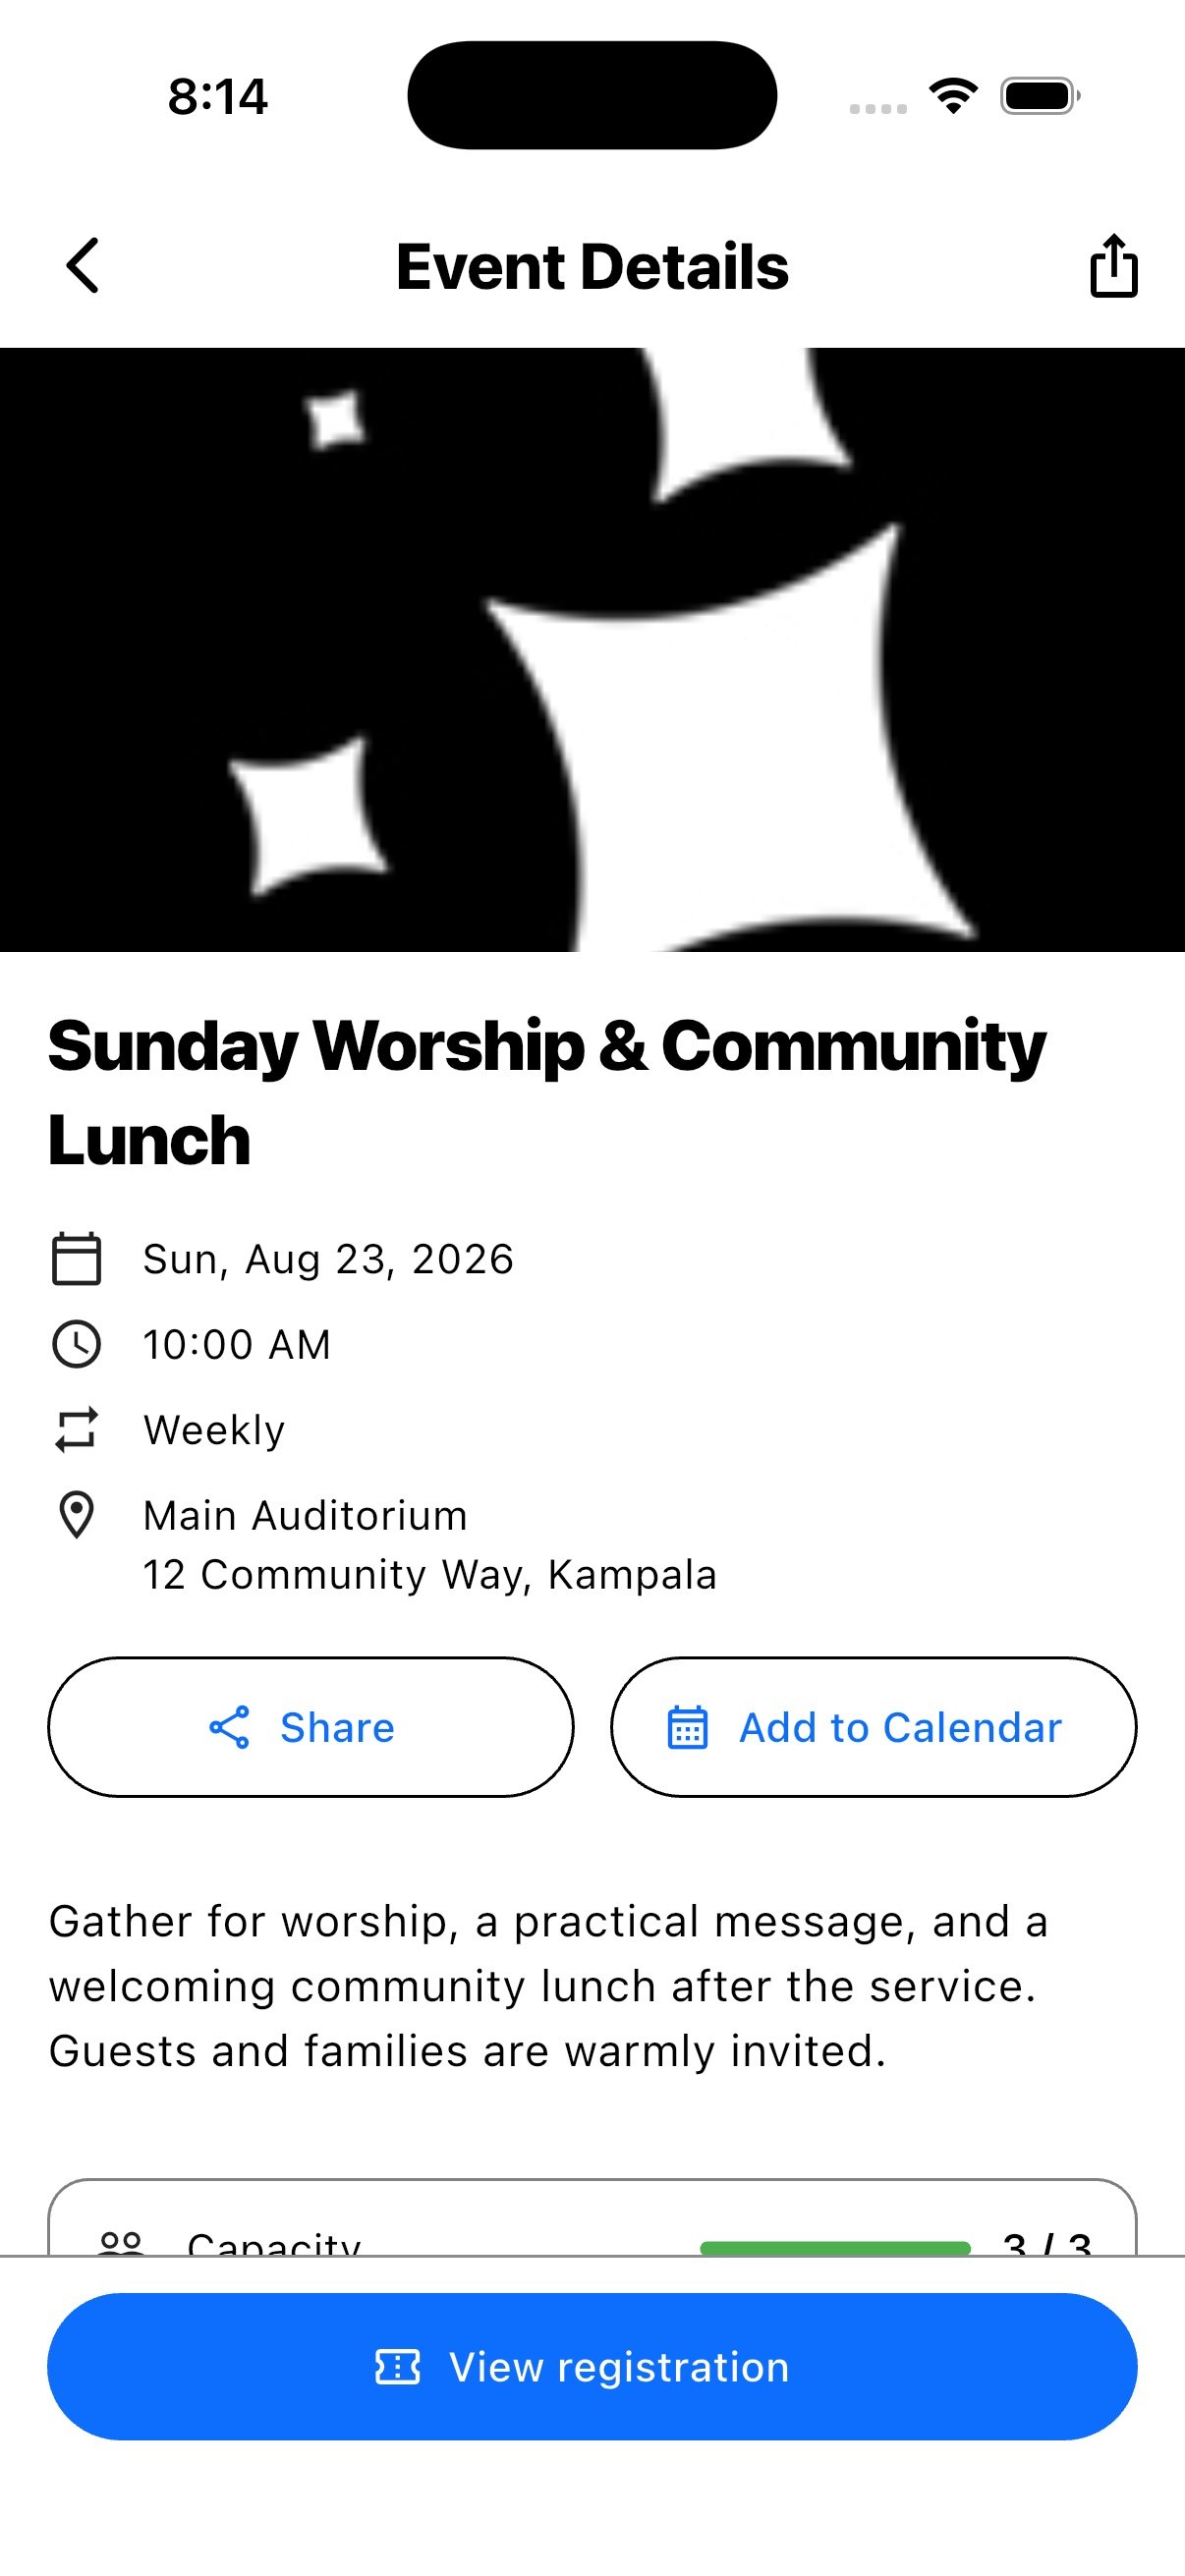
Members can openEvents from Quick actions on the mobile Home screen, then:
- Browse an agenda or calendar
- Open event details and add the event to their calendar
- Register themselves and additional guests
- Enter meal, childcare, and special-note information when requested
- Pay securely in the app for paid events
- Review
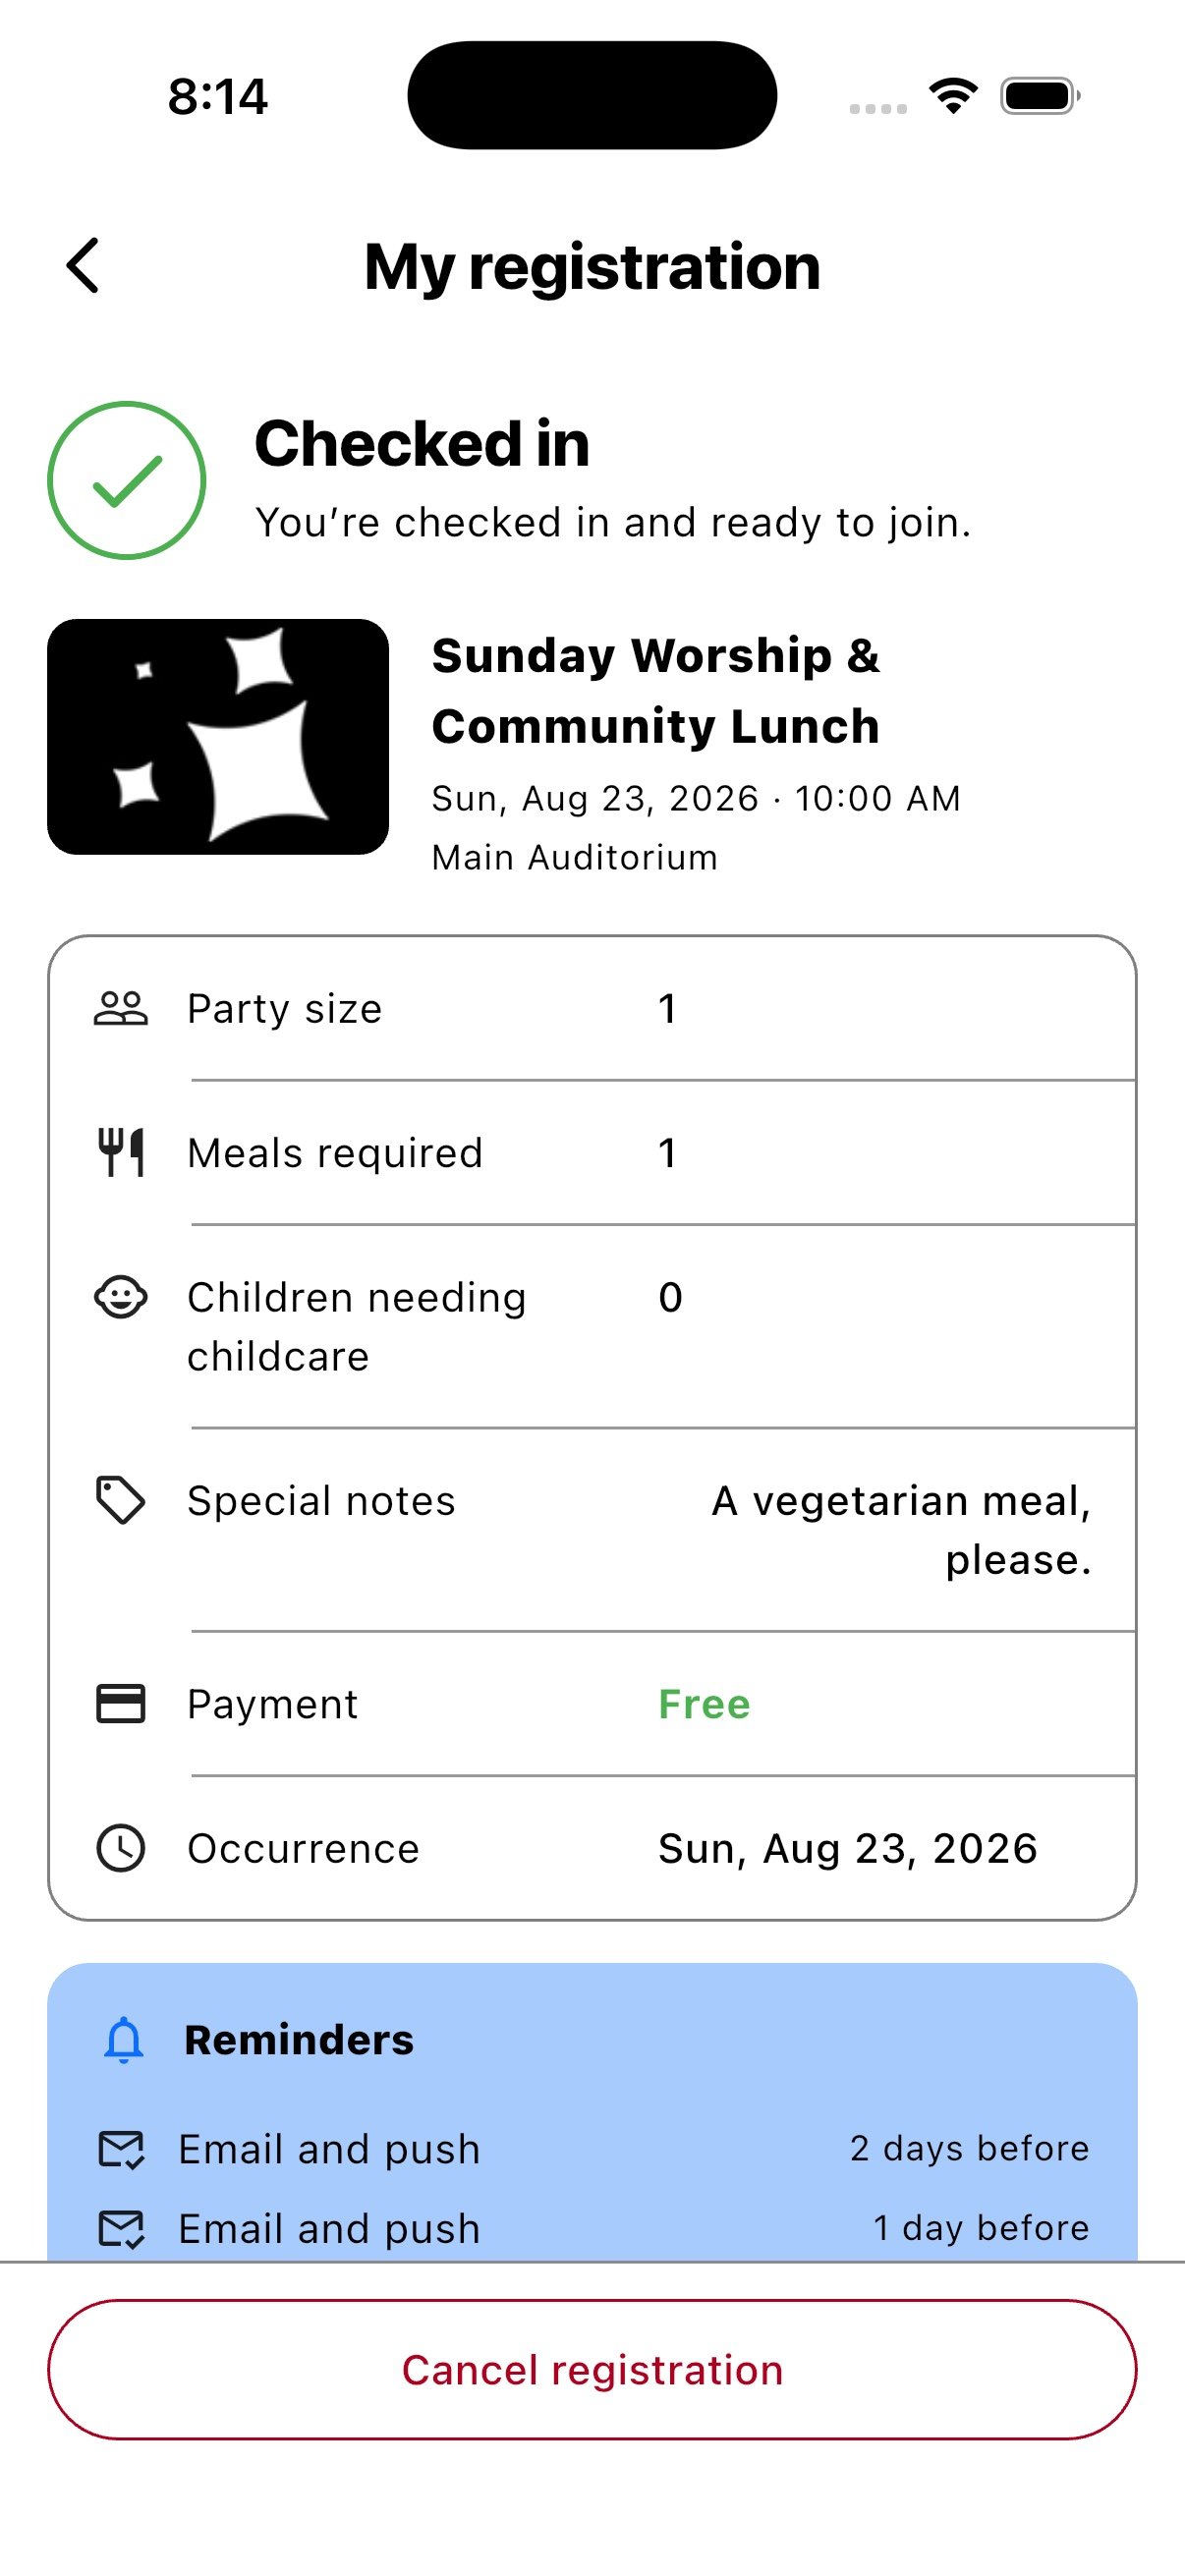
My registrations - Open a registration to see its current status, party needs, payment, reminders, and check-in timing
- Cancel a registration
- Check themselves in during the event window
- Share a public event
Volunteer Ministries
Use Volunteer Ministries to group opportunities under larger service teams.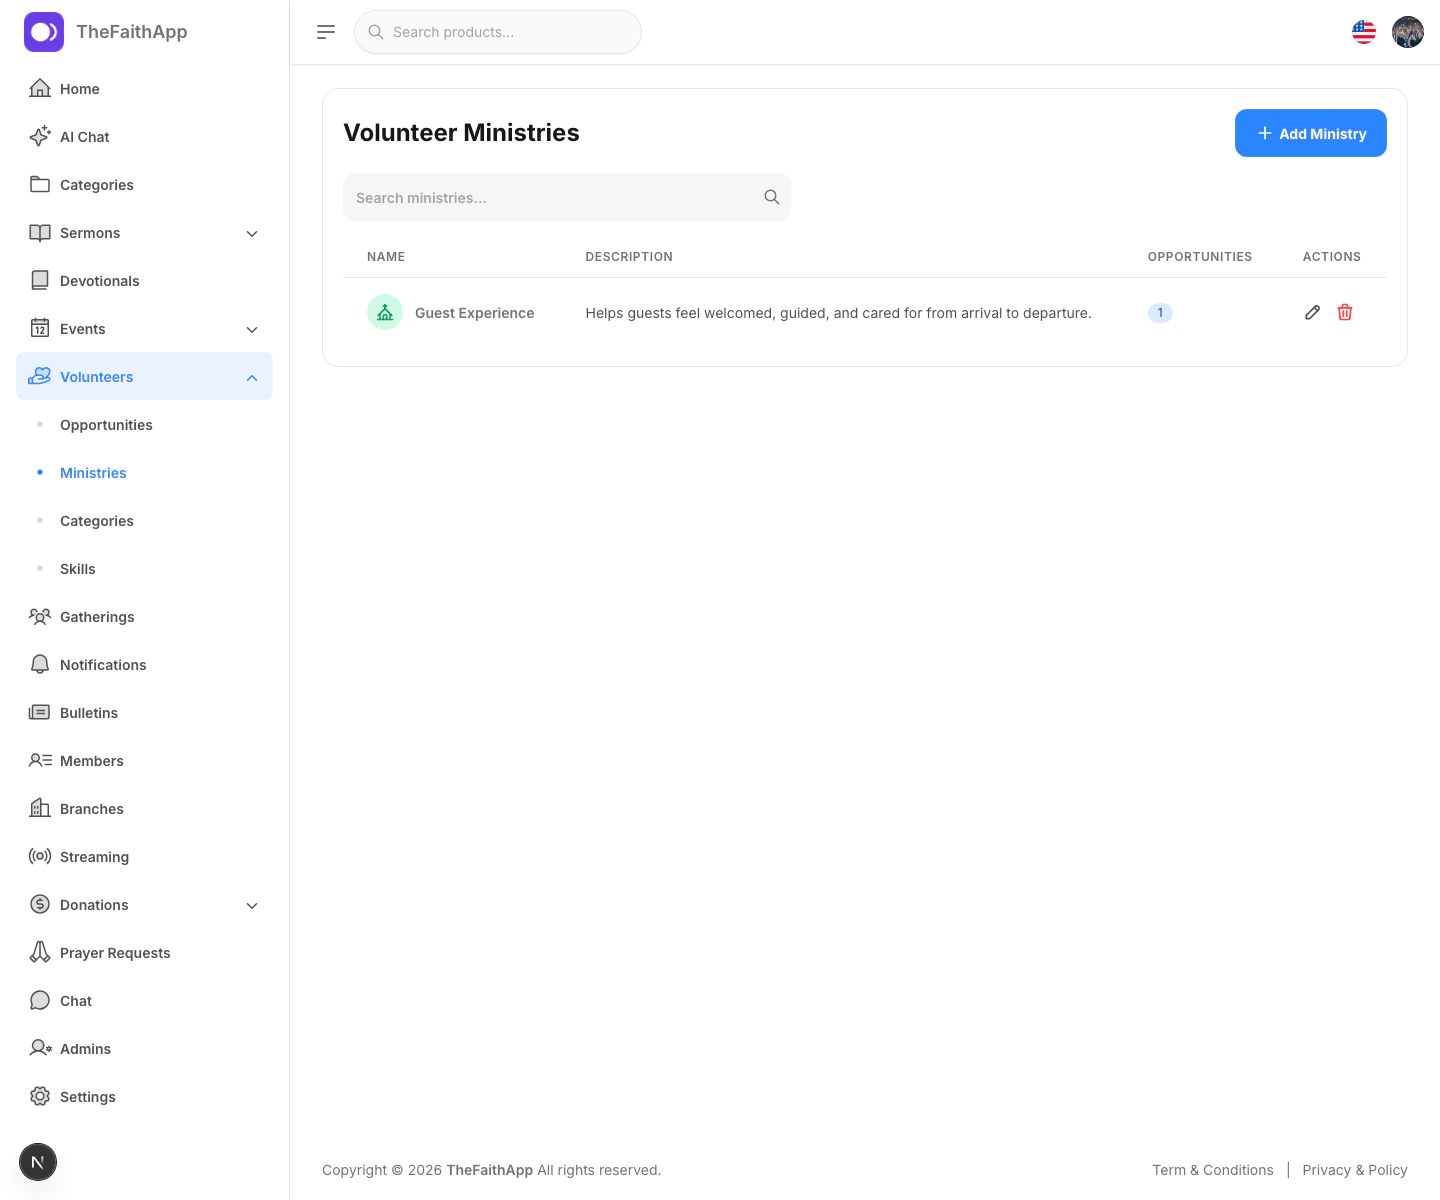
What You Can Do
- Create a ministry
- Add a short description
- Search ministries
- Review how many opportunities belong to each ministry
- Edit or delete ministries
Steps
- Open
Volunteers. - Select
Ministries. - Click
Add Ministry. - Enter the ministry name and description.
- Save the ministry.
Volunteer Categories
Use Volunteer Categories to organize opportunities by type of service.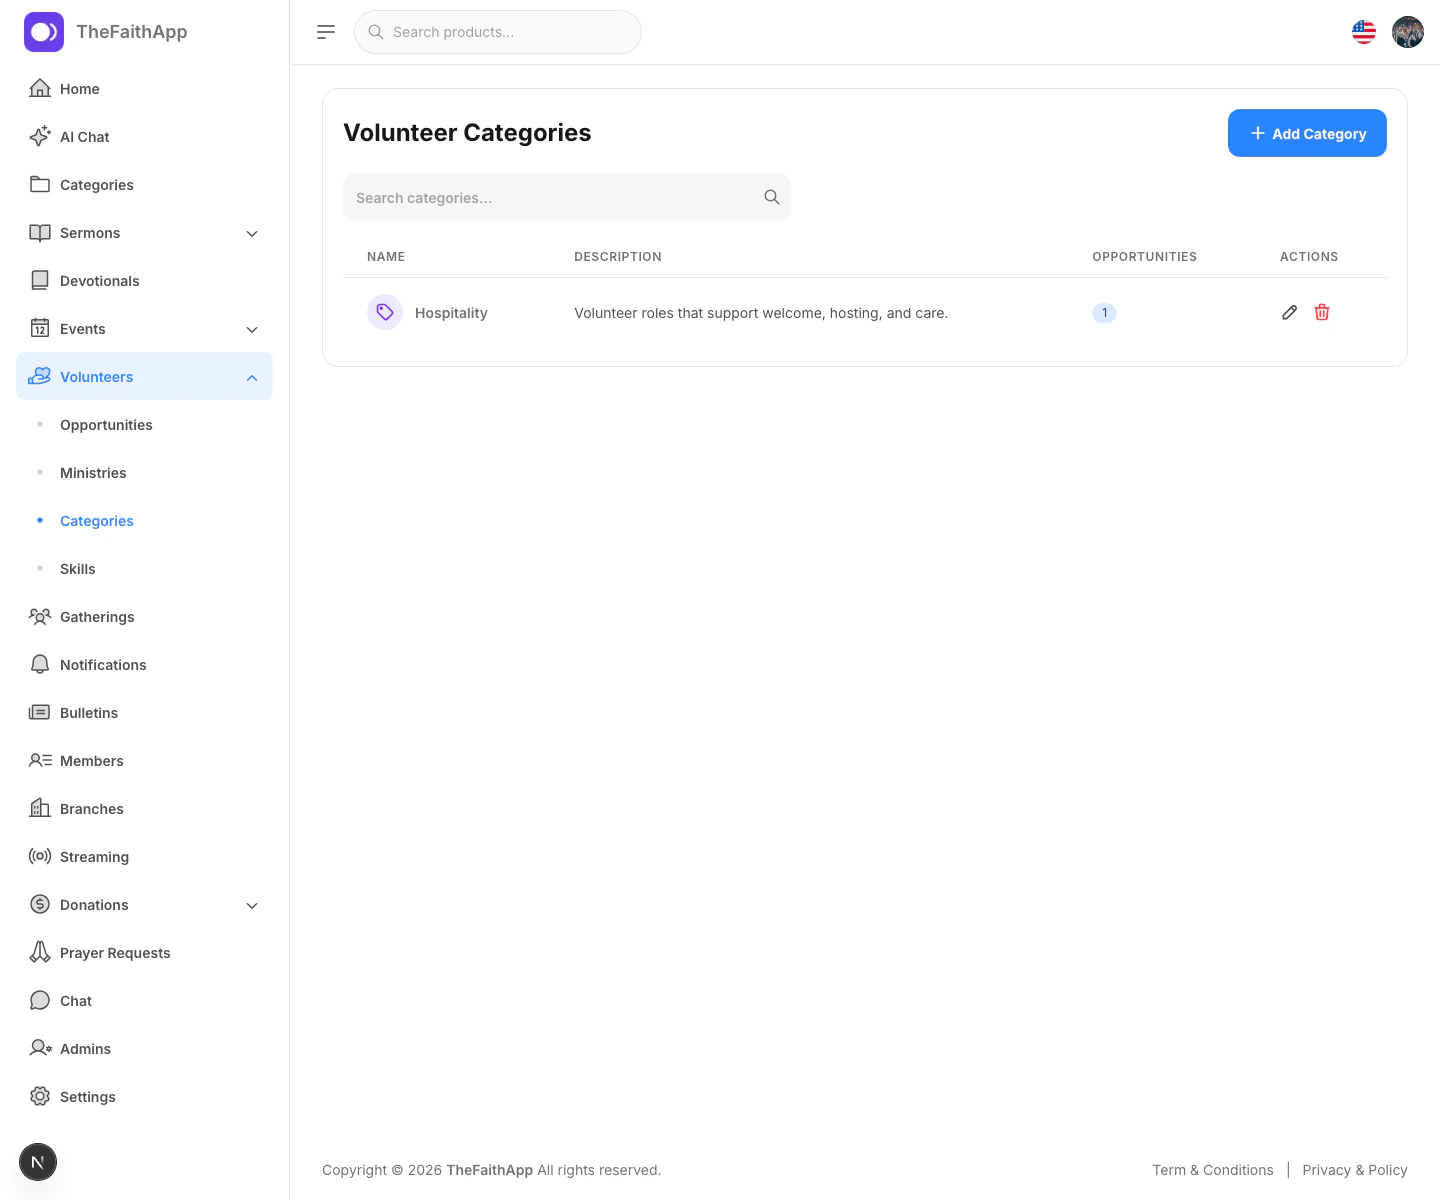
What You Can Do
- Create categories for different service areas
- Search categories
- Review opportunity counts by category
- Edit or delete categories
Steps
- Open
Volunteers. - Select
Categories. - Click
Add Category. - Enter the category name and description.
- Save the category.
Volunteer Skills
Use Volunteer Skills to track the abilities that can be matched to volunteer opportunities.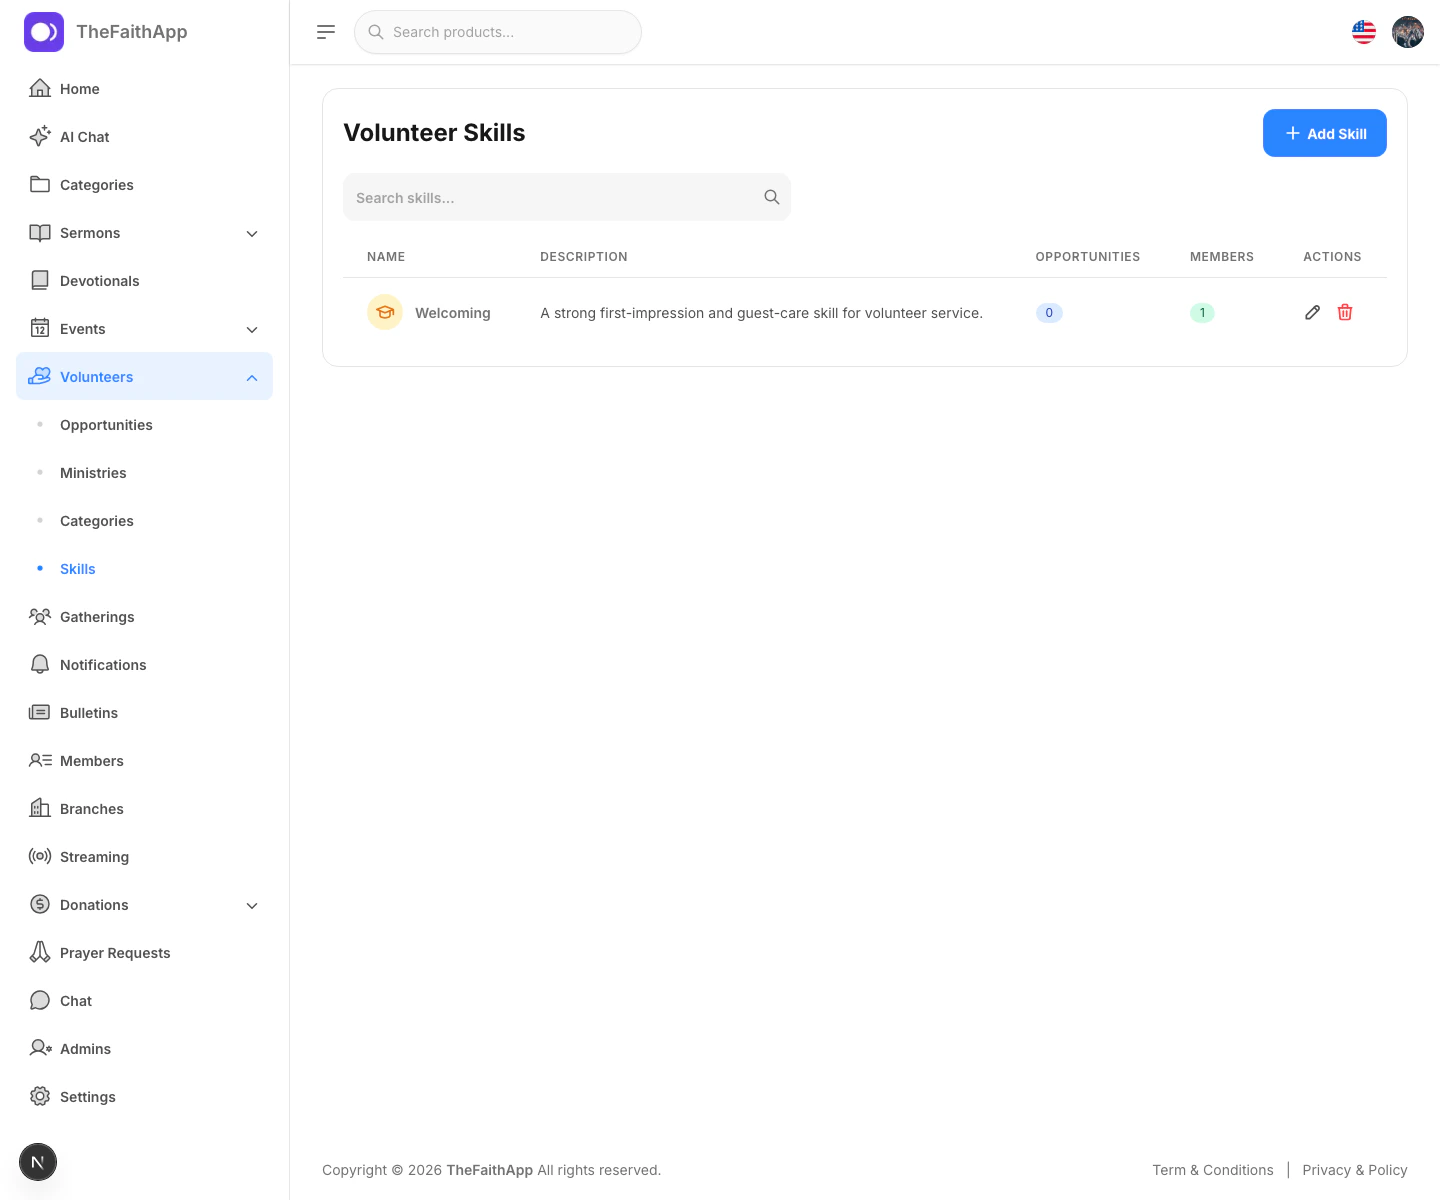
What You Can Do
- Create a skill
- Describe what the skill is used for
- Search skills
- Review how many opportunities and members are linked to each skill
- Edit or delete skills
Steps
- Open
Volunteers. - Select
Skills. - Click
Add Skill. - Enter the skill name and description.
- Save the skill.
Volunteer Opportunities
Use Volunteer Opportunities to publish open serving roles and manage needed capacity.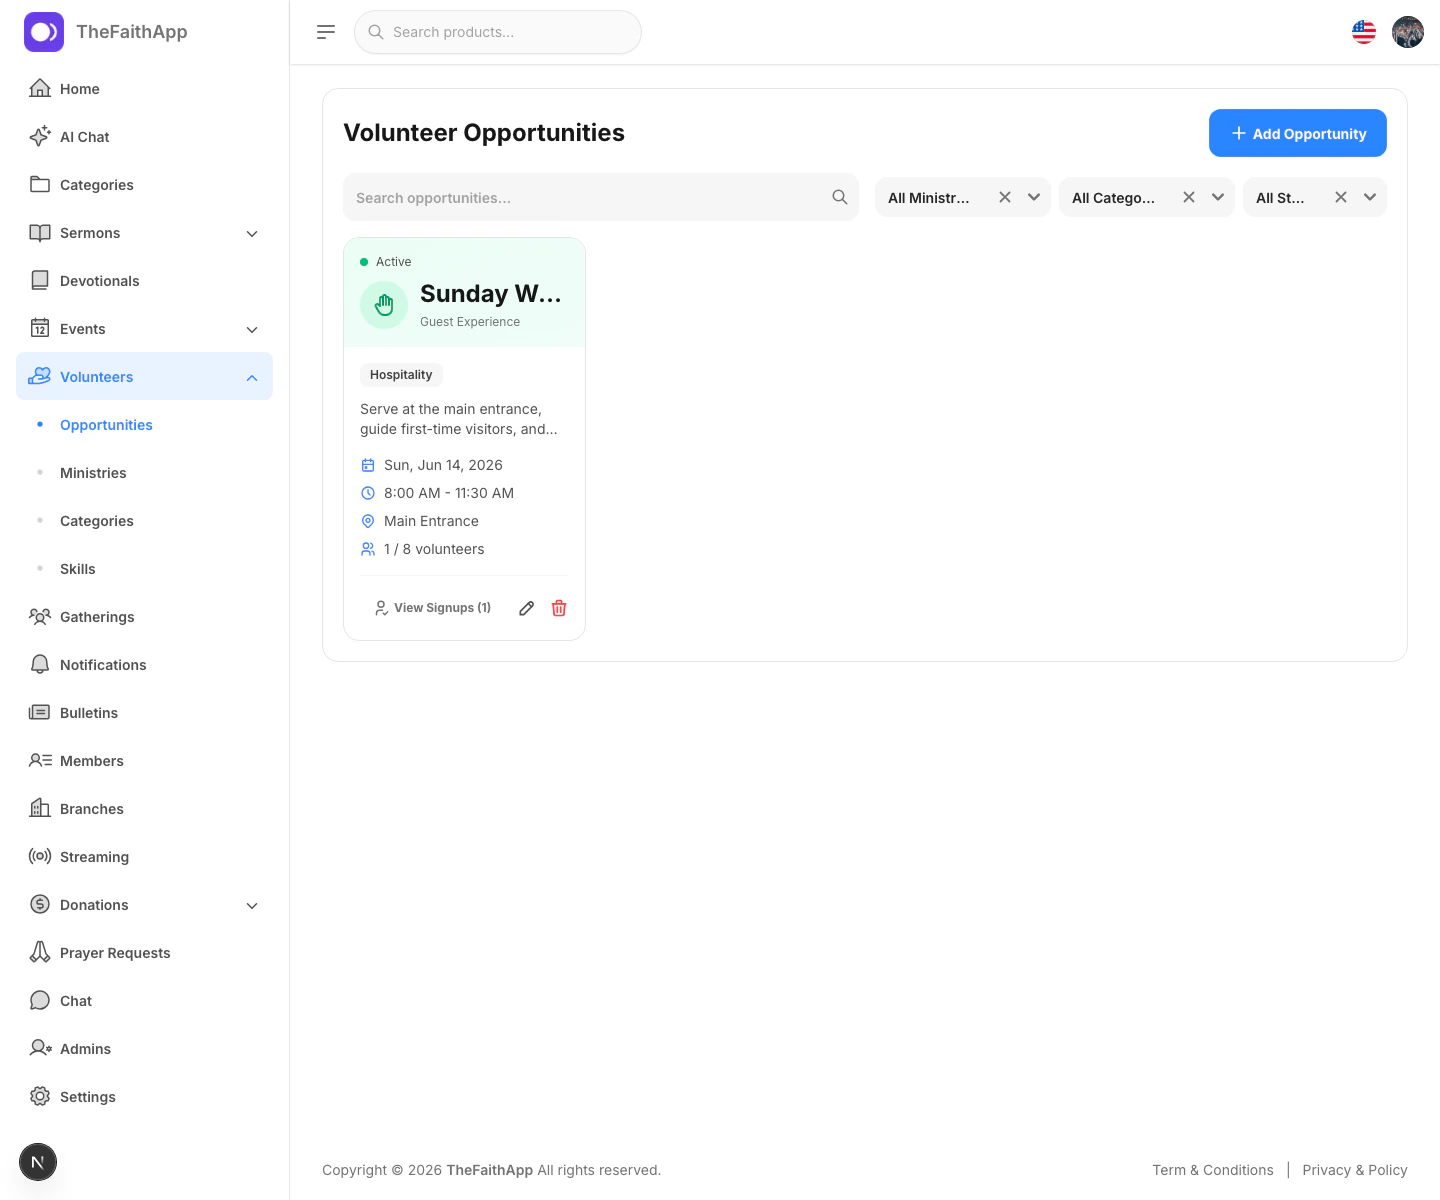
What You Can Do
- Create a new opportunity
- Assign it to a ministry and category
- Set location, date, and time
- Define how many volunteers are needed
- Require approval before a signup is accepted
- Filter by ministry, category, or status
- Open signup requests for review
- Edit or delete opportunities
Opportunity Details
- Title and description
- Ministry
- Category
- Location
- Date and time
- Volunteer slots needed
- Status
- Approval requirement
Steps
- Open
Volunteers. - Select
Opportunities. - Click
Add Opportunity. - Enter the opportunity details.
- Choose the ministry and category if needed.
- Set the date, time, and location.
- Add the number of volunteer slots.
- Turn on approval if your team wants to review requests first.
- Save the opportunity.
Notes
- Opportunity cards show the number of filled and open volunteer spots.
- Active opportunities are easier for team leads to review from one page.
Volunteer Signups
Use the signups drawer to review volunteer requests for a specific opportunity.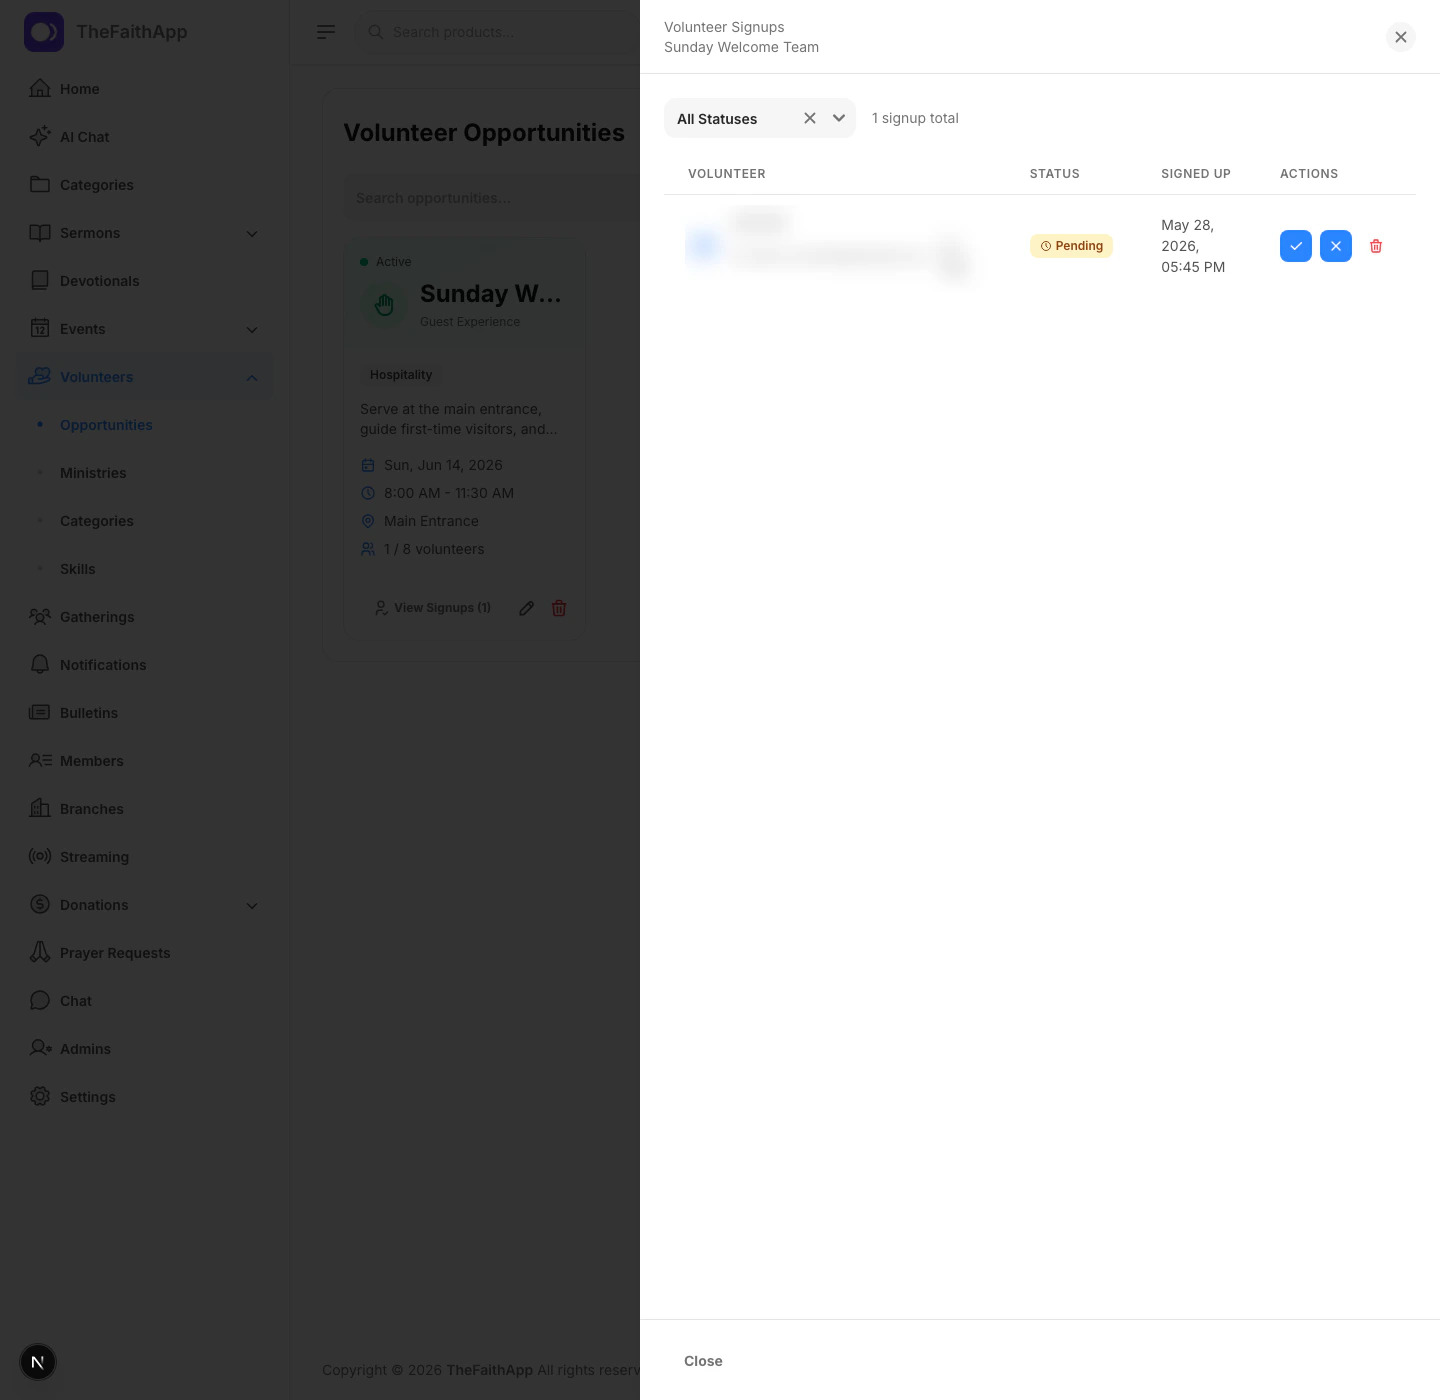
What You Can Do
- Review incoming signups
- Filter signups by status
- Approve or reject pending requests
- Remove a signup when needed
Steps
- Open
Volunteers. - Select
Opportunities. - Find the opportunity you want to review.
- Click
View Signups. - Use the status filter if you want to narrow the list.
- Approve or reject pending requests from the actions column.
Notes
- Opportunity cards show the current signup count before you open the drawer.
- Approval-based workflows are useful when volunteer roles have limited spaces or need team-lead review first.