> ## Documentation Index
> Fetch the complete documentation index at: https://docs.thefaithapp.com/llms.txt
> Use this file to discover all available pages before exploring further.
# New Visitor Journey
> Set up a welcoming guest page, collect Connect Cards, and coordinate thoughtful follow-up from one Visitor Inbox.
The New Visitor Journey gives first-time guests a simple way to learn what to
expect, plan a visit, or ask for help. Guests can use the public pages without
creating an account or signing in.
When a guest submits a form, the response appears in **Visitor Inbox** so your
team can assign an owner, follow up, and keep the full story in one place.
## Before You Start
Make sure you have:
* Access to **Branches** and **Visitor Inbox**.
* At least one branch with its address and active gathering times added.
* Arrival, parking, kids, accessibility, and welcome-desk information for each
branch.
* A public welcome image address if you want to show a custom photo.
* A church-owned Handwrytten account if your team wants to send physical
welcome cards.
Read the public page as if you were arriving at your church for the first
time. Details that feel obvious to regular members can be very helpful to a
new guest.
## 1. Prepare Each Branch
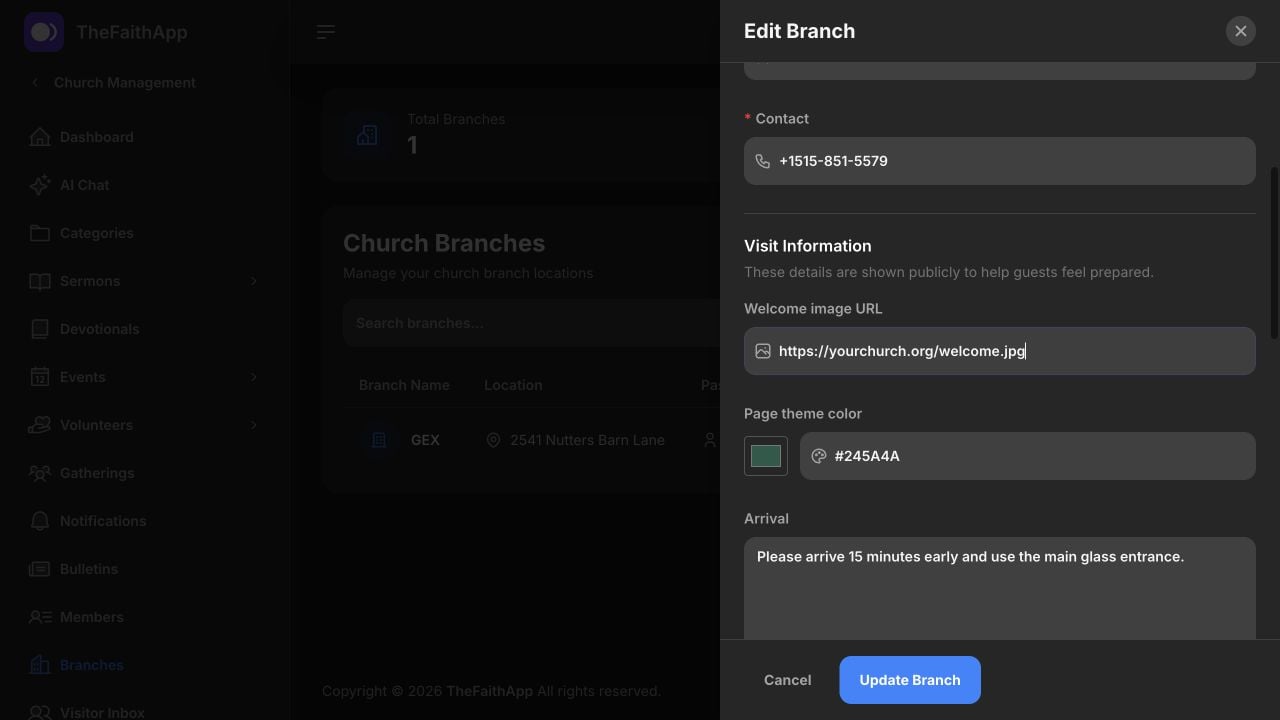
The public guest pages use the information saved on the selected branch.
 ### Steps
1. Open **Branches**.
2. Find the branch you want to update and select its edit button.
3. Scroll to **Visit Information**.
4. Add clear arrival, parking, kids, accessibility, welcome-desk, public
contact, and map information.
5. Paste a public **Welcome image URL** if you want to show a custom photo.
6. Choose a **Page theme color** that works with your church branding.
7. Select **Update Branch**.
### Welcome Image Tips
* Use a bright, welcoming photo of the church, entrance, or community.
* The image must already be online and have a public address beginning with
`https://`.
* If you do not manage your church website, ask the person who does to give you
the image address.
* Do not use a private photo link that requires someone to sign in.
Do not place private staff details or sensitive pastoral information on the
public page. Only add contact information that the church is comfortable
sharing publicly.
## 2. Preview the Guest Experience
Use the public page to check exactly what a guest will see before you share it.
### Steps
1. Open **Branches**.
2. Find the branch you want to update and select its edit button.
3. Scroll to **Visit Information**.
4. Add clear arrival, parking, kids, accessibility, welcome-desk, public
contact, and map information.
5. Paste a public **Welcome image URL** if you want to show a custom photo.
6. Choose a **Page theme color** that works with your church branding.
7. Select **Update Branch**.
### Welcome Image Tips
* Use a bright, welcoming photo of the church, entrance, or community.
* The image must already be online and have a public address beginning with
`https://`.
* If you do not manage your church website, ask the person who does to give you
the image address.
* Do not use a private photo link that requires someone to sign in.
Do not place private staff details or sensitive pastoral information on the
public page. Only add contact information that the church is comfortable
sharing publicly.
## 2. Preview the Guest Experience
Use the public page to check exactly what a guest will see before you share it.
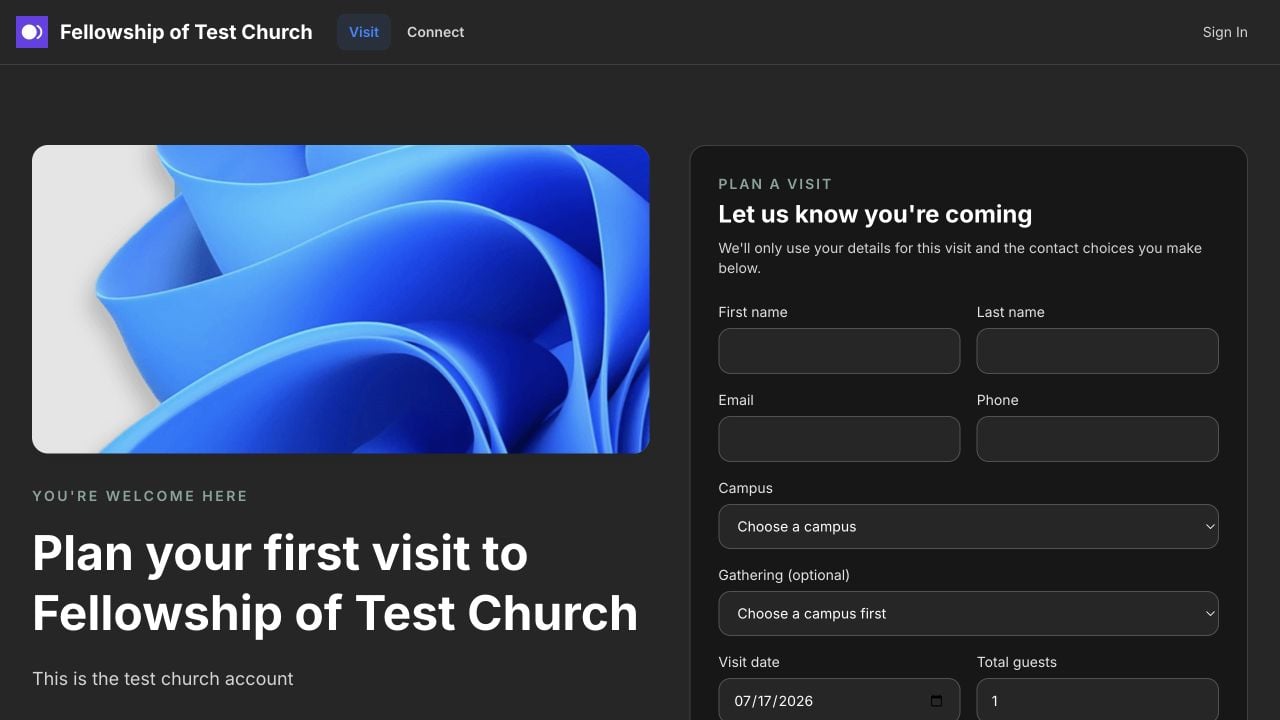 Check that:
* The church name, photo, and theme color look correct.
* The address, arrival, parking, kids, and accessibility details are easy to
understand.
* The correct branches and gathering times appear.
* The form works well on both a phone and a computer.
* The contact-permission choices are clear.
Guests do not need an account. They can complete the form directly from the
public page, even though a **Sign In** option may also appear in the header.
## 3. Share or Embed the Pages
Open **Visitor Inbox** and select **Generate visitor links**.
Check that:
* The church name, photo, and theme color look correct.
* The address, arrival, parking, kids, and accessibility details are easy to
understand.
* The correct branches and gathering times appear.
* The form works well on both a phone and a computer.
* The contact-permission choices are clear.
Guests do not need an account. They can complete the form directly from the
public page, even though a **Sign In** option may also appear in the header.
## 3. Share or Embed the Pages
Open **Visitor Inbox** and select **Generate visitor links**.
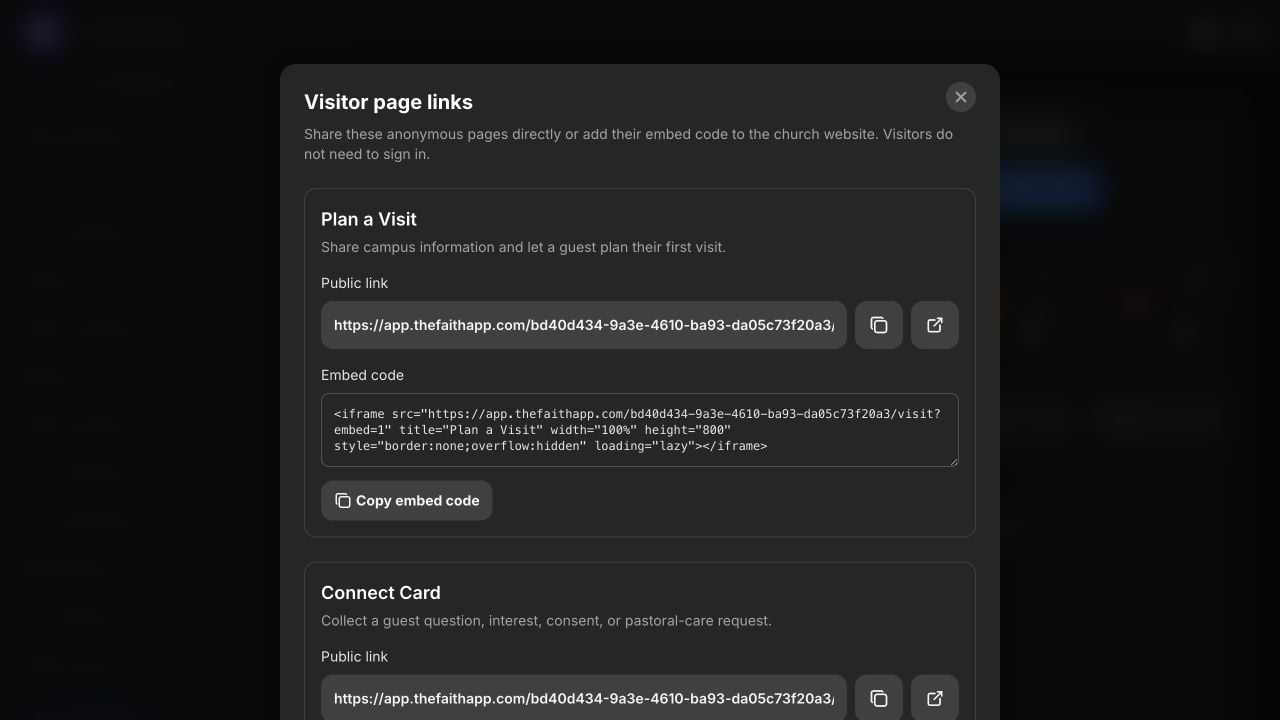 You will see two guest pages:
* **Plan a Visit** helps someone prepare for a service and choose a branch,
gathering, and planned visit date.
* **Connect Card** lets someone ask a question, request support, show interest
in a next step, or request a pastor conversation.
### Share a Direct Link
1. Select the copy button beside the page you want to share.
2. Paste the link into an email, message, social profile, QR code, or website
button.
3. Open the link yourself once to confirm that it works.
### Place a Form on Your Website
1. Copy the **Embed code** for the page you want.
2. Paste it into the part of your website that accepts custom HTML or embed
code.
3. Open the website on a phone and computer to check the size and spacing.
If you do not manage the website, send the complete embed code to the person
who does. They should paste it as supplied rather than changing the link
inside it.
## 4. Understand the Connect Card
The Connect Card is designed to feel welcoming and optional. Only a name and
one way to reach the guest are required.
You will see two guest pages:
* **Plan a Visit** helps someone prepare for a service and choose a branch,
gathering, and planned visit date.
* **Connect Card** lets someone ask a question, request support, show interest
in a next step, or request a pastor conversation.
### Share a Direct Link
1. Select the copy button beside the page you want to share.
2. Paste the link into an email, message, social profile, QR code, or website
button.
3. Open the link yourself once to confirm that it works.
### Place a Form on Your Website
1. Copy the **Embed code** for the page you want.
2. Paste it into the part of your website that accepts custom HTML or embed
code.
3. Open the website on a phone and computer to check the size and spacing.
If you do not manage the website, send the complete embed code to the person
who does. They should paste it as supplied rather than changing the link
inside it.
## 4. Understand the Connect Card
The Connect Card is designed to feel welcoming and optional. Only a name and
one way to reach the guest are required.
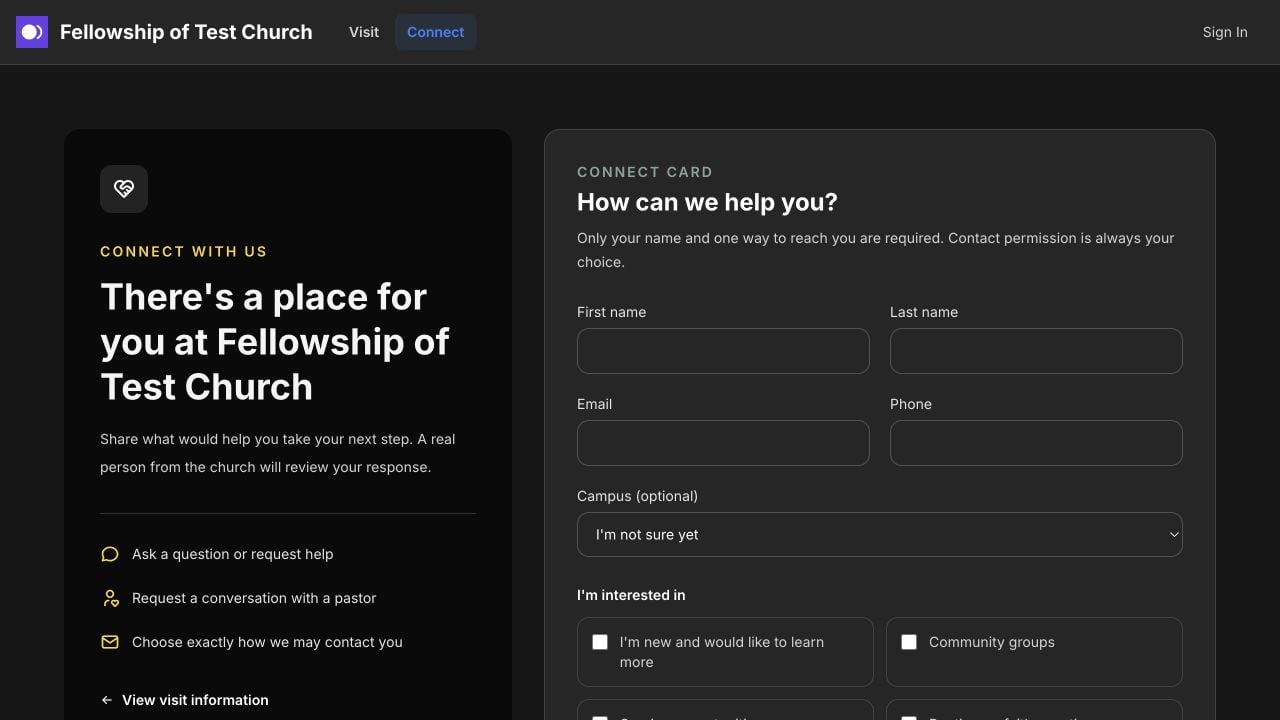 A guest can:
* Select an area of interest.
* Add a question or message.
* Choose a preferred contact method.
* Allow email, text, or phone contact separately.
* Ask for a pastor conversation.
* Choose **No follow-up** when they do not want to be contacted.
Asking for a pastor conversation does not automatically give permission for
marketing messages.
## 5. Work From Visitor Inbox
Every submitted Plan a Visit form or Connect Card appears in **Visitor Inbox**.
A guest can:
* Select an area of interest.
* Add a question or message.
* Choose a preferred contact method.
* Allow email, text, or phone contact separately.
* Ask for a pastor conversation.
* Choose **No follow-up** when they do not want to be contacted.
Asking for a pastor conversation does not automatically give permission for
marketing messages.
## 5. Work From Visitor Inbox
Every submitted Plan a Visit form or Connect Card appears in **Visitor Inbox**.
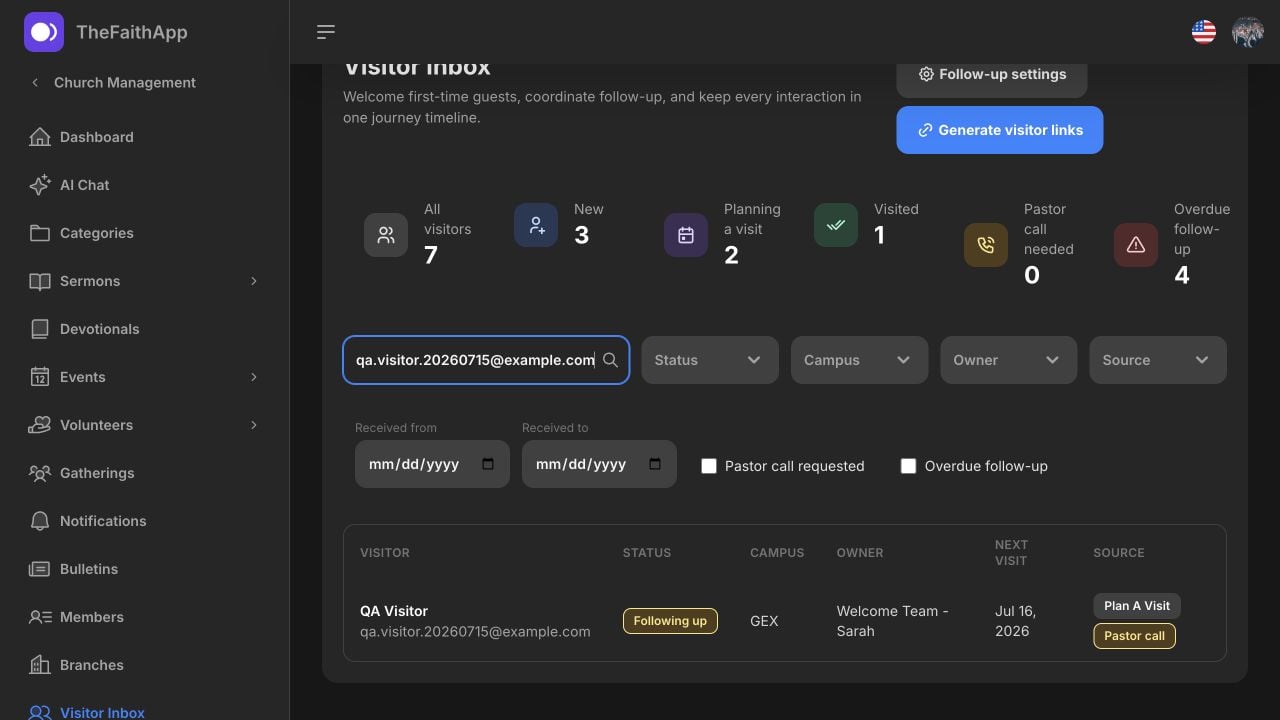 Use the search box and filters to find someone by:
* Name, email address, or phone number.
* Journey status.
* Branch, follow-up owner, or form source.
* Submission date.
* Pastor-call request.
* Overdue follow-up.
The cards at the top give your team a quick view of new visitors, planned
visits, completed visits, pastor-call requests, and overdue work.
### Helpful Terms
* **Status** shows where the guest is in the journey, such as new, visit
planned, visited, or following up.
* **Owner** is the staff member responsible for the next personal response.
* **Overdue** means a staff follow-up task has passed its due date and is not
complete.
## 6. Follow Up With One Visitor
Select a visitor row to open their details.
Use the search box and filters to find someone by:
* Name, email address, or phone number.
* Journey status.
* Branch, follow-up owner, or form source.
* Submission date.
* Pastor-call request.
* Overdue follow-up.
The cards at the top give your team a quick view of new visitors, planned
visits, completed visits, pastor-call requests, and overdue work.
### Helpful Terms
* **Status** shows where the guest is in the journey, such as new, visit
planned, visited, or following up.
* **Owner** is the staff member responsible for the next personal response.
* **Overdue** means a staff follow-up task has passed its due date and is not
complete.
## 6. Follow Up With One Visitor
Select a visitor row to open their details.
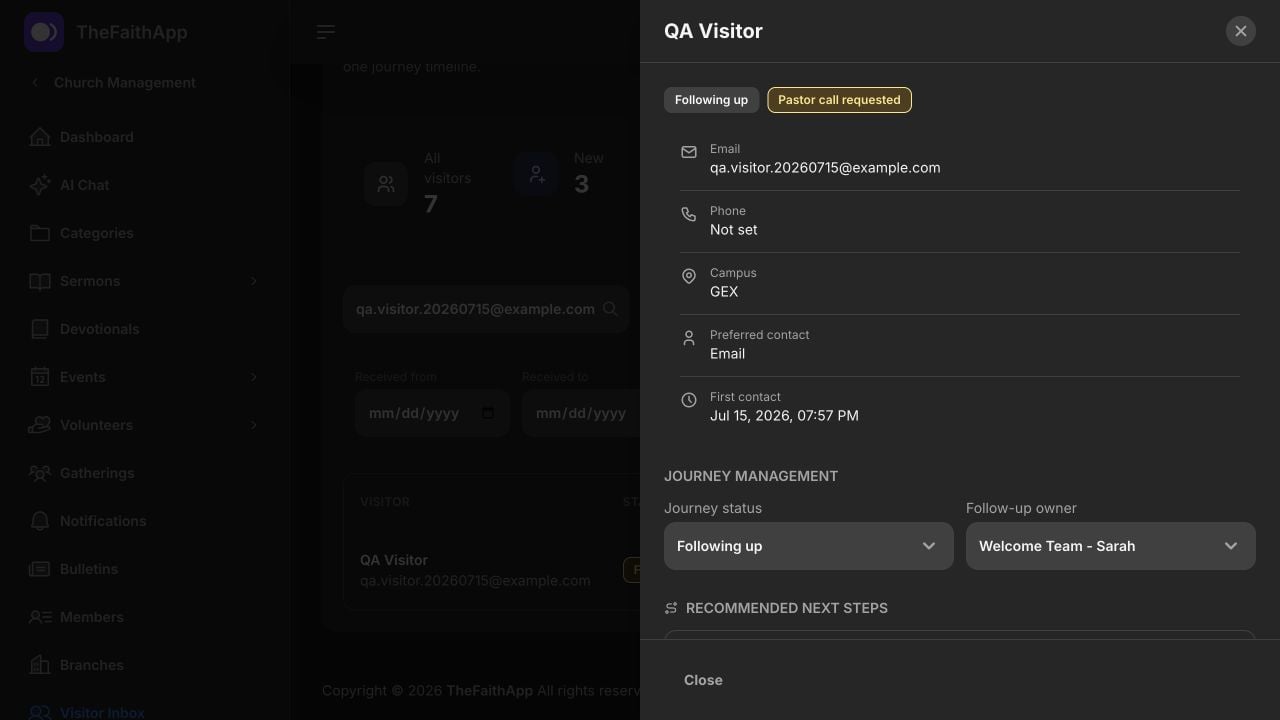 From the visitor details, staff can:
* Assign or change the follow-up owner.
* Update the journey status.
* Review the preferred contact method and permission before reaching out.
* Check in a planned visit or record a no-show.
* Add private staff notes.
* Create, reassign, pause, resume, skip, or complete follow-up tasks.
* Review recommended next steps and the full journey timeline.
Before contacting someone, check both their preferred method and the permission
for that exact channel. Permission to email does not also give permission to
text or call.
## 7. Configure the Follow-Up Sequence
Select **Follow-up settings** in **Visitor Inbox** to decide what should happen
after a new form arrives.
From the visitor details, staff can:
* Assign or change the follow-up owner.
* Update the journey status.
* Review the preferred contact method and permission before reaching out.
* Check in a planned visit or record a no-show.
* Add private staff notes.
* Create, reassign, pause, resume, skip, or complete follow-up tasks.
* Review recommended next steps and the full journey timeline.
Before contacting someone, check both their preferred method and the permission
for that exact channel. Permission to email does not also give permission to
text or call.
## 7. Configure the Follow-Up Sequence
Select **Follow-up settings** in **Visitor Inbox** to decide what should happen
after a new form arrives.
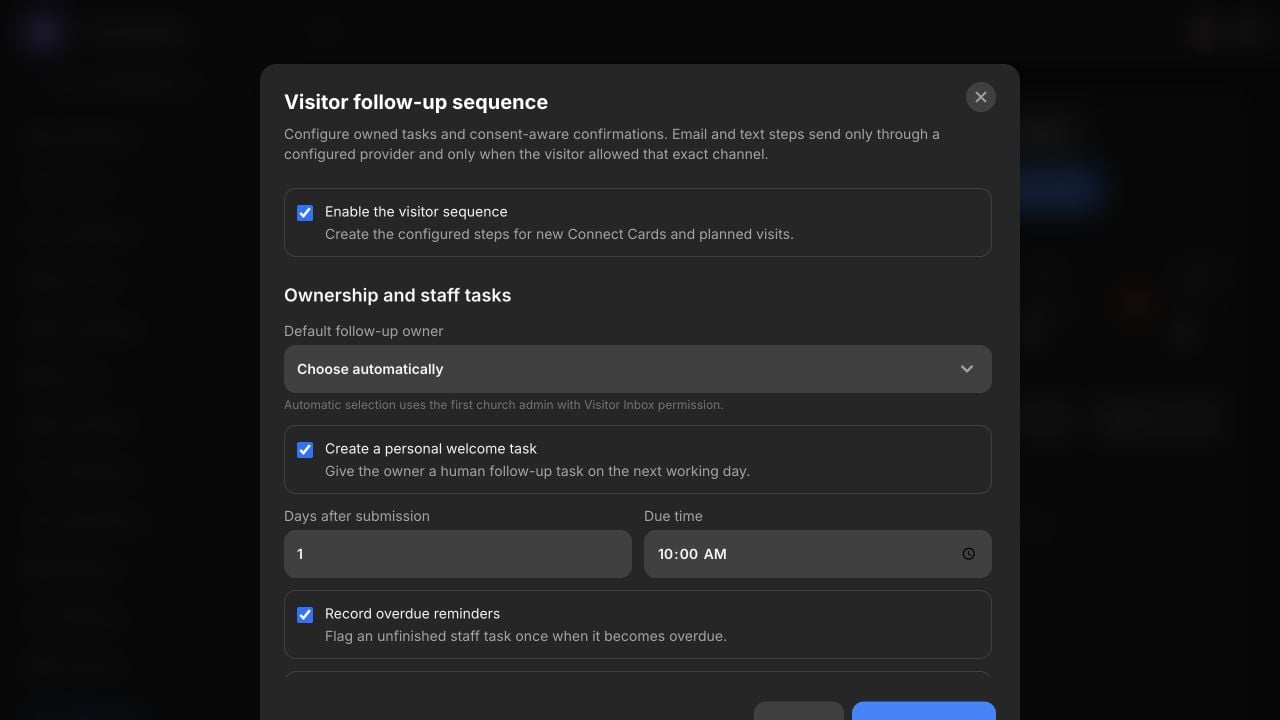 You can configure:
* A default follow-up owner.
* A personal welcome task and its due time.
* Overdue reminders.
* An immediate pastor-call task when requested.
* Confirmation email and text wording.
* An optional invitation to an upcoming newcomer event.
Select **Save sequence** after making changes.
Automated email and text messages are only sent when that delivery service is
configured and the guest allowed that exact contact channel. Permission is
checked again when the message is about to be sent.
Automation helps the team remember the next action. Personal and pastoral
follow-up still belongs to the assigned staff member.
## 8. Send a Handwritten Welcome Card
Churches with their own Handwrytten account can prepare and track a physical
card from the visitor details. Handwrytten bills the connected church account;
TheFaithApp never stores the payment card number.
### Connect the Church Account
1. Open **Settings**, then **Integrations**.
2. Select the **Handwrytten** card to open its setup drawer.
3. Copy an API key from the church's Handwrytten Integrations page.
4. Paste the key into TheFaithApp and select **Connect and test**.
5. Confirm whether the account shows **Test mode** or **Live mode**.
Test mode does not print or mail the card, although Handwrytten may place a
temporary payment authorization. Live mode charges the church's Handwrytten
account and sends the physical card.
### Prepare and Approve a Card
1. Open the visitor in **Visitor Inbox**.
2. Under **Handwritten cards**, select **Send a card**.
3. Confirm the visitor's postal address and record how they gave permission to
receive physical mail.
4. Choose a card design and handwriting style from the connected Handwrytten
account.
5. Review the message, closing, and church return address.
6. Review the completed card before selecting **Submit test card** or the live
mailing action.
The first saved design, message, handwriting style, and return address can be
reused as the church's visitor-card defaults.
Never send a physical card without the visitor's current permission. In live
mode, check the recipient, address, message, and charge warning carefully
before approving the order.
### Track the Result
The visitor details show each draft or order with its test/live state, current
status, message preview, and any provider error. Submitted orders can be
refreshed, and cancellation appears only when the order can still be canceled.
If Handwrytten definitely rejects an order, correct the account or card details
and create a new draft. If the result says it needs review, do not submit it
again until the Handwrytten order history has been checked.
## 9. Link a Visitor to the Member Directory
When the relationship is ready, open the visitor and select **Link existing
member** or **Convert to member**.
The app shows possible records with the exact same email address or phone
number so staff can review them first. It never merges those records
automatically.
The original visit, notes, tasks, and timeline stay in Visitor Inbox. Contact
permission is not copied to the member record, and converting a visitor does
not send account credentials.
## Recommended Next Steps
The guest confirmation page and visitor details only show actions that are
available for that church and person. After a visitor is linked to a member,
the member Home screen can also recommend useful actions such as:
* Choose a branch.
* Join an active Community Group.
* Explore an upcoming event.
* Find an active serving opportunity.
* Request prayer.
* Continue a requested pastor conversation.
Membership classes, baptism, and Bible-plan recommendations stay hidden until
those experiences are available and configured.
## Before You Share the Pages
* Preview both **Plan a Visit** and **Connect Card**.
* Test the pages on a phone and computer.
* Confirm every branch has current public information and gathering times.
* Submit one test response and confirm it appears in **Visitor Inbox**.
* Confirm the correct staff member receives ownership.
* Review the confirmation wording and contact permission.
* Close the test visitor and complete its test tasks when testing is finished.
## Common Questions
### Does a guest need to create an account?
No. The Plan a Visit and Connect Card forms work without sign-in.
### Does submitting a form create a member record?
No. It creates a visitor record. Staff choose later whether to link or convert
the visitor to a member.
### Can both forms be placed on our church website?
Yes. Use the embed code shown under **Generate visitor links**, or share the
direct links from buttons on your website.
### What happens if two records have the same email address or phone number?
The app shows a possible match for staff to review. It does not automatically
merge or delete either record.
### Can the system send a message without permission?
Automated messages only use a channel the guest specifically allowed. Staff
should also review and respect the guest's choices before making personal
contact.
## Current Product Notes
* Newcomer invitations currently use an existing upcoming Event while a
dedicated Classes experience is not yet available.
* Physical card artwork is created and managed in Handwrytten. TheFaithApp
provides selection, approval, submission, and visitor-history tracking.
* Handwrytten test mode still requires a payment method that can accept a
temporary authorization, even though the card is not mailed or charged.
You can configure:
* A default follow-up owner.
* A personal welcome task and its due time.
* Overdue reminders.
* An immediate pastor-call task when requested.
* Confirmation email and text wording.
* An optional invitation to an upcoming newcomer event.
Select **Save sequence** after making changes.
Automated email and text messages are only sent when that delivery service is
configured and the guest allowed that exact contact channel. Permission is
checked again when the message is about to be sent.
Automation helps the team remember the next action. Personal and pastoral
follow-up still belongs to the assigned staff member.
## 8. Send a Handwritten Welcome Card
Churches with their own Handwrytten account can prepare and track a physical
card from the visitor details. Handwrytten bills the connected church account;
TheFaithApp never stores the payment card number.
### Connect the Church Account
1. Open **Settings**, then **Integrations**.
2. Select the **Handwrytten** card to open its setup drawer.
3. Copy an API key from the church's Handwrytten Integrations page.
4. Paste the key into TheFaithApp and select **Connect and test**.
5. Confirm whether the account shows **Test mode** or **Live mode**.
Test mode does not print or mail the card, although Handwrytten may place a
temporary payment authorization. Live mode charges the church's Handwrytten
account and sends the physical card.
### Prepare and Approve a Card
1. Open the visitor in **Visitor Inbox**.
2. Under **Handwritten cards**, select **Send a card**.
3. Confirm the visitor's postal address and record how they gave permission to
receive physical mail.
4. Choose a card design and handwriting style from the connected Handwrytten
account.
5. Review the message, closing, and church return address.
6. Review the completed card before selecting **Submit test card** or the live
mailing action.
The first saved design, message, handwriting style, and return address can be
reused as the church's visitor-card defaults.
Never send a physical card without the visitor's current permission. In live
mode, check the recipient, address, message, and charge warning carefully
before approving the order.
### Track the Result
The visitor details show each draft or order with its test/live state, current
status, message preview, and any provider error. Submitted orders can be
refreshed, and cancellation appears only when the order can still be canceled.
If Handwrytten definitely rejects an order, correct the account or card details
and create a new draft. If the result says it needs review, do not submit it
again until the Handwrytten order history has been checked.
## 9. Link a Visitor to the Member Directory
When the relationship is ready, open the visitor and select **Link existing
member** or **Convert to member**.
The app shows possible records with the exact same email address or phone
number so staff can review them first. It never merges those records
automatically.
The original visit, notes, tasks, and timeline stay in Visitor Inbox. Contact
permission is not copied to the member record, and converting a visitor does
not send account credentials.
## Recommended Next Steps
The guest confirmation page and visitor details only show actions that are
available for that church and person. After a visitor is linked to a member,
the member Home screen can also recommend useful actions such as:
* Choose a branch.
* Join an active Community Group.
* Explore an upcoming event.
* Find an active serving opportunity.
* Request prayer.
* Continue a requested pastor conversation.
Membership classes, baptism, and Bible-plan recommendations stay hidden until
those experiences are available and configured.
## Before You Share the Pages
* Preview both **Plan a Visit** and **Connect Card**.
* Test the pages on a phone and computer.
* Confirm every branch has current public information and gathering times.
* Submit one test response and confirm it appears in **Visitor Inbox**.
* Confirm the correct staff member receives ownership.
* Review the confirmation wording and contact permission.
* Close the test visitor and complete its test tasks when testing is finished.
## Common Questions
### Does a guest need to create an account?
No. The Plan a Visit and Connect Card forms work without sign-in.
### Does submitting a form create a member record?
No. It creates a visitor record. Staff choose later whether to link or convert
the visitor to a member.
### Can both forms be placed on our church website?
Yes. Use the embed code shown under **Generate visitor links**, or share the
direct links from buttons on your website.
### What happens if two records have the same email address or phone number?
The app shows a possible match for staff to review. It does not automatically
merge or delete either record.
### Can the system send a message without permission?
Automated messages only use a channel the guest specifically allowed. Staff
should also review and respect the guest's choices before making personal
contact.
## Current Product Notes
* Newcomer invitations currently use an existing upcoming Event while a
dedicated Classes experience is not yet available.
* Physical card artwork is created and managed in Handwrytten. TheFaithApp
provides selection, approval, submission, and visitor-history tracking.
* Handwrytten test mode still requires a payment method that can accept a
temporary authorization, even though the card is not mailed or charged.