> ## Documentation Index
> Fetch the complete documentation index at: https://docs.thefaithapp.com/llms.txt
> Use this file to discover all available pages before exploring further.
# Giving and Finance
> Manage donations, recurring gifts, funds, payment providers, billing plans, payment methods, and AI add-on billing in TheFaithApp.
# Giving and Finance
This guide covers the main giving and billing tools used to receive donations, manage payment setup, and control subscription-related billing in TheFaithApp.
These tools include:
* Donations
* Recurring donations
* Funds
* Public donation links
* Payment providers
* Billing plans
* Payment methods
* AI add-on billing
## Before You Start
* Sign in to your admin account.
* Open `Donations` from the left sidebar for gift activity and funds.
* Open `Settings` for payment providers, billing plans, payment methods, and AI billing.
* Some billing or payment actions depend on the payment providers already connected to your account.
## Donations Overview
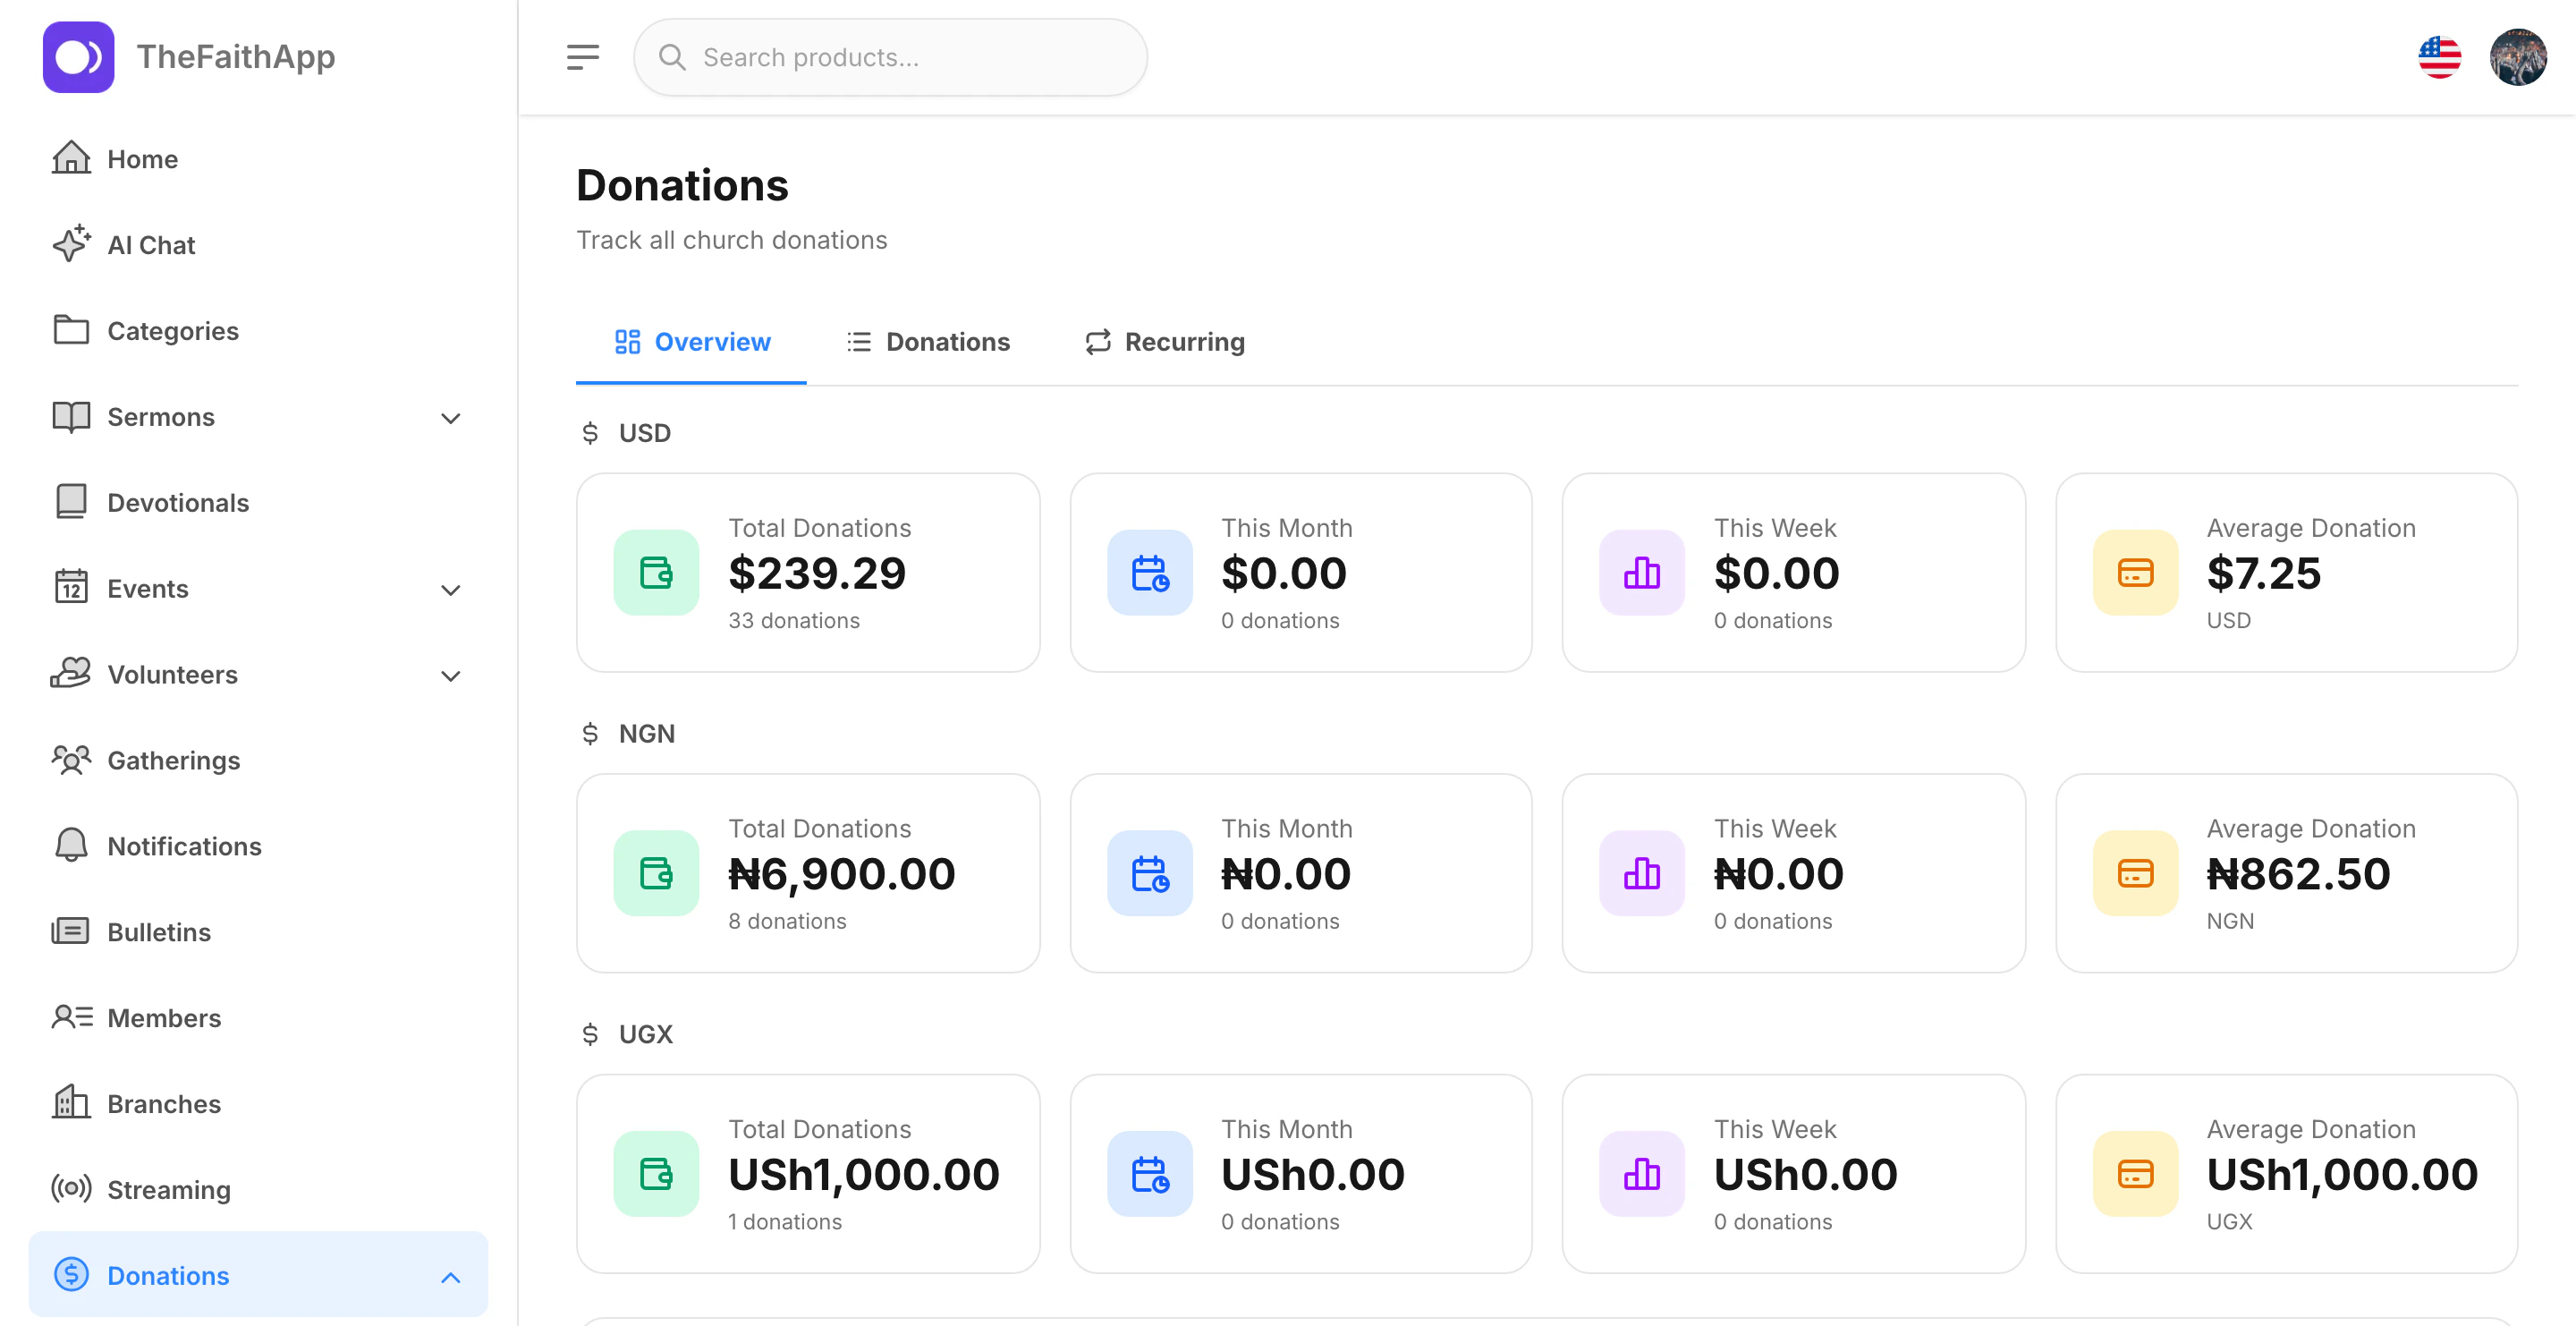
Use the overview tab to monitor giving performance across the payment currencies already active in your church account.
 ### What You Can Do
* Review total donations by currency
* Compare this month and this week at a glance
* See the average donation amount
* Use the overview before exporting or reviewing individual gifts
### Steps
1. Click `Donations`.
2. Stay on the `Overview` tab.
3. Review the cards for each available currency.
4. Switch to the other tabs when you need deeper detail.
## Donation Records
Use the donations list when you need to search, review, or export individual giving records.
### What You Can Do
* Review total donations by currency
* Compare this month and this week at a glance
* See the average donation amount
* Use the overview before exporting or reviewing individual gifts
### Steps
1. Click `Donations`.
2. Stay on the `Overview` tab.
3. Review the cards for each available currency.
4. Switch to the other tabs when you need deeper detail.
## Donation Records
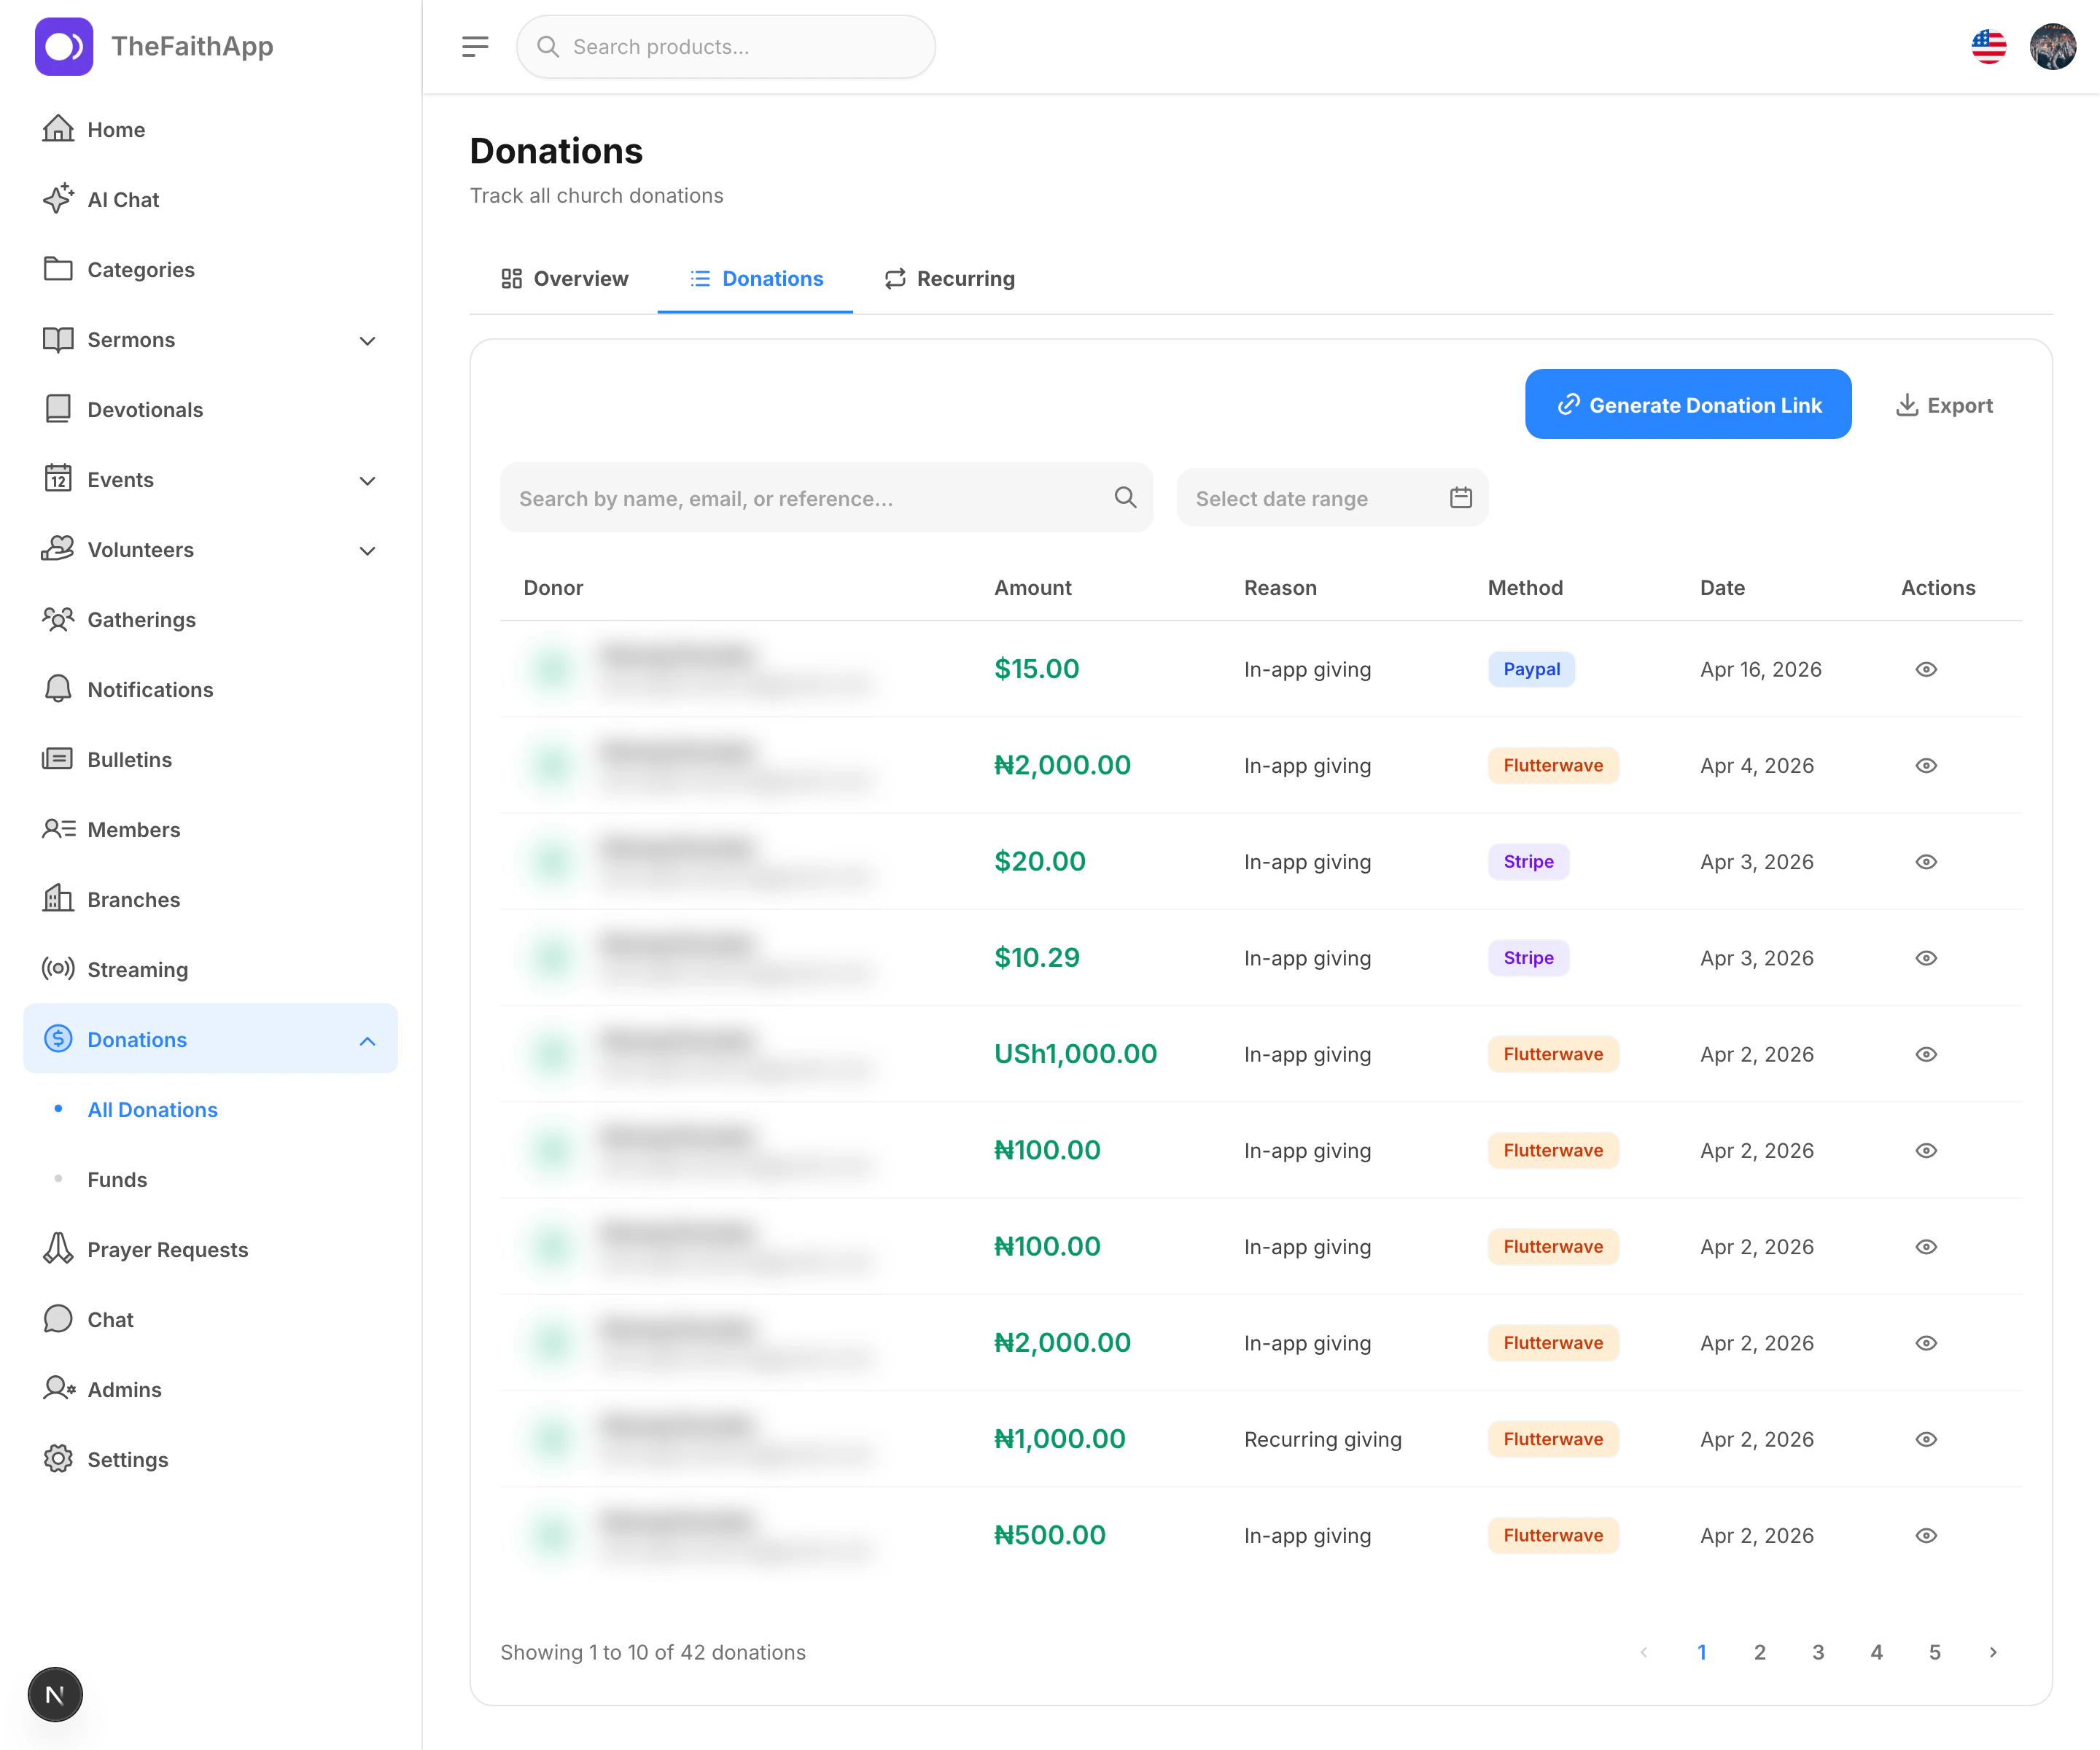
Use the donations list when you need to search, review, or export individual giving records.
 ### What You Can Do
* Search donations by donor details or reference
* Filter donations by date range
* Review gift amount, reason, method, and date
* Open an individual donation record
* Export the current results
### Steps
1. Open `Donations`.
2. Click the `Donations` tab.
3. Use search or the date range filter to narrow the list.
4. Review the donation rows.
5. Click the view icon when you need the full donation details.
6. Click `Export` when you want to download the current set of records.
### Notes
* The export action follows the filters you have applied.
* Donation rows show the payment method used for each gift.
## Public Donation Links
Use the donation link tool when you want to share a direct public giving page outside the admin dashboard.
### What You Can Do
* Search donations by donor details or reference
* Filter donations by date range
* Review gift amount, reason, method, and date
* Open an individual donation record
* Export the current results
### Steps
1. Open `Donations`.
2. Click the `Donations` tab.
3. Use search or the date range filter to narrow the list.
4. Review the donation rows.
5. Click the view icon when you need the full donation details.
6. Click `Export` when you want to download the current set of records.
### Notes
* The export action follows the filters you have applied.
* Donation rows show the payment method used for each gift.
## Public Donation Links
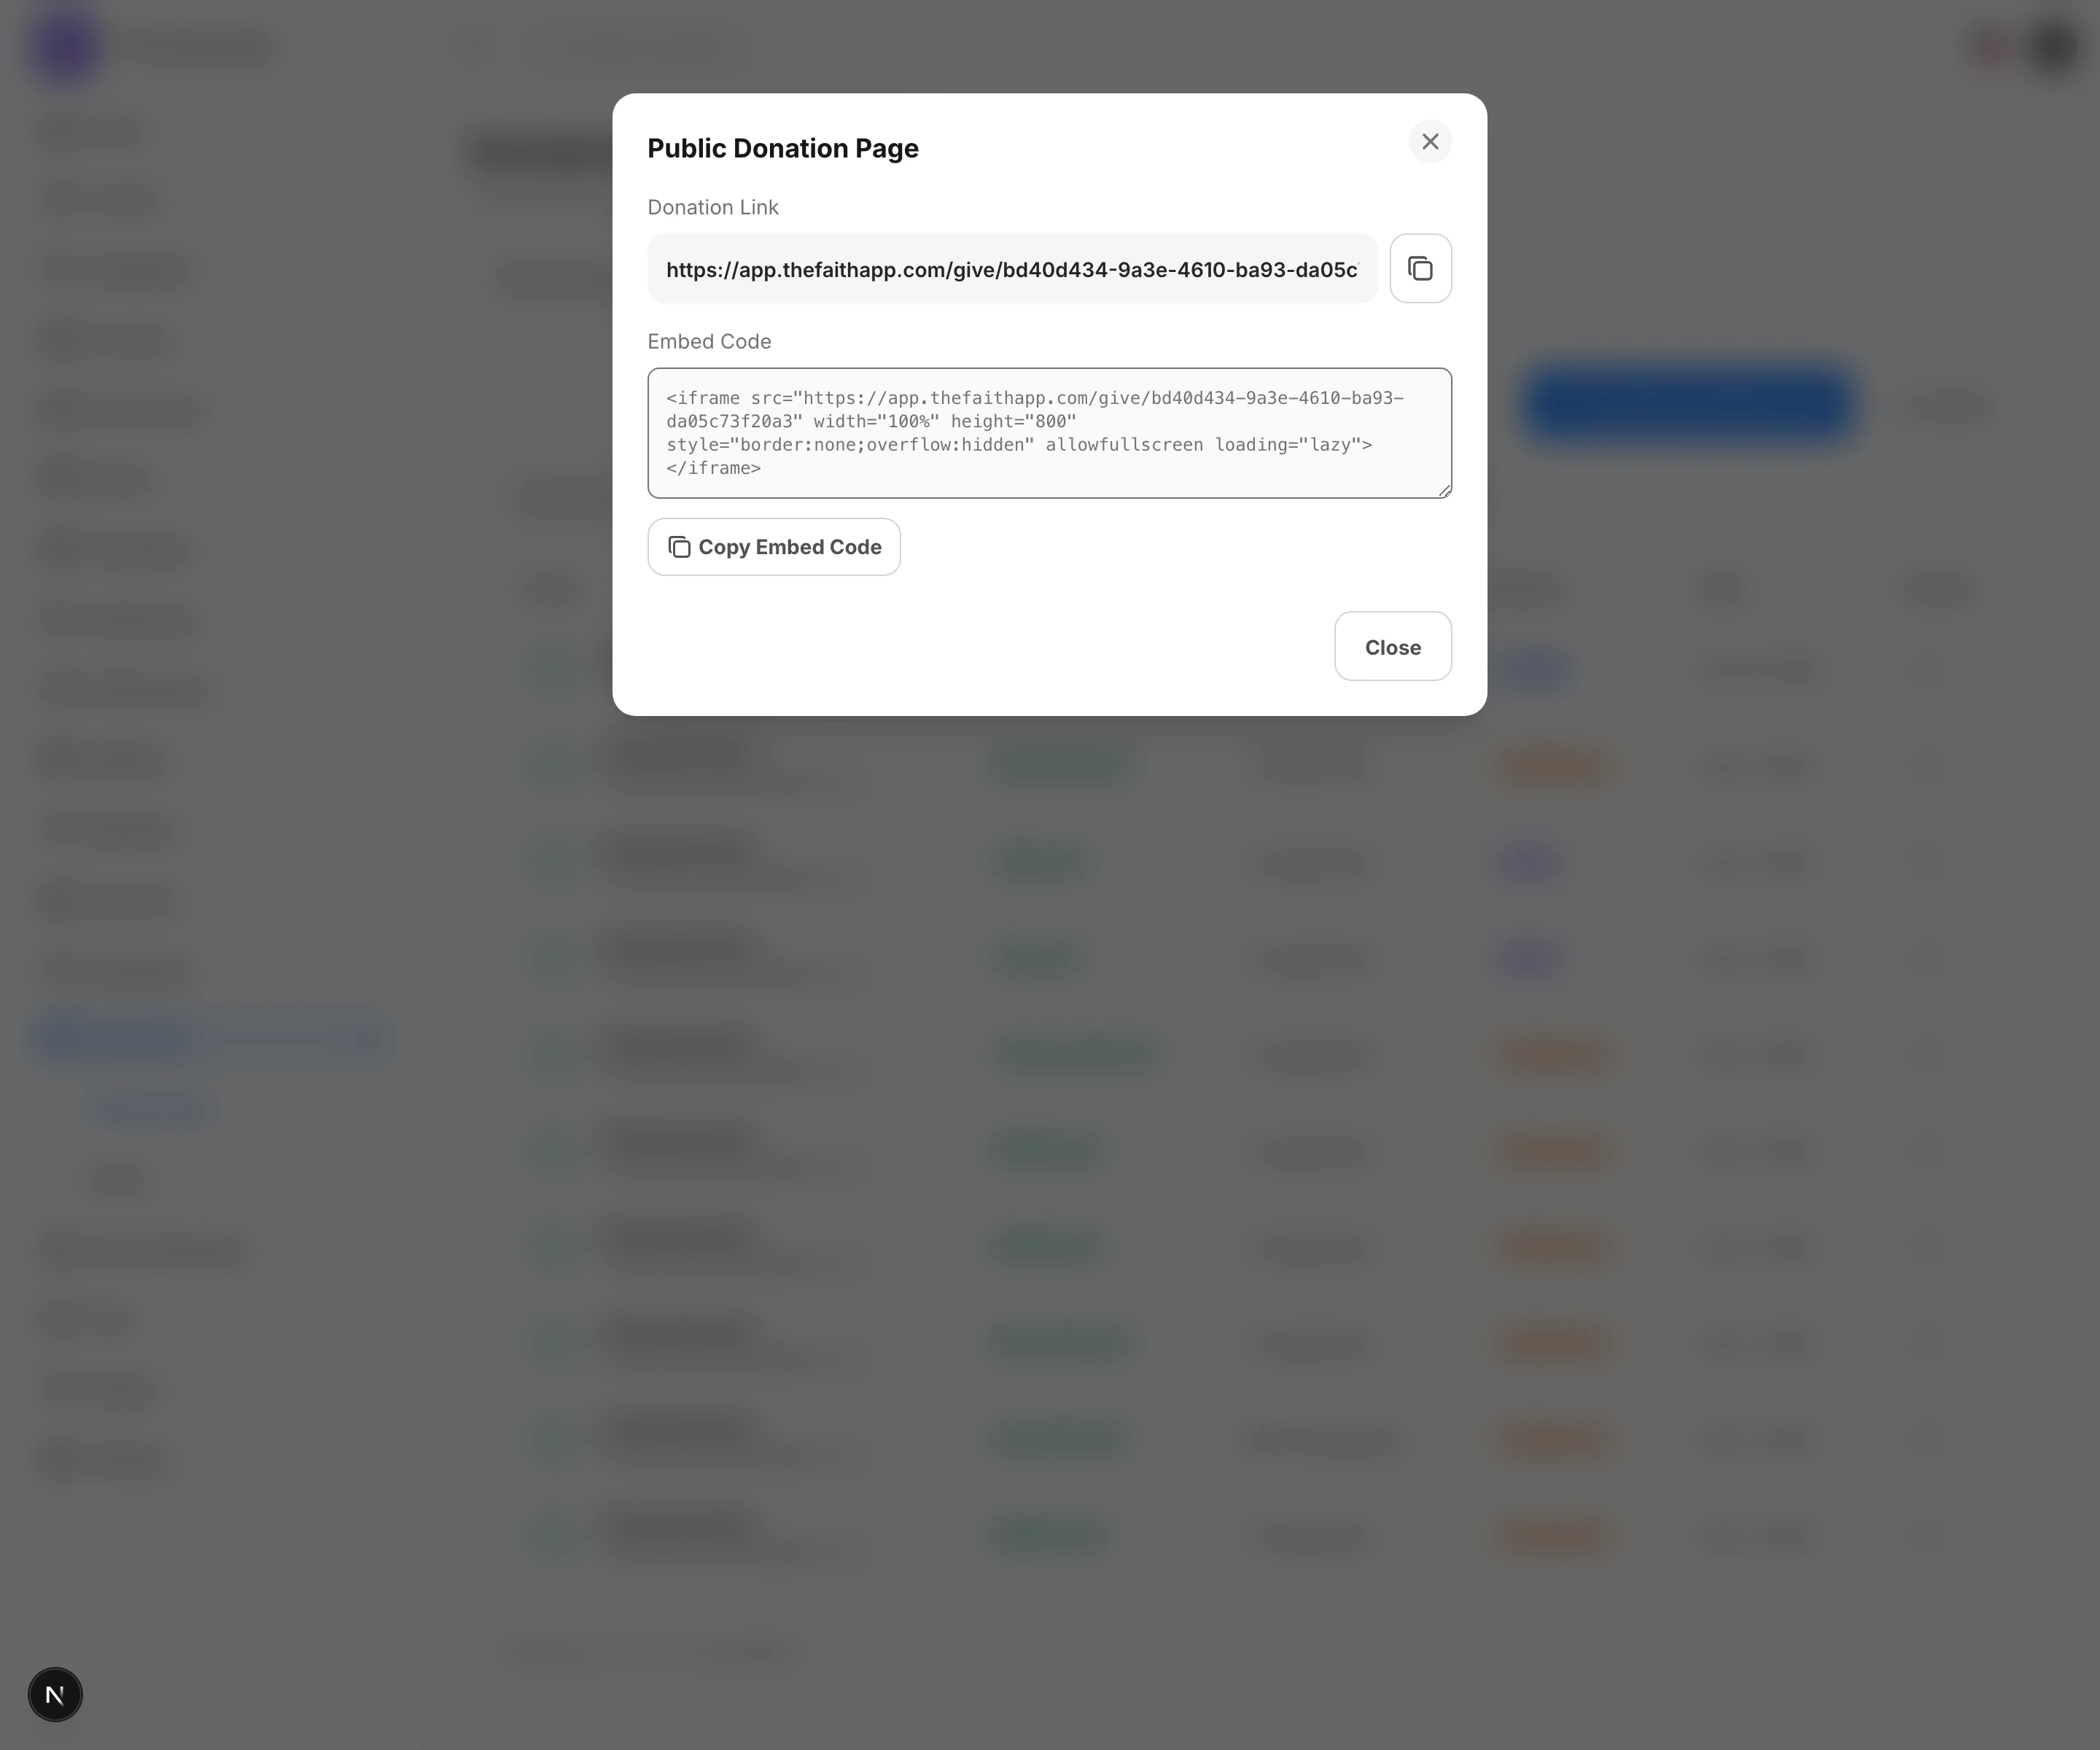
Use the donation link tool when you want to share a direct public giving page outside the admin dashboard.
 ### What You Can Do
* Generate a public giving link
* Copy the direct donation page URL
* Copy embed code for websites or landing pages
### Steps
1. Open `Donations`.
2. Click the `Donations` tab.
3. Click `Generate Donation Link`.
4. Copy the link or embed code you want to share.
5. Send the link to members, supporters, or website managers.
### Notes
* The generated link opens a secure public giving experience for your church.
* Use the embed option when you want the giving form placed inside another website.
## Public Giving Page
Use the public giving page when you want supporters to give through a church-branded page outside the admin dashboard.
### What You Can Do
* Generate a public giving link
* Copy the direct donation page URL
* Copy embed code for websites or landing pages
### Steps
1. Open `Donations`.
2. Click the `Donations` tab.
3. Click `Generate Donation Link`.
4. Copy the link or embed code you want to share.
5. Send the link to members, supporters, or website managers.
### Notes
* The generated link opens a secure public giving experience for your church.
* Use the embed option when you want the giving form placed inside another website.
## Public Giving Page
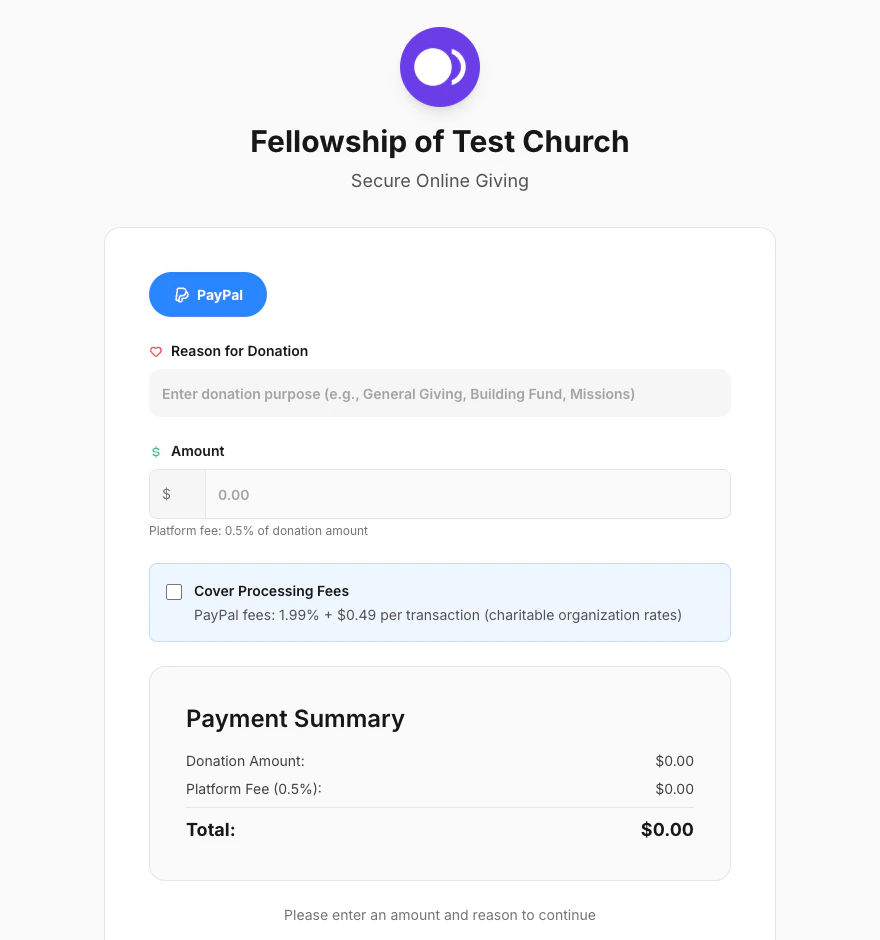
Use the public giving page when you want supporters to give through a church-branded page outside the admin dashboard.
 ### What Supporters Can Do
* Choose the available payment option
* Enter a donation reason and amount
* Decide whether to cover processing fees
* Review the payment summary before continuing
### Steps
1. Generate the public donation link from `Donations`.
2. Open the link to confirm the church branding and page title.
3. Share the link with supporters.
4. Ask supporters to sign in from the public page.
5. After sign-in, choose the payment option shown on the page.
6. Enter the donation purpose and amount.
7. Turn on `Cover Processing Fees` if the supporter wants to include them.
8. Review `Payment Summary` and continue to payment.
### Notes
* The screenshot above shows the public giving form after the supporter has already signed in.
* The current public giving experience starts with sign-in before the donation form appears.
* Connected payment providers control which payment options appear after sign-in.
* If the church has set a default payment provider, supporters may see only that option instead of multiple tabs.
## Recurring Donations
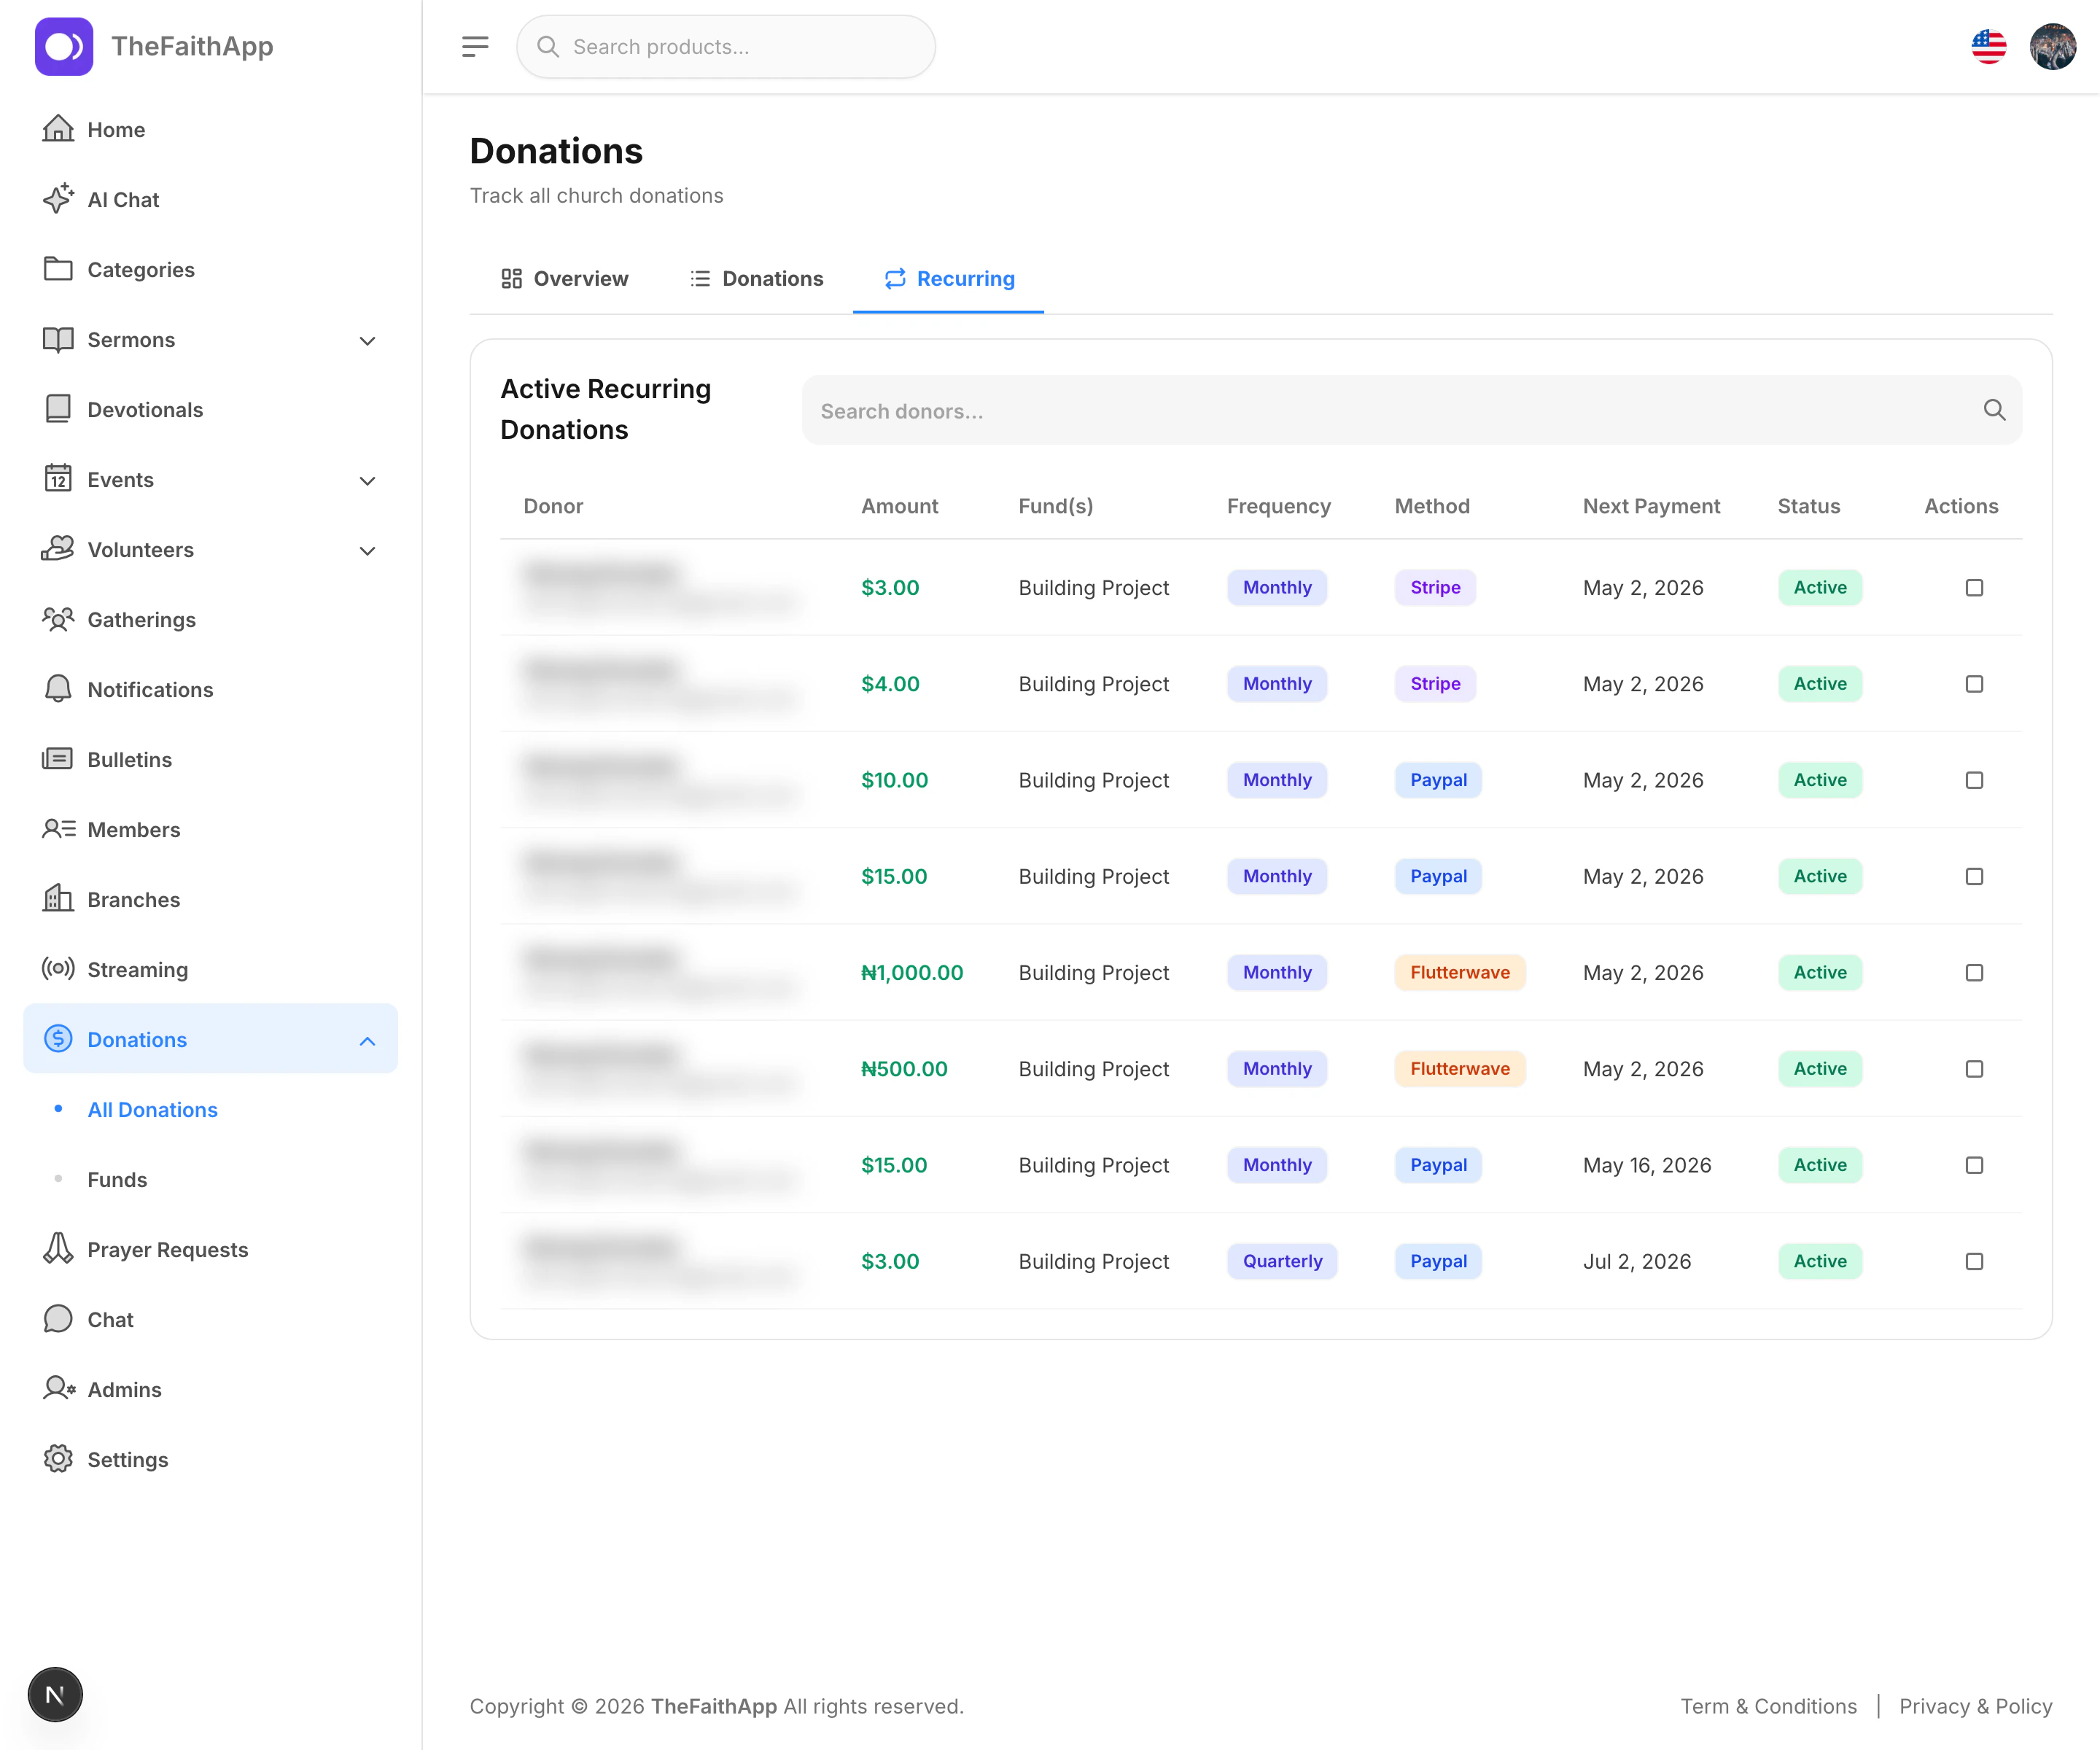
Use recurring donations to review active scheduled gifts and confirm what supporters have set up to repeat automatically.
### What Supporters Can Do
* Choose the available payment option
* Enter a donation reason and amount
* Decide whether to cover processing fees
* Review the payment summary before continuing
### Steps
1. Generate the public donation link from `Donations`.
2. Open the link to confirm the church branding and page title.
3. Share the link with supporters.
4. Ask supporters to sign in from the public page.
5. After sign-in, choose the payment option shown on the page.
6. Enter the donation purpose and amount.
7. Turn on `Cover Processing Fees` if the supporter wants to include them.
8. Review `Payment Summary` and continue to payment.
### Notes
* The screenshot above shows the public giving form after the supporter has already signed in.
* The current public giving experience starts with sign-in before the donation form appears.
* Connected payment providers control which payment options appear after sign-in.
* If the church has set a default payment provider, supporters may see only that option instead of multiple tabs.
## Recurring Donations
Use recurring donations to review active scheduled gifts and confirm what supporters have set up to repeat automatically.
 ### What You Can Do
* Review active recurring gifts
* Search recurring donations
* See the fund, amount, frequency, method, and next payment date
* Cancel a recurring donation when needed
### Steps
1. Open `Donations`.
2. Click the `Recurring` tab.
3. Search for a donor or recurring record if needed.
4. Review the next payment date and current status.
5. Use the action menu when you need to cancel an active recurring gift.
### Notes
* The recurring table is best for finance follow-up and supporter support requests.
* Status helps your team confirm whether a recurring gift is still active.
## Funds
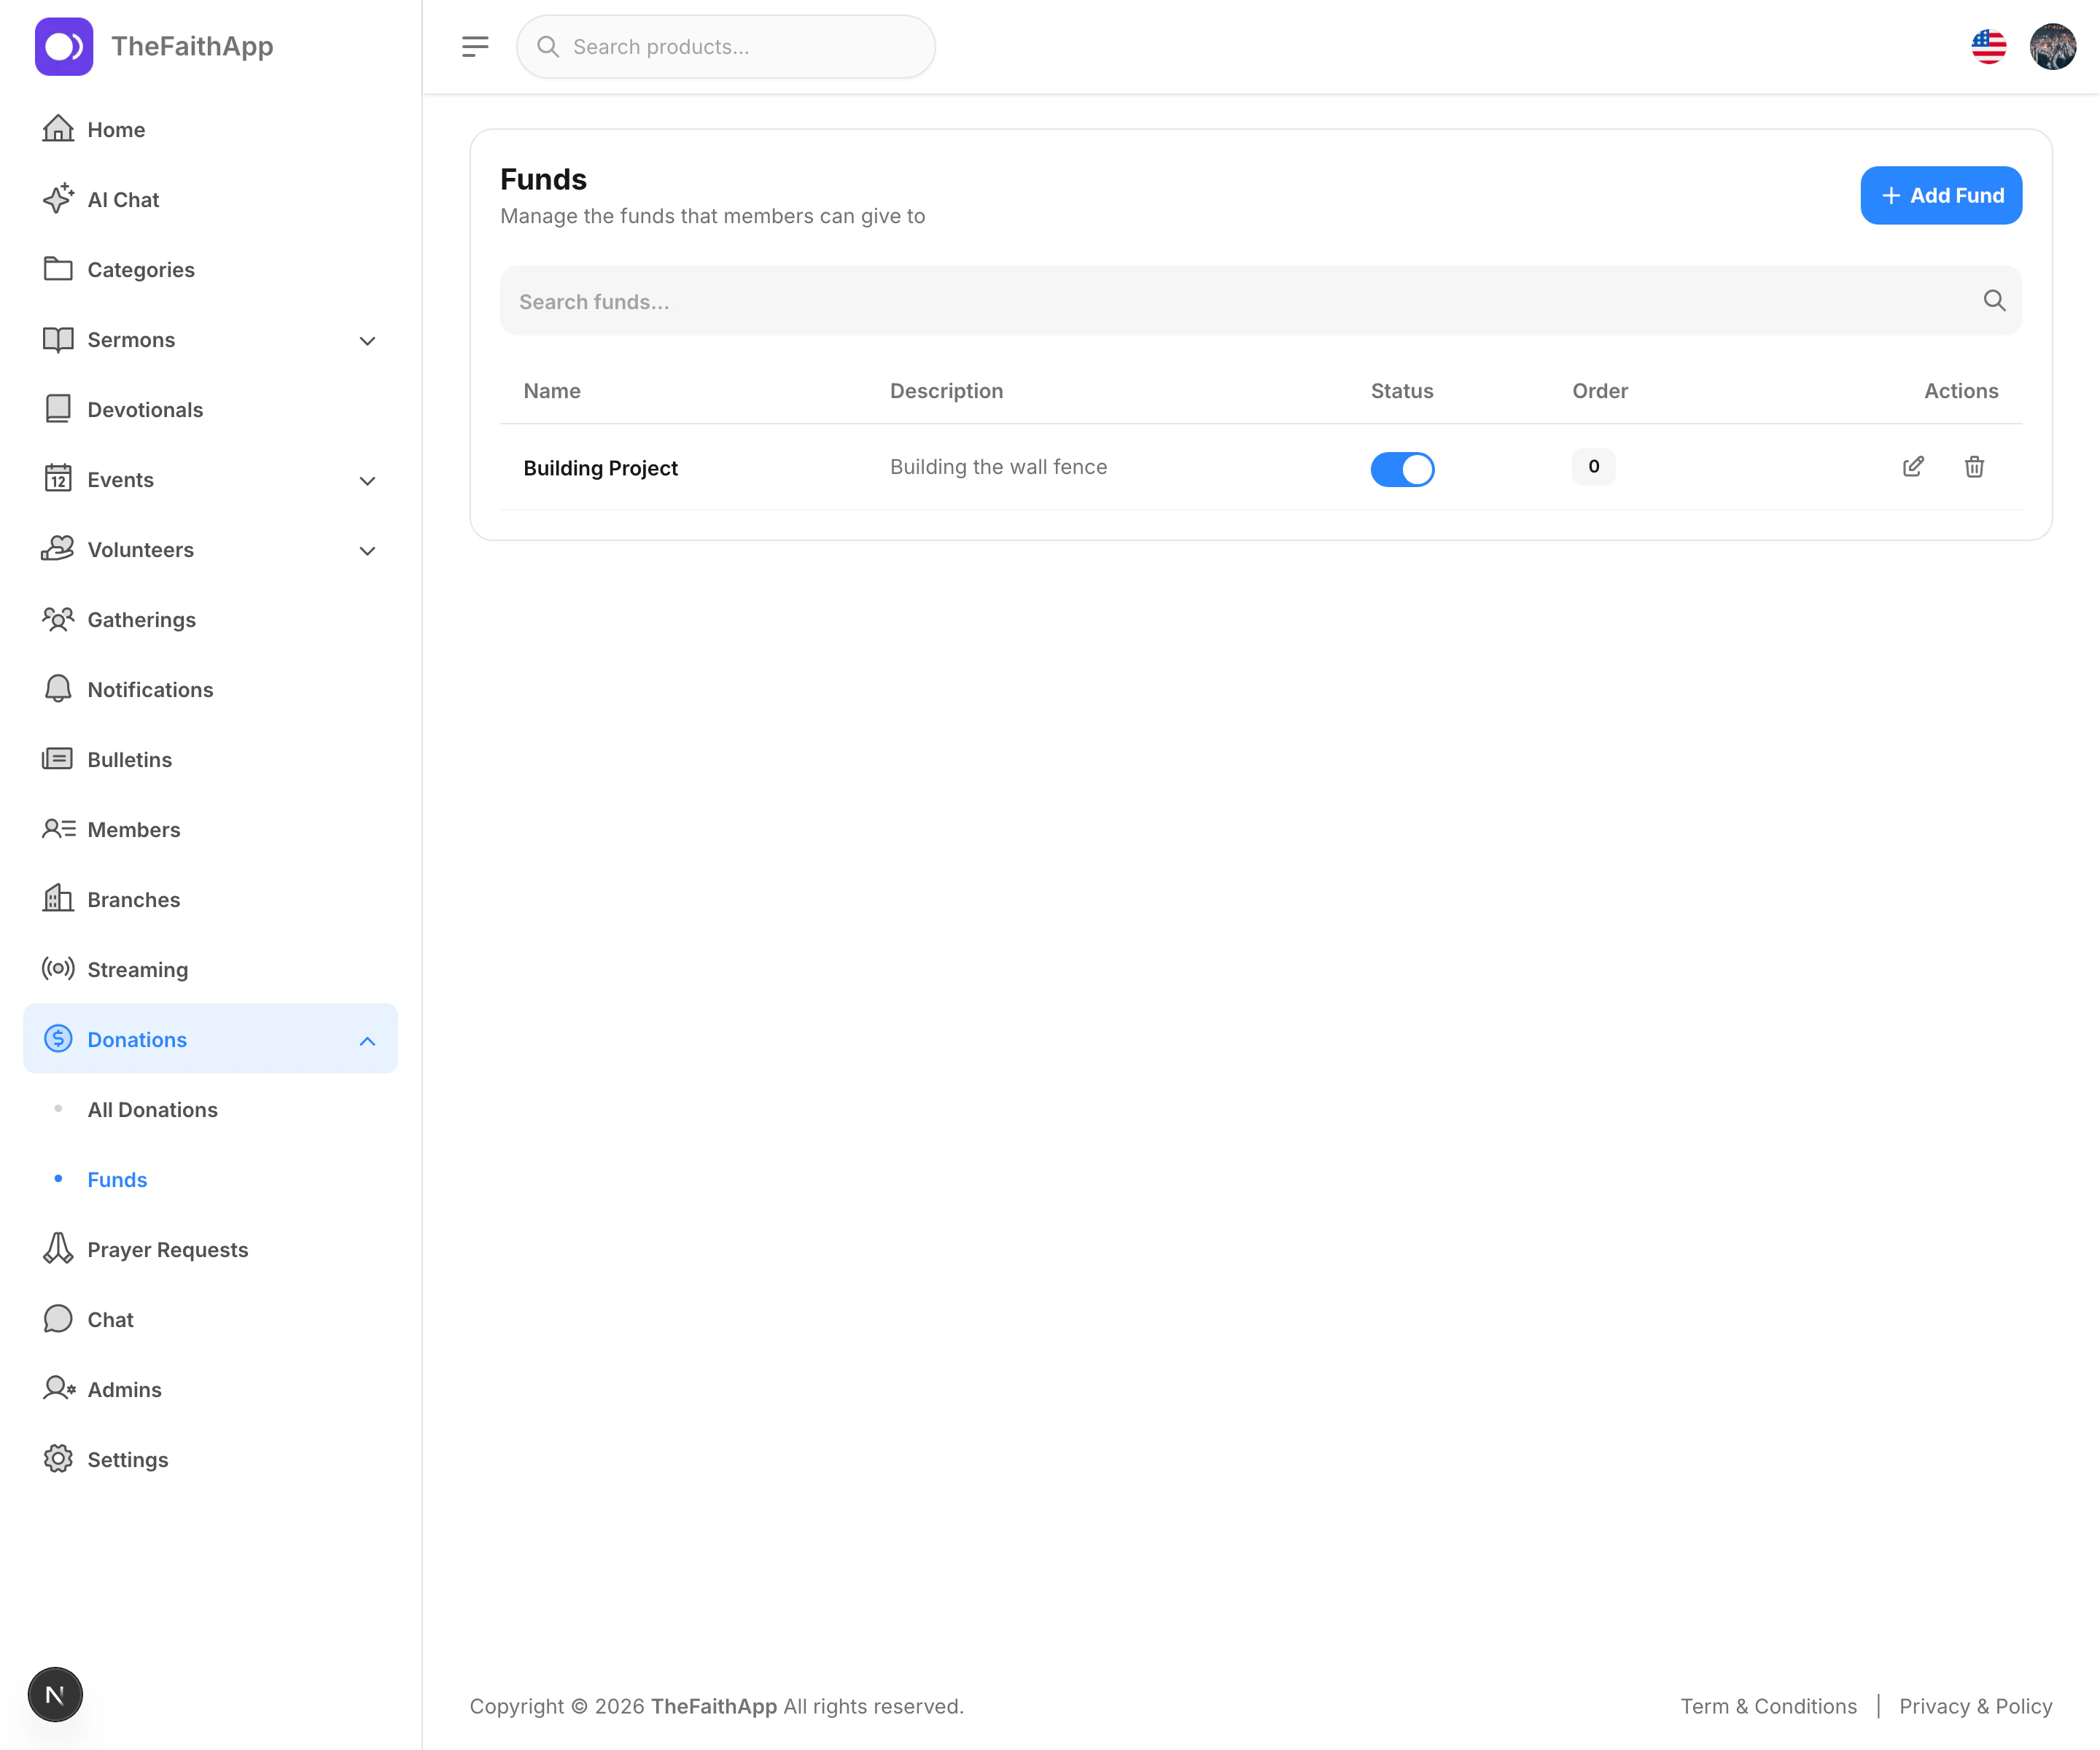
Use funds to control the giving categories donors can choose from.
### What You Can Do
* Review active recurring gifts
* Search recurring donations
* See the fund, amount, frequency, method, and next payment date
* Cancel a recurring donation when needed
### Steps
1. Open `Donations`.
2. Click the `Recurring` tab.
3. Search for a donor or recurring record if needed.
4. Review the next payment date and current status.
5. Use the action menu when you need to cancel an active recurring gift.
### Notes
* The recurring table is best for finance follow-up and supporter support requests.
* Status helps your team confirm whether a recurring gift is still active.
## Funds
Use funds to control the giving categories donors can choose from.
 ### What You Can Do
* Create a fund
* Add a short description
* Turn a fund on or off
* Search funds
* Edit or delete a fund
### Examples
* Building fund
* Missions
* General giving
* Youth ministry
### Steps
1. Open `Donations`.
2. Click `Funds`.
3. Click `Add Fund`.
4. Enter the fund name and optional description.
5. Save the fund.
6. Use the toggle or actions in the list when you need to update it later.
### Notes
* Active funds are available in the giving experience.
* Inactive funds can be kept for reporting history without staying visible to donors.
## Payment Providers
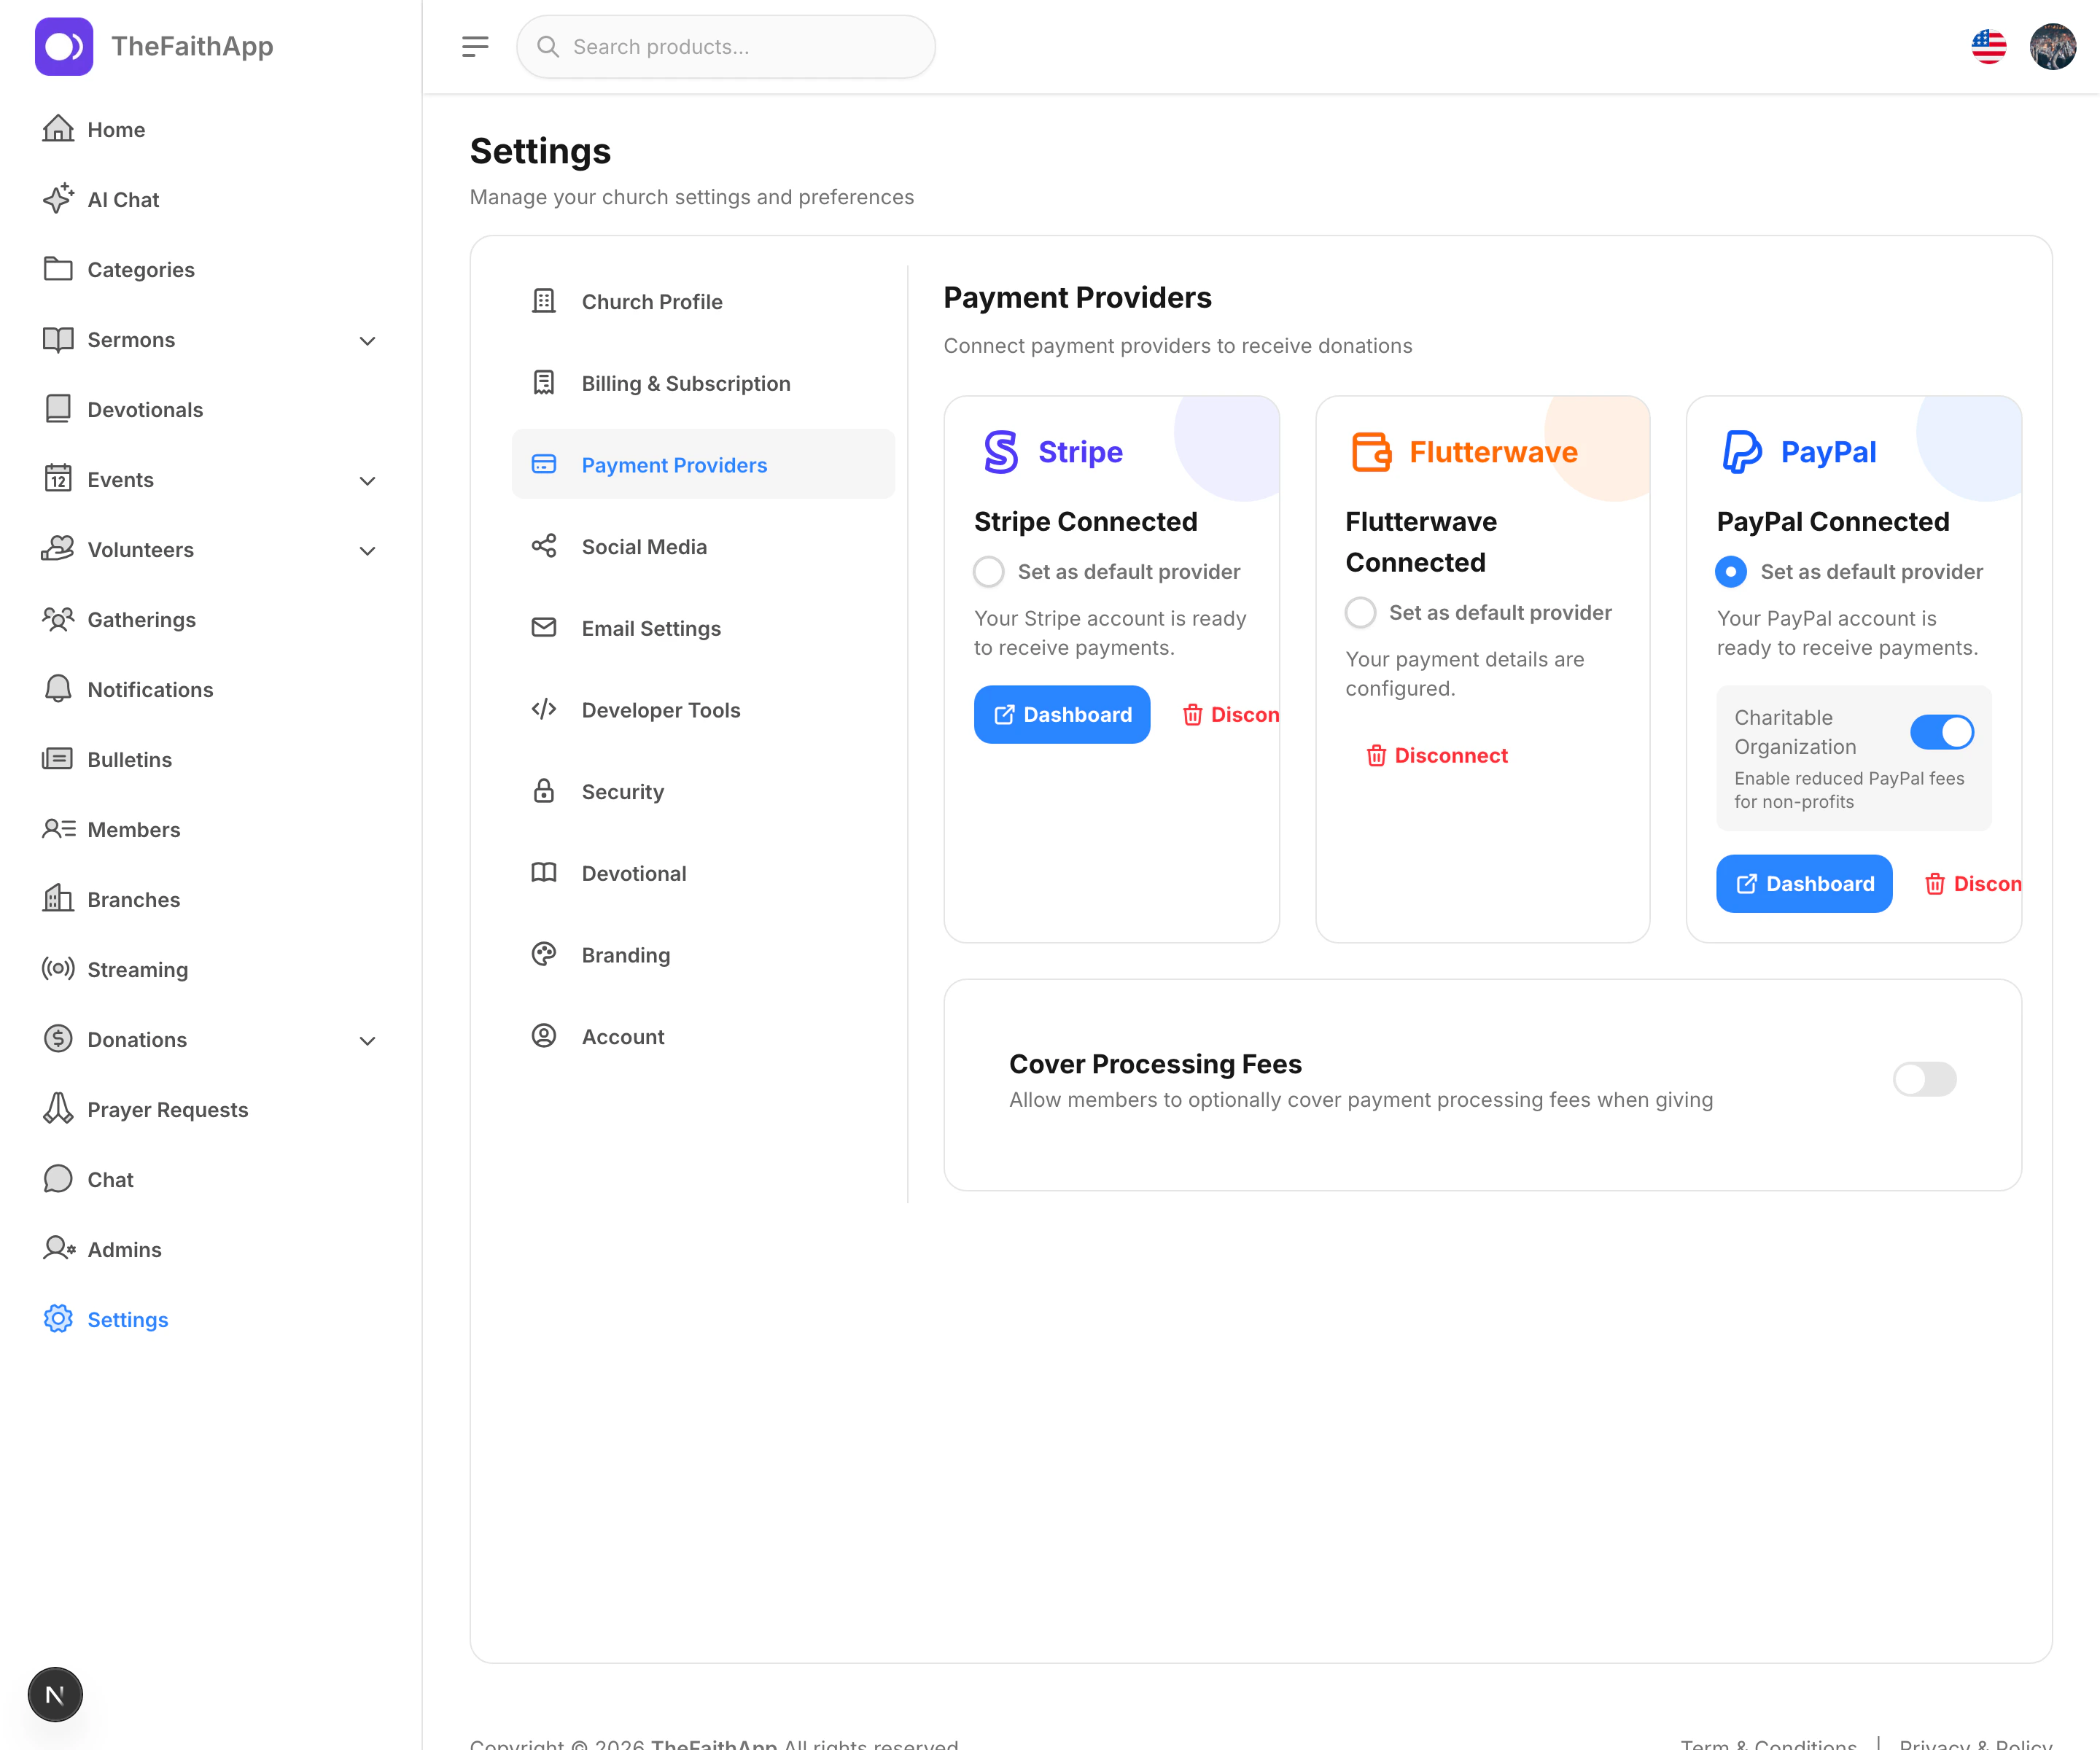
Use payment providers to connect the services your church will use to accept online gifts.
### What You Can Do
* Create a fund
* Add a short description
* Turn a fund on or off
* Search funds
* Edit or delete a fund
### Examples
* Building fund
* Missions
* General giving
* Youth ministry
### Steps
1. Open `Donations`.
2. Click `Funds`.
3. Click `Add Fund`.
4. Enter the fund name and optional description.
5. Save the fund.
6. Use the toggle or actions in the list when you need to update it later.
### Notes
* Active funds are available in the giving experience.
* Inactive funds can be kept for reporting history without staying visible to donors.
## Payment Providers
Use payment providers to connect the services your church will use to accept online gifts.
 ### Available Providers
* Stripe
* Flutterwave
* PayPal
### What You Can Do
* Connect a payment provider
* Disconnect a provider
* Set the default provider
* Turn on charitable PayPal fees where applicable
* Allow donors to cover processing fees
### Steps
1. Open `Settings`.
2. Click `Payment Providers`.
3. Connect the provider you want to use.
4. Set a default provider if more than one is available.
5. Turn on `Cover Processing Fees` if your church wants to offer that option during giving.
6. Save or confirm any provider changes.
### Notes
* Stripe, Flutterwave, and PayPal can support different payment needs depending on your region and ministry setup.
* The default provider is the main option used when multiple providers are connected.
## Billing and Subscription
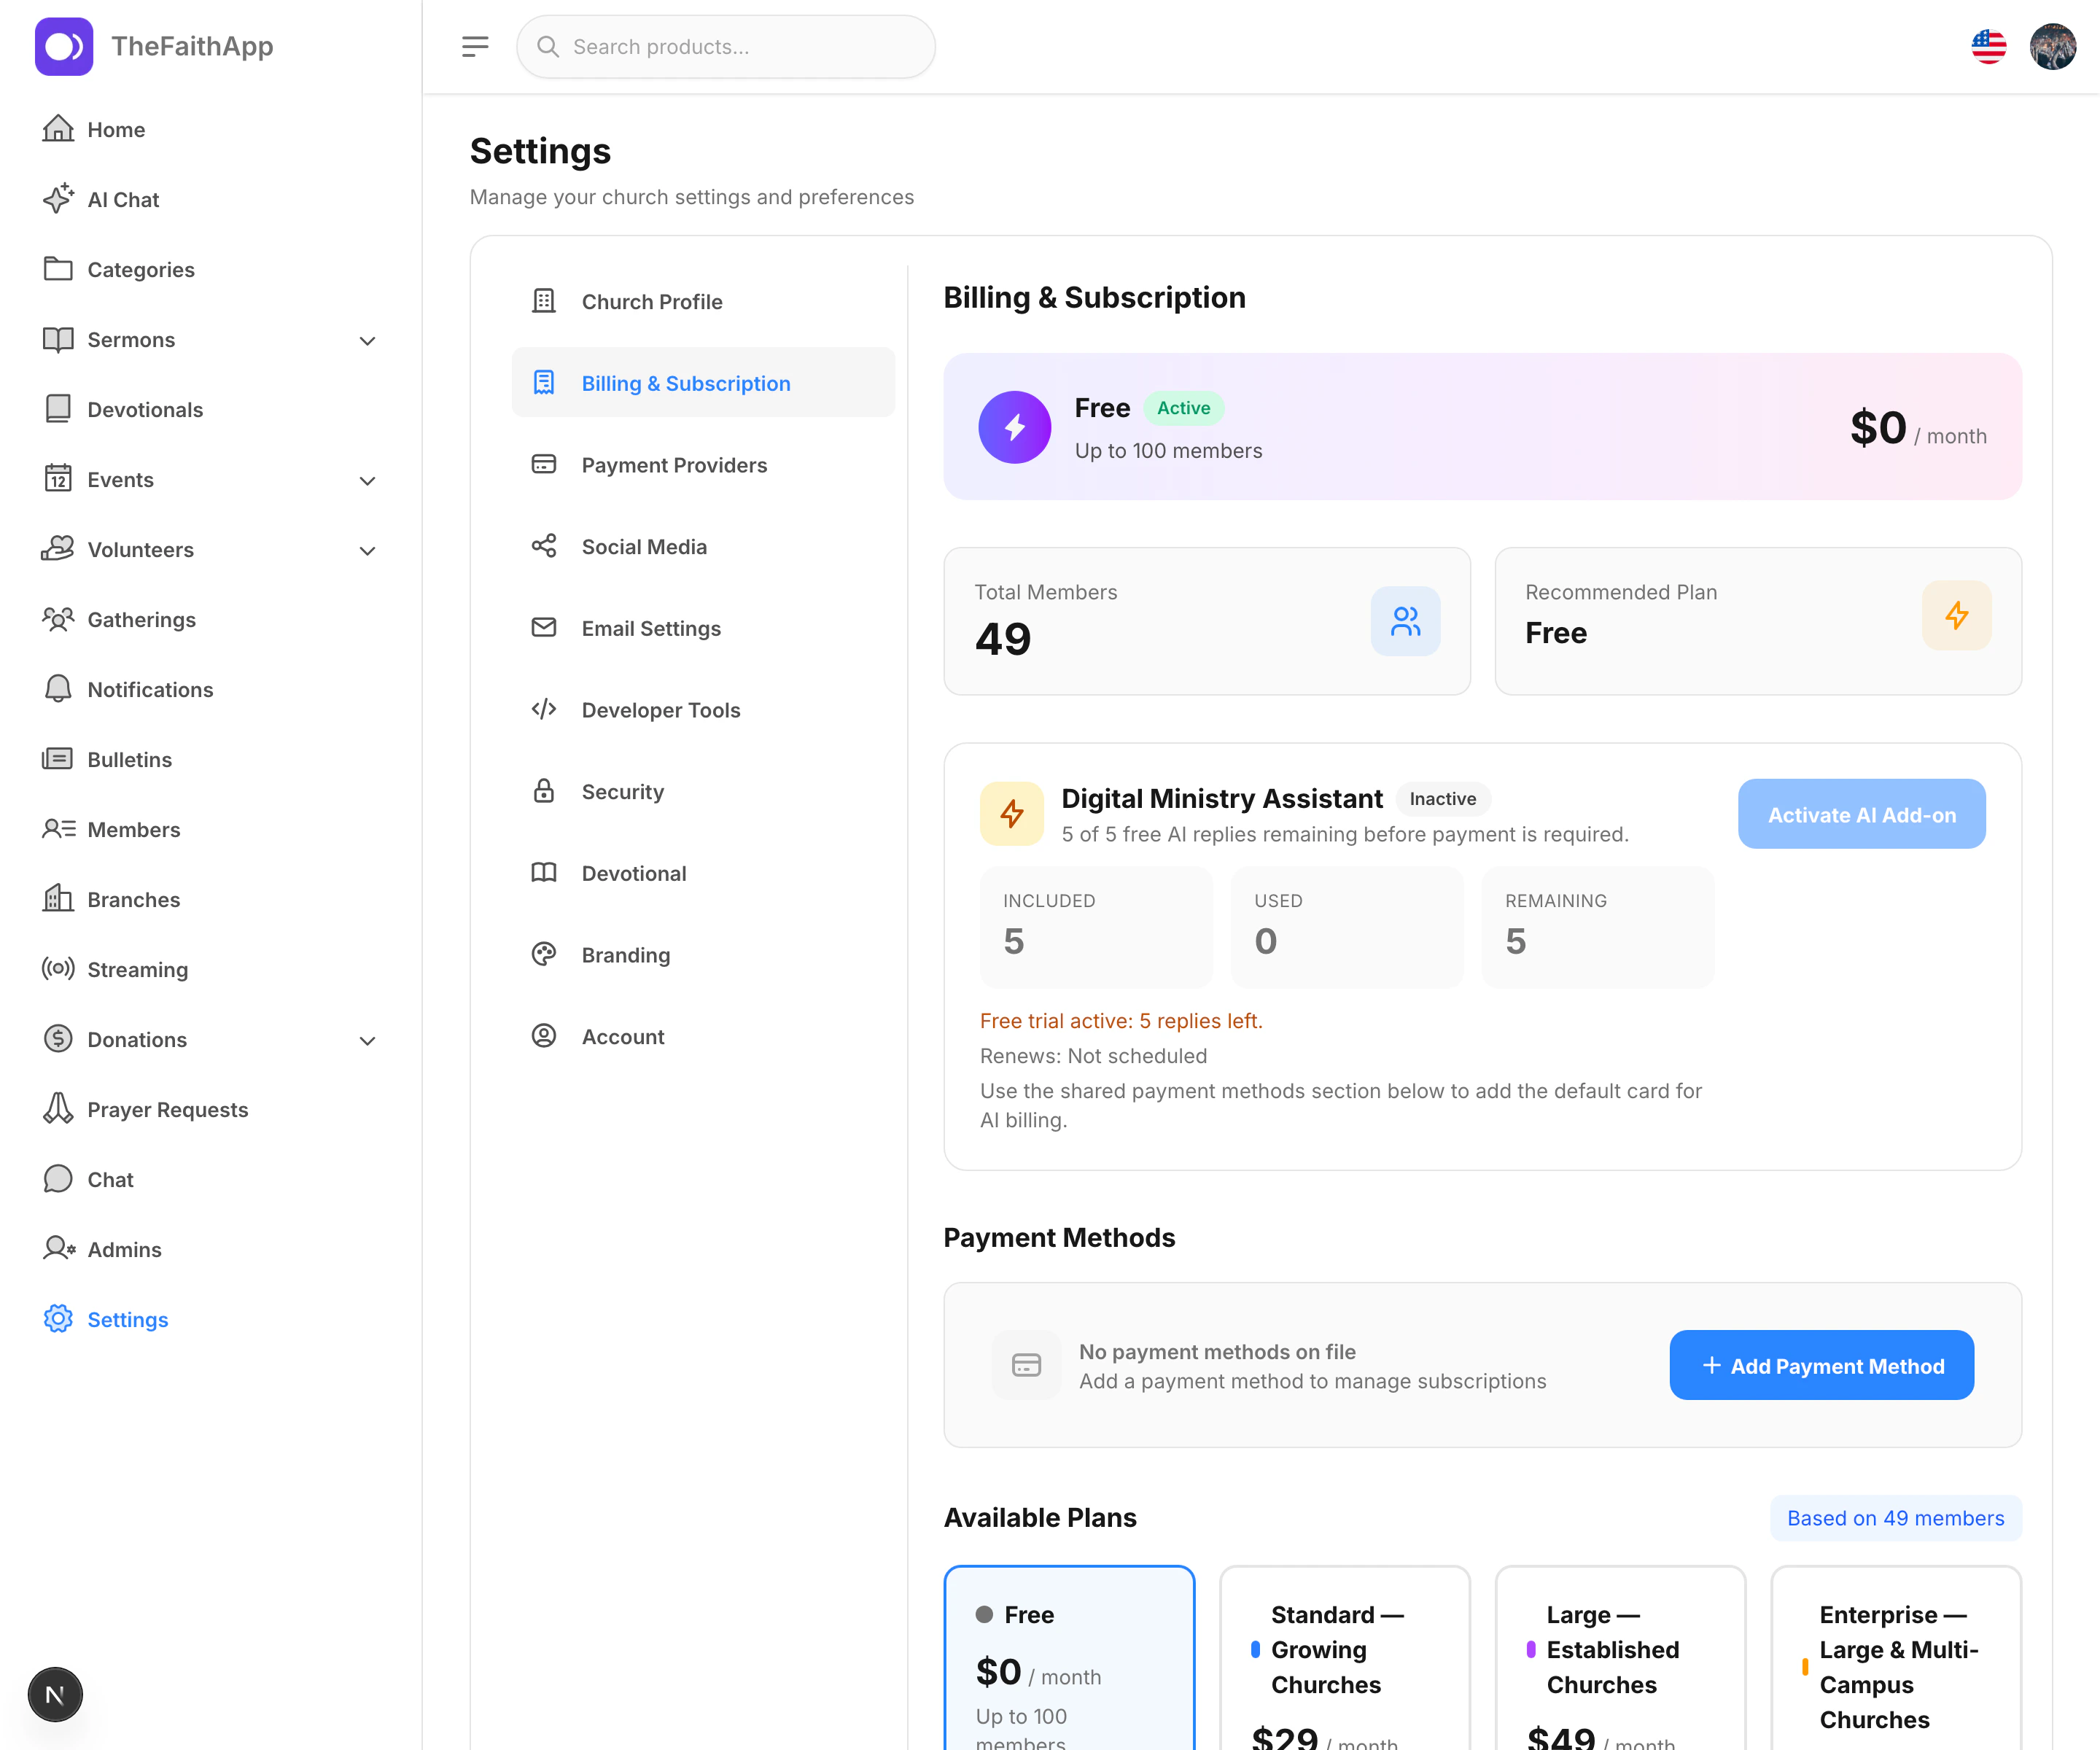
Use the billing page to manage your current plan, review recommended plans, and keep subscription billing organized.
### Available Providers
* Stripe
* Flutterwave
* PayPal
### What You Can Do
* Connect a payment provider
* Disconnect a provider
* Set the default provider
* Turn on charitable PayPal fees where applicable
* Allow donors to cover processing fees
### Steps
1. Open `Settings`.
2. Click `Payment Providers`.
3. Connect the provider you want to use.
4. Set a default provider if more than one is available.
5. Turn on `Cover Processing Fees` if your church wants to offer that option during giving.
6. Save or confirm any provider changes.
### Notes
* Stripe, Flutterwave, and PayPal can support different payment needs depending on your region and ministry setup.
* The default provider is the main option used when multiple providers are connected.
## Billing and Subscription
Use the billing page to manage your current plan, review recommended plans, and keep subscription billing organized.
 ### What You Can Do
* Review your current plan
* See the recommended plan based on member count
* Compare available plans
* Add and manage payment methods
* Review billing history
### Steps
1. Open `Settings`.
2. Click `Billing & Subscription`.
3. Review the current plan summary.
4. Compare the available plans below.
5. Click `Switch Plan` when you are ready to move to a different subscription tier.
6. Review the billing history section for past charges.
### Notes
* Recommended plans are based on the member count in your church account.
* The billing page is also where AI add-on billing is managed.
## Payment Methods
Use payment methods to add the card used for subscription billing and other paid add-ons.
### What You Can Do
* Review your current plan
* See the recommended plan based on member count
* Compare available plans
* Add and manage payment methods
* Review billing history
### Steps
1. Open `Settings`.
2. Click `Billing & Subscription`.
3. Review the current plan summary.
4. Compare the available plans below.
5. Click `Switch Plan` when you are ready to move to a different subscription tier.
6. Review the billing history section for past charges.
### Notes
* Recommended plans are based on the member count in your church account.
* The billing page is also where AI add-on billing is managed.
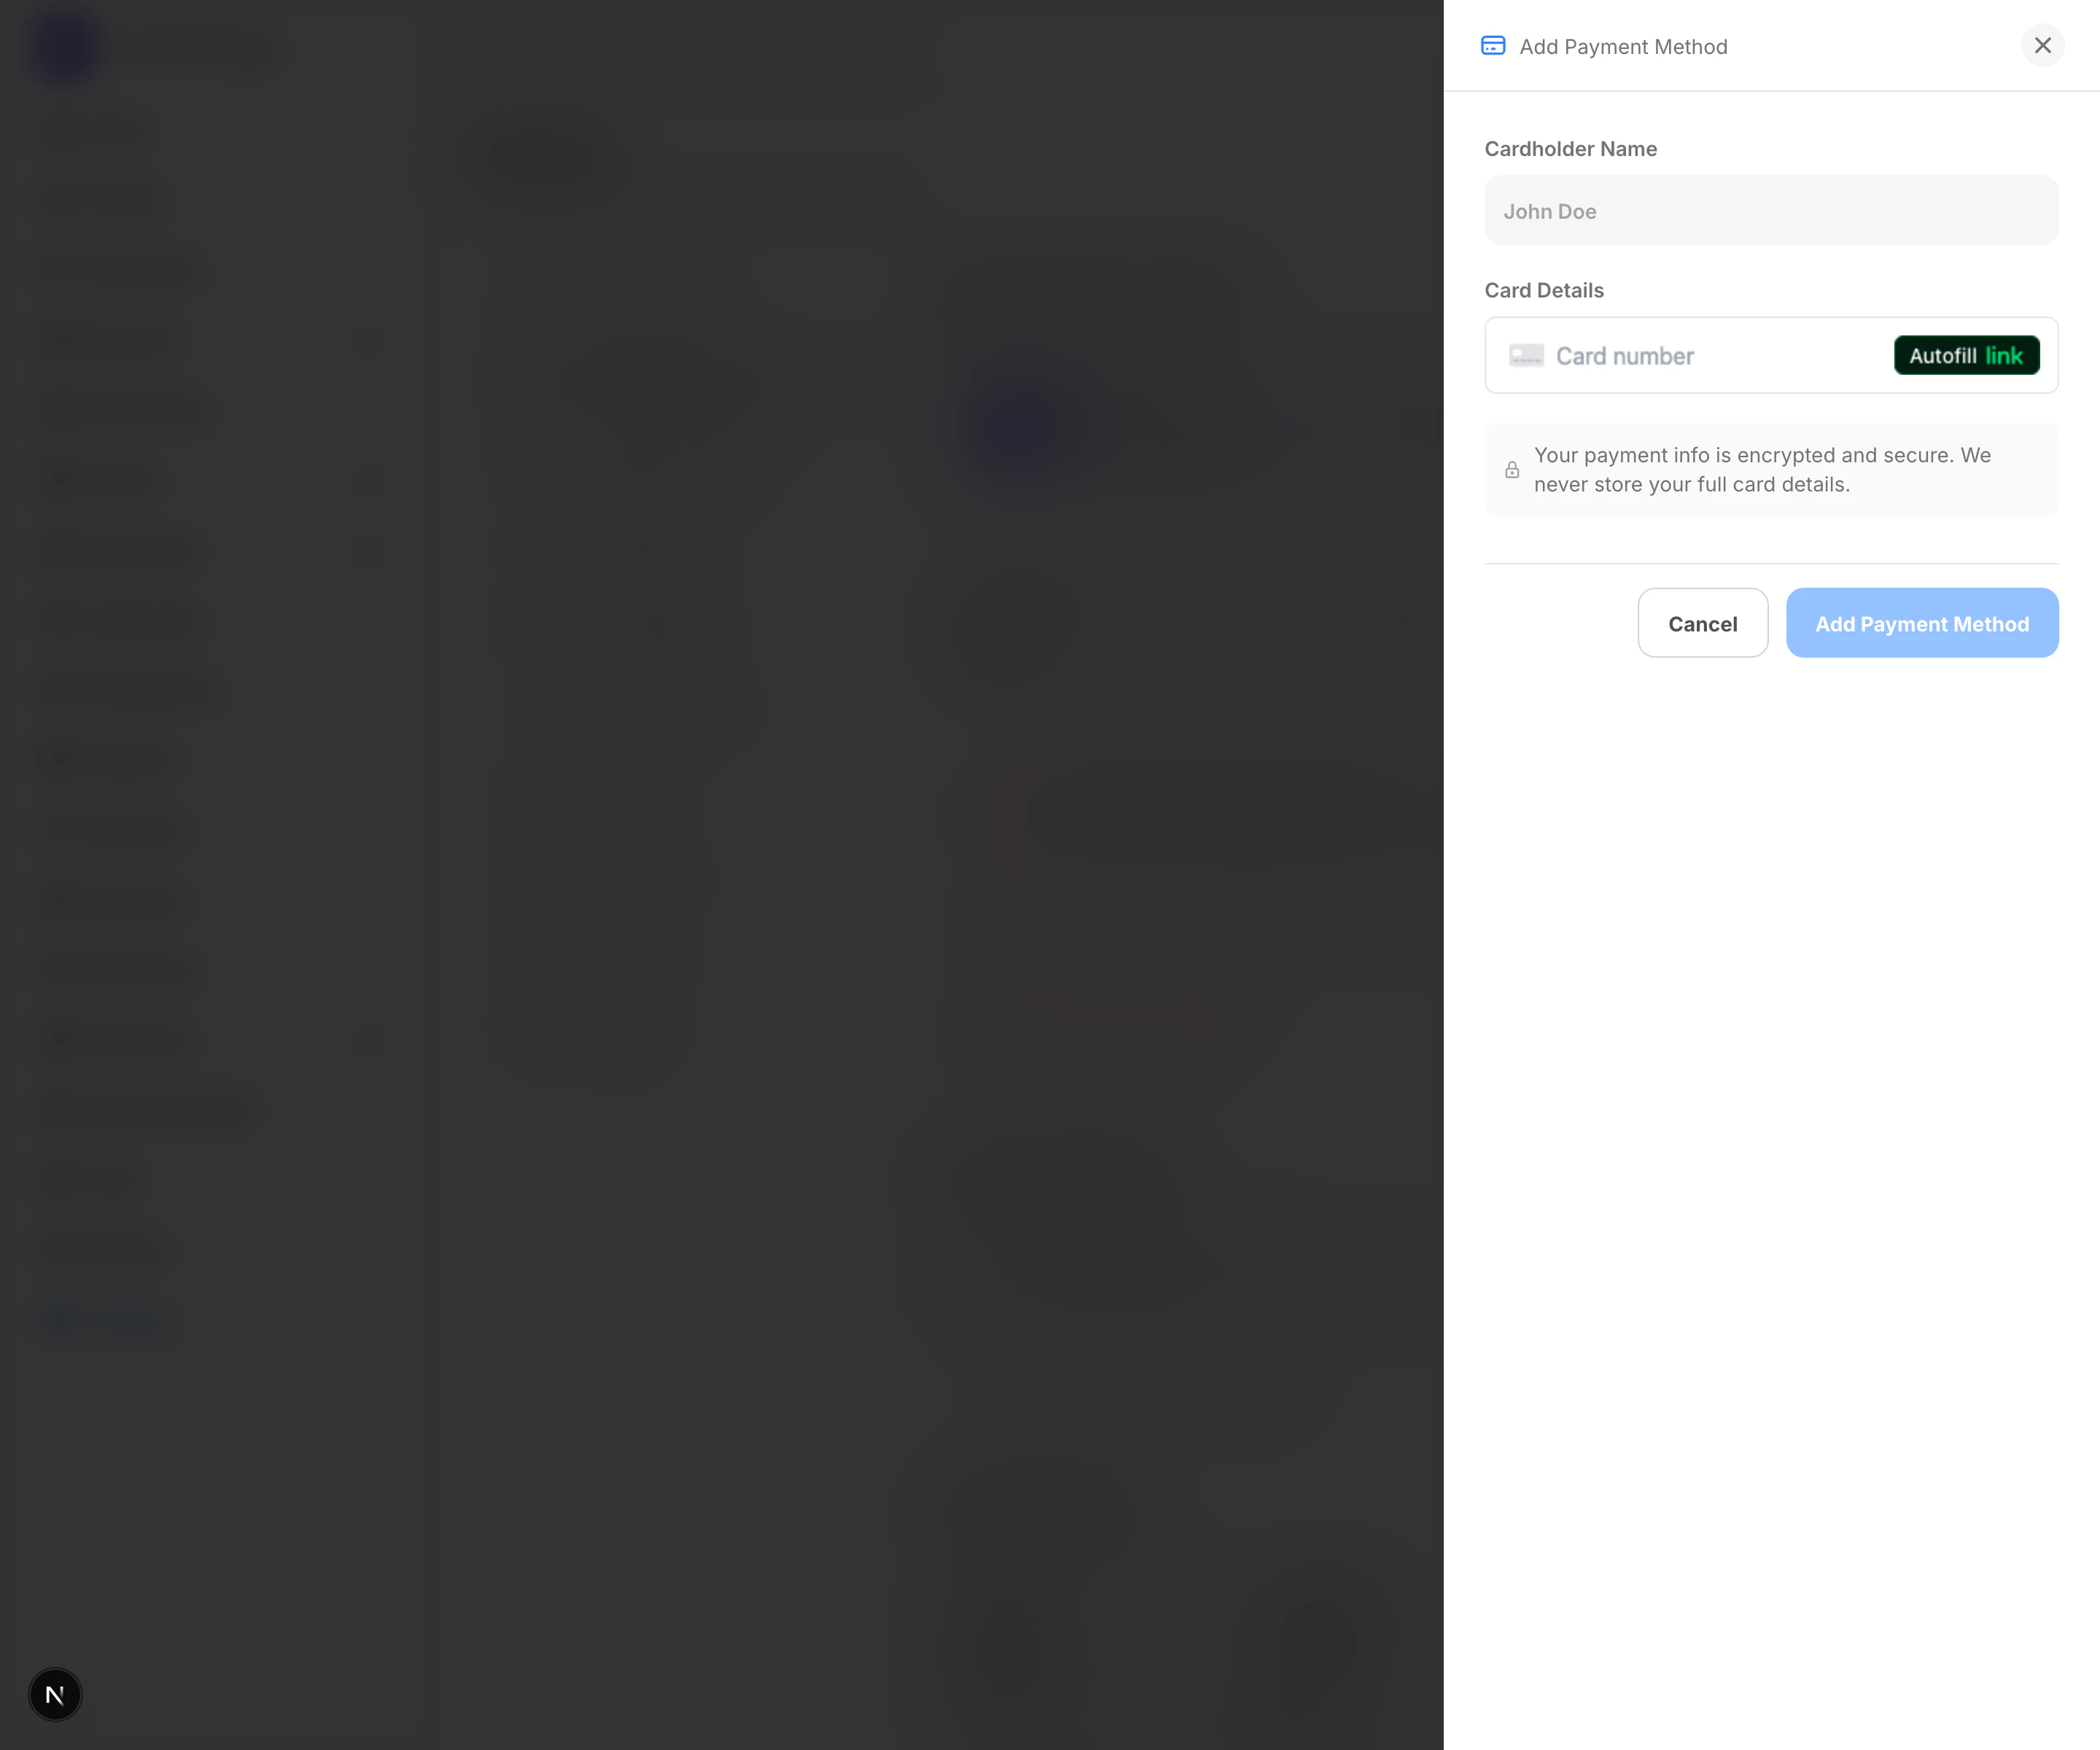
## Payment Methods
Use payment methods to add the card used for subscription billing and other paid add-ons.
 ### What You Can Do
* Add a payment method
* Set a default card
* Remove a payment method when it is no longer needed
### Steps
1. Open `Settings`.
2. Click `Billing & Subscription`.
3. In `Payment Methods`, click `Add Payment Method`.
4. Enter the cardholder name and card details.
5. Save the payment method.
### Notes
* Add a payment method before activating paid add-ons or switching to paid plans.
* The billing page uses the saved payment methods section for subscription charging.
## AI Add-On Billing
Use the AI section on the billing page to manage access to the Digital Ministry Assistant add-on.
### What You Can Do
* Review free AI replies remaining
* Activate the AI add-on
* See included, used, and remaining usage
* Cancel the add-on when needed
### Steps
1. Open `Settings`.
2. Click `Billing & Subscription`.
3. Find the `Digital Ministry Assistant` section.
4. Review the current status and usage totals.
5. Add a payment method first if required.
6. Click `Activate AI Add-on` when you are ready to continue with paid AI usage.
### Notes
* The billing panel shows whether the AI add-on is active, inactive, past due, or canceled.
* Free usage can run out before activation is required, depending on the account state.
### What You Can Do
* Add a payment method
* Set a default card
* Remove a payment method when it is no longer needed
### Steps
1. Open `Settings`.
2. Click `Billing & Subscription`.
3. In `Payment Methods`, click `Add Payment Method`.
4. Enter the cardholder name and card details.
5. Save the payment method.
### Notes
* Add a payment method before activating paid add-ons or switching to paid plans.
* The billing page uses the saved payment methods section for subscription charging.
## AI Add-On Billing
Use the AI section on the billing page to manage access to the Digital Ministry Assistant add-on.
### What You Can Do
* Review free AI replies remaining
* Activate the AI add-on
* See included, used, and remaining usage
* Cancel the add-on when needed
### Steps
1. Open `Settings`.
2. Click `Billing & Subscription`.
3. Find the `Digital Ministry Assistant` section.
4. Review the current status and usage totals.
5. Add a payment method first if required.
6. Click `Activate AI Add-on` when you are ready to continue with paid AI usage.
### Notes
* The billing panel shows whether the AI add-on is active, inactive, past due, or canceled.
* Free usage can run out before activation is required, depending on the account state.