> ## Documentation Index
> Fetch the complete documentation index at: https://docs.thefaithapp.com/llms.txt
> Use this file to discover all available pages before exploring further.
# Dashboard and Internal Tools
> Use the admin dashboard, AI chat assistant, feature requests, support, notifications, and profile tools in TheFaithApp.
# Dashboard and Internal Tools
This guide covers the main admin tools used after sign-in.
These tools include:
* Dashboard
* AI Chat
* Feature Requests
* Support
* Push Notifications
* Profile
## Before You Start
* Sign in to your admin account.
* Open `Church Management` in the left sidebar to find `Dashboard`, `AI Chat`, and `Notifications`.
* `Profile`, `Feature Requests`, and `Support` are in the profile menu at the top right.
* Some tools only appear if your account has permission to use them.
## Dashboard
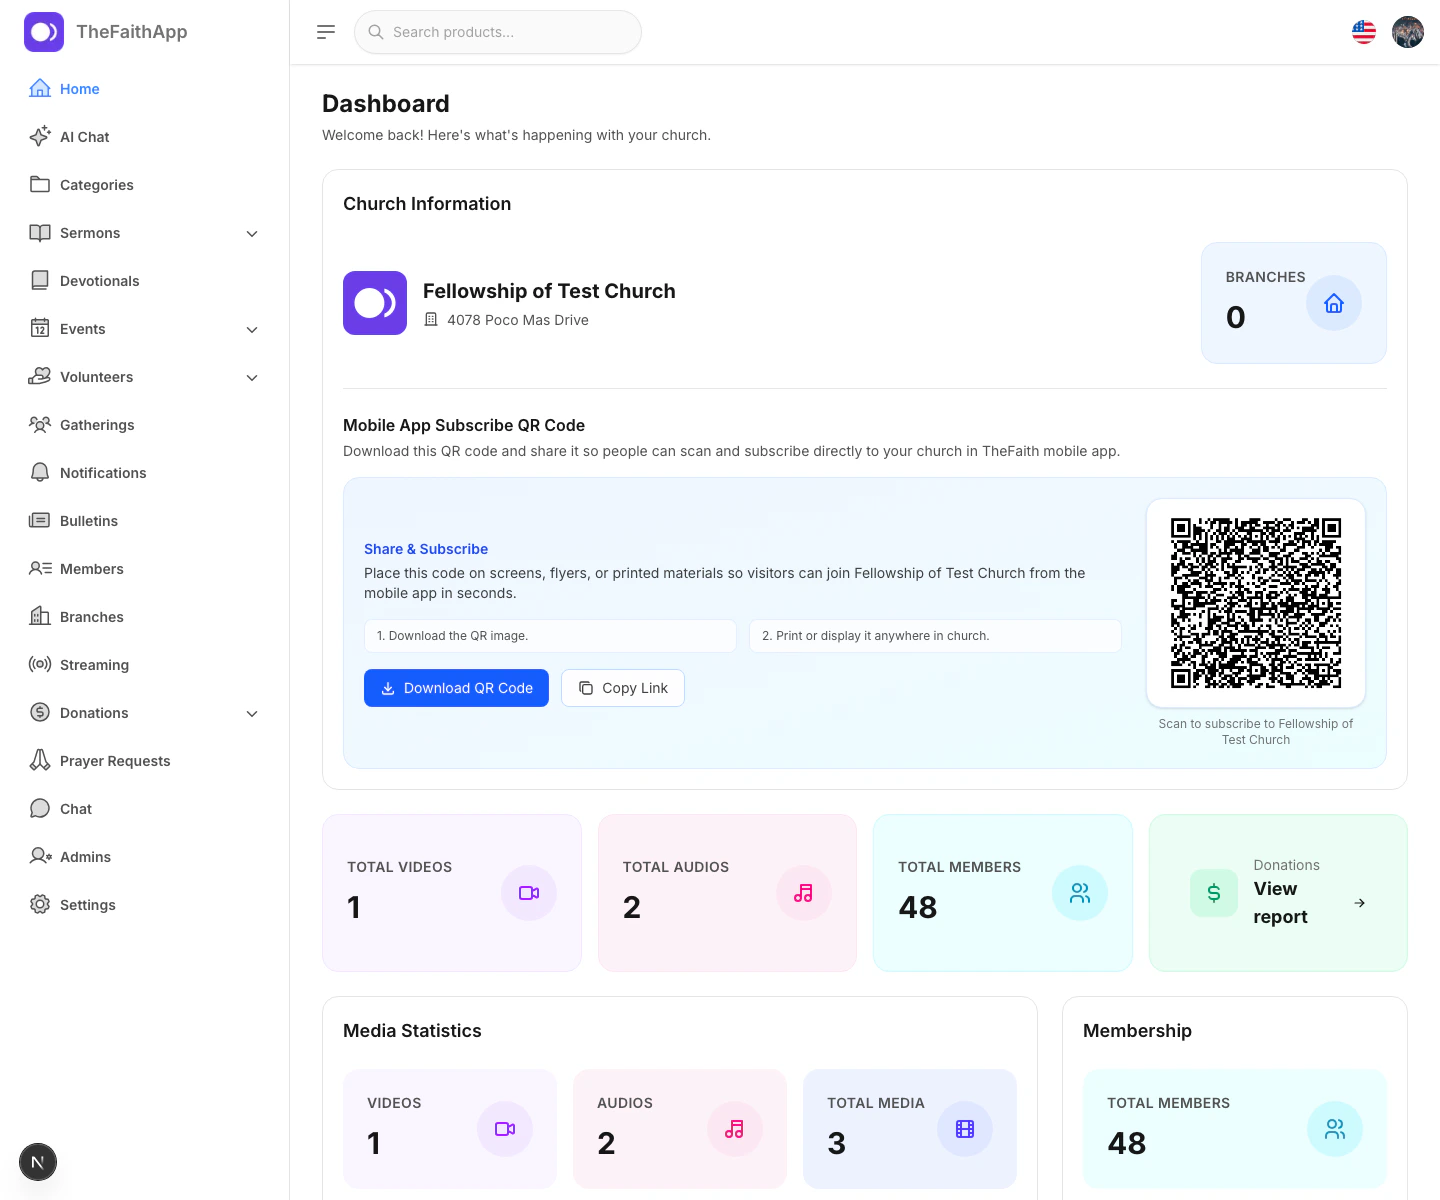
The dashboard is the first page after sign-in and gives a quick summary of church activity.
 ### What You Can Do
* Review church information and branch count
* Download or copy the mobile app subscribe QR code
* Check totals for videos, audios, members, and donations
* Review recent media uploads and recent bulletins
* Open the donations report from the dashboard card
### Steps
1. Open `Church Management` in the left sidebar.
2. Click `Dashboard`.
3. Review the church information card.
4. Use `Download QR Code` or `Copy Link` if you want to share church mobile app access.
5. Scroll down to review media, bulletin, and membership summaries.
6. Open the donations report from the dashboard when needed.
### Notes
* Dashboard cards update based on the church data already in the system.
* If the mobile subscribe setup is incomplete, the QR section can show a warning instead of the QR code.
## AI Chat
AI Chat helps admins draft content and get guided help inside the admin workspace.
### What You Can Do
* Review church information and branch count
* Download or copy the mobile app subscribe QR code
* Check totals for videos, audios, members, and donations
* Review recent media uploads and recent bulletins
* Open the donations report from the dashboard card
### Steps
1. Open `Church Management` in the left sidebar.
2. Click `Dashboard`.
3. Review the church information card.
4. Use `Download QR Code` or `Copy Link` if you want to share church mobile app access.
5. Scroll down to review media, bulletin, and membership summaries.
6. Open the donations report from the dashboard when needed.
### Notes
* Dashboard cards update based on the church data already in the system.
* If the mobile subscribe setup is incomplete, the QR section can show a warning instead of the QR code.
## AI Chat
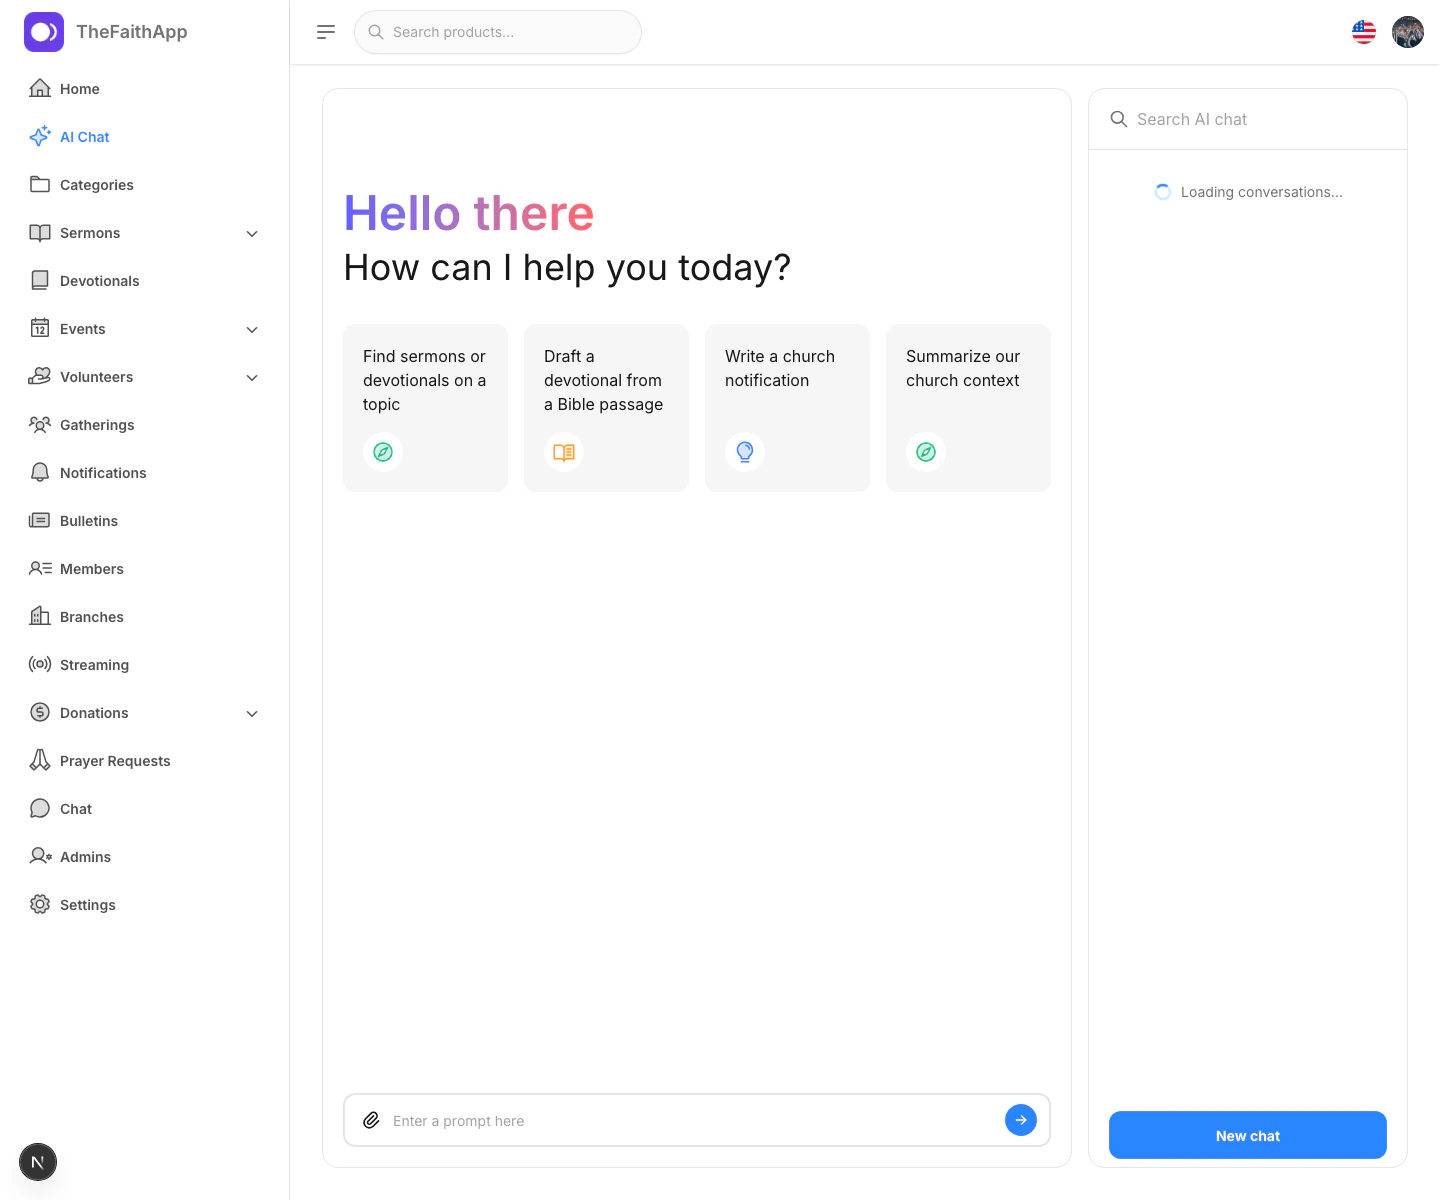
AI Chat helps admins draft content and get guided help inside the admin workspace.
 ### What You Can Do
* Start a new AI conversation
* Use suggested prompts to get started faster
* Type your own prompt
* Search past conversations
* Rename, archive, or delete saved conversations
### Steps
1. Open `Church Management`, then click `AI Chat`.
2. Choose a suggested prompt or type your own message.
3. Send the prompt.
4. Use `New chat` when you want to start over.
5. Open the action menu on a past conversation to rename, archive, or delete it.
### Notes
* Access depends on your admin role or AI Chat permission.
* If AI access is unavailable, the page shows a billing or reply-limit message with a link to `Settings`.
## Feature Requests
Use Feature Requests to send product ideas to the support team.
### What You Can Do
* Start a new AI conversation
* Use suggested prompts to get started faster
* Type your own prompt
* Search past conversations
* Rename, archive, or delete saved conversations
### Steps
1. Open `Church Management`, then click `AI Chat`.
2. Choose a suggested prompt or type your own message.
3. Send the prompt.
4. Use `New chat` when you want to start over.
5. Open the action menu on a past conversation to rename, archive, or delete it.
### Notes
* Access depends on your admin role or AI Chat permission.
* If AI access is unavailable, the page shows a billing or reply-limit message with a link to `Settings`.
## Feature Requests
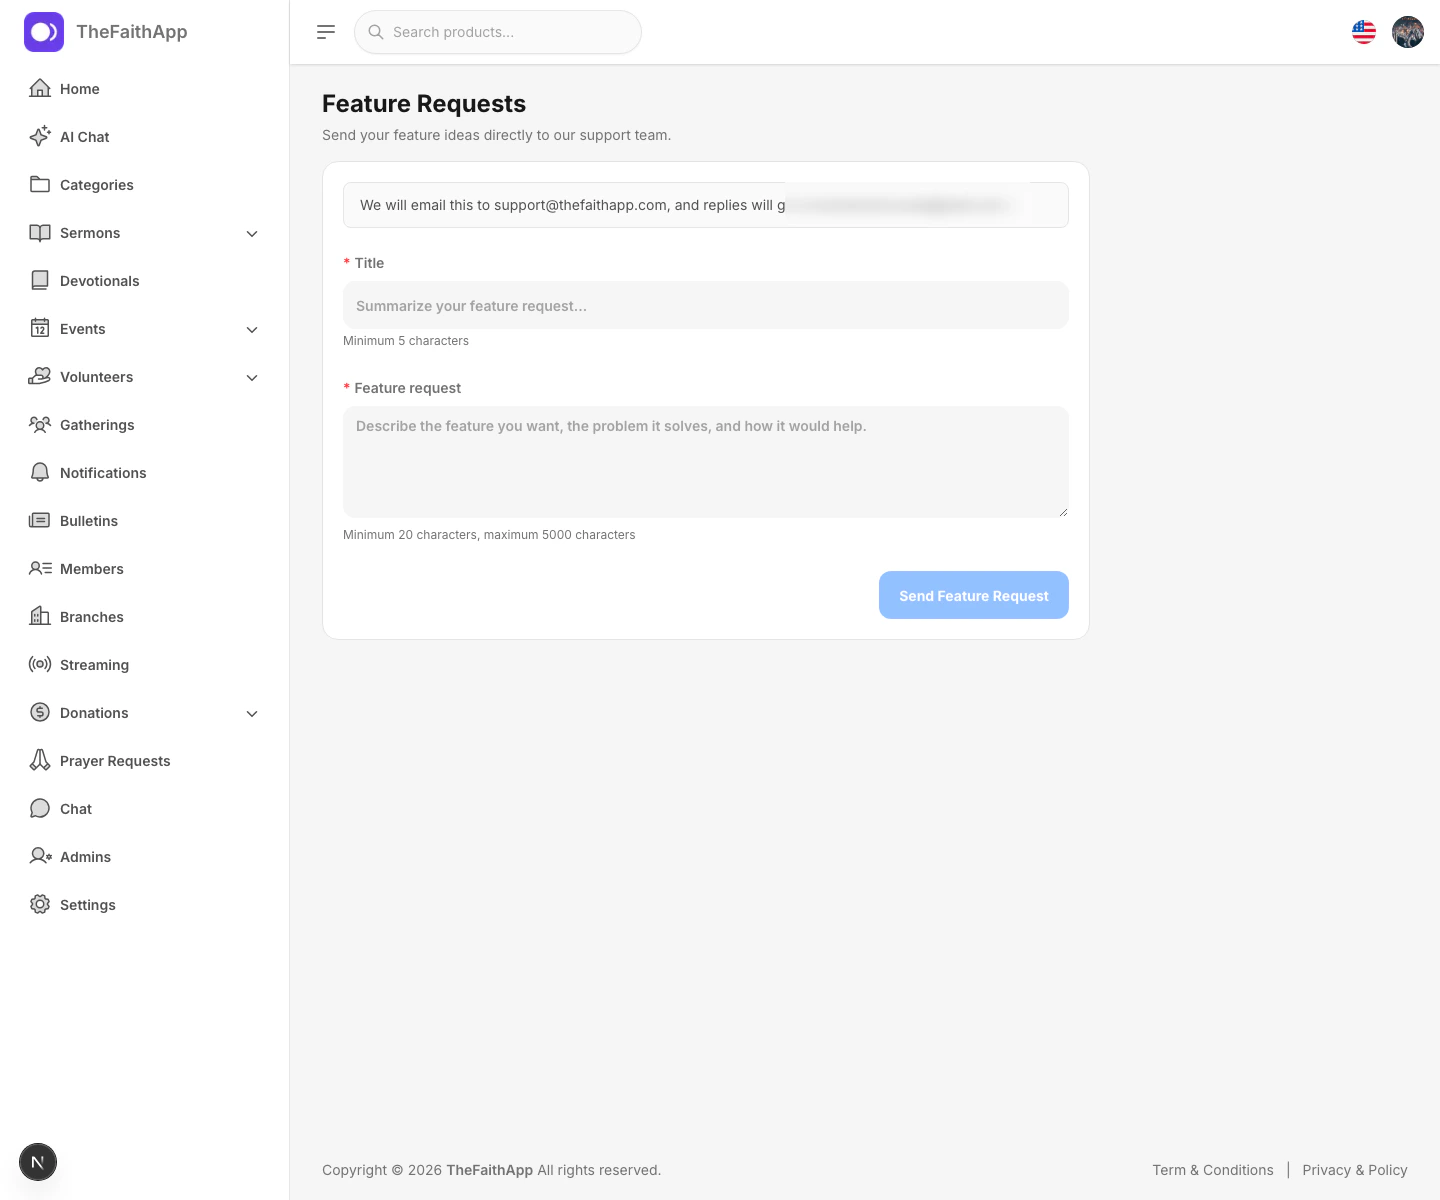
Use Feature Requests to send product ideas to the support team.
 ### Steps
1. Click your profile avatar in the top-right corner.
2. Select `Feature Requests`.
3. Enter a short title.
4. Describe the feature idea and why it would help.
5. Click `Send Feature Request`.
### Result
* The request is sent to the support team.
* Replies go to the email address on your admin account.
* A success message confirms the request was sent.
### Notes
* The title must be at least 5 characters.
* The message must be at least 20 characters.
## Support
Use Support when you need help with a question or issue.
### Steps
1. Click your profile avatar in the top-right corner.
2. Select `Feature Requests`.
3. Enter a short title.
4. Describe the feature idea and why it would help.
5. Click `Send Feature Request`.
### Result
* The request is sent to the support team.
* Replies go to the email address on your admin account.
* A success message confirms the request was sent.
### Notes
* The title must be at least 5 characters.
* The message must be at least 20 characters.
## Support
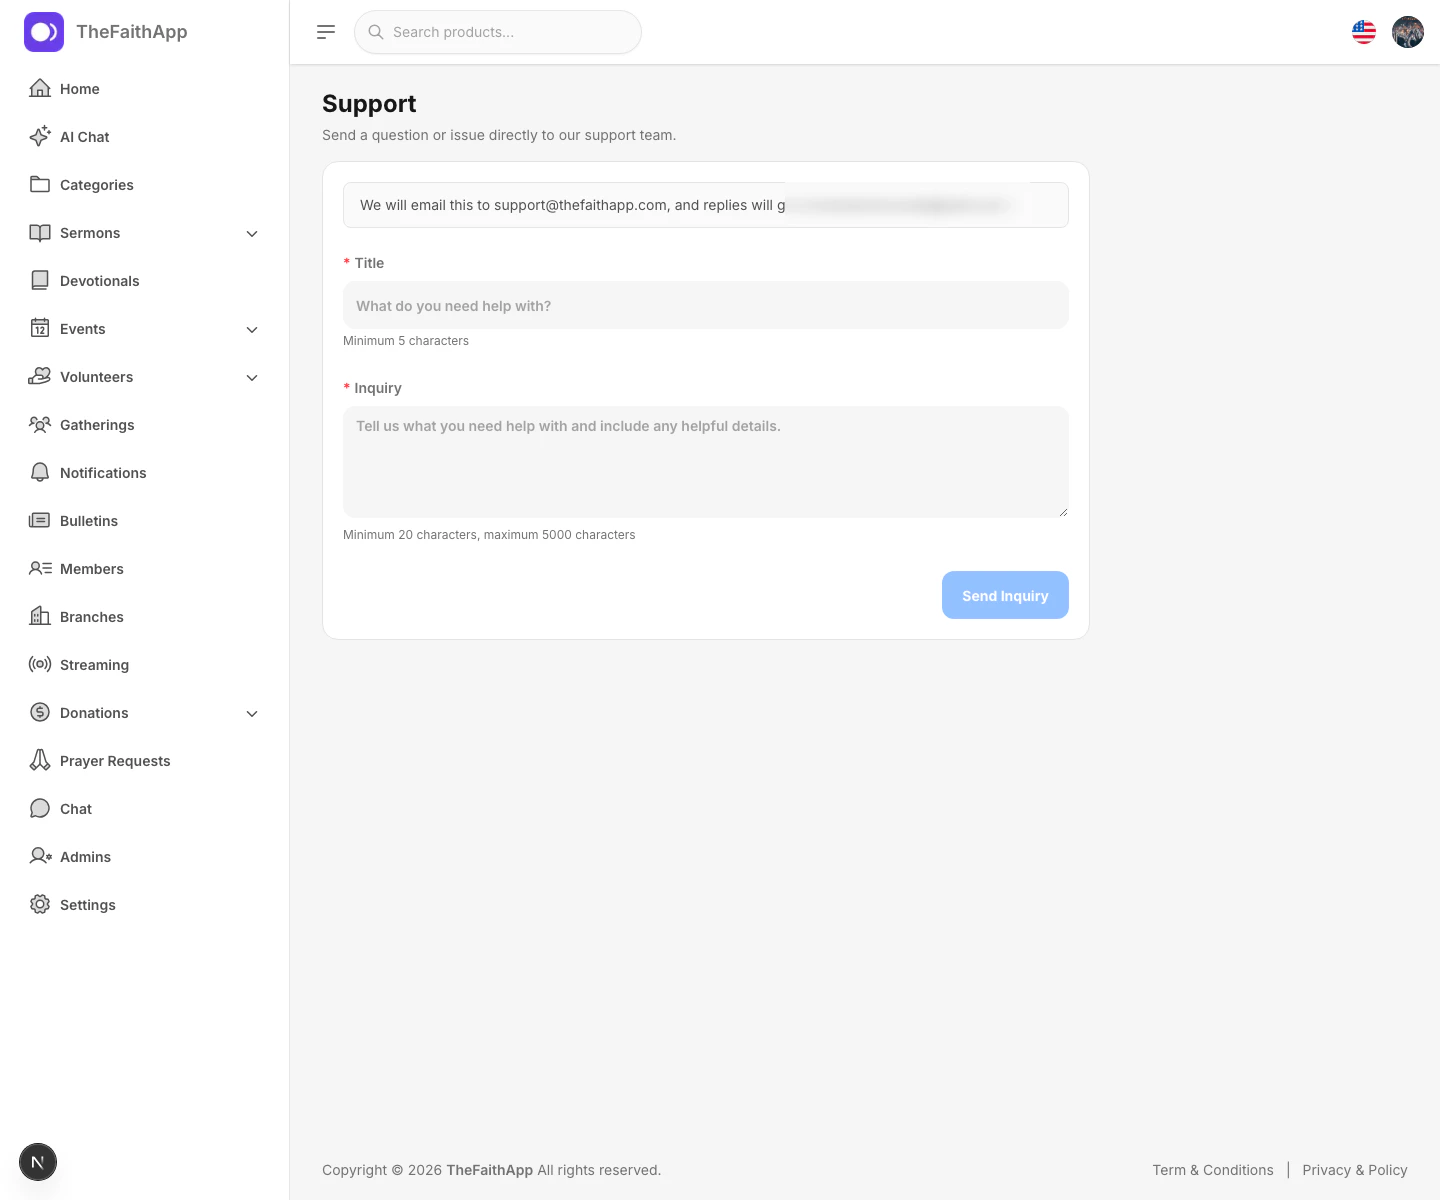
Use Support when you need help with a question or issue.
 ### Steps
1. Click your profile avatar in the top-right corner.
2. Select `Support`.
3. Enter a short title for the issue or question.
4. Add the full details in the message box.
5. Click `Send Inquiry`.
### Result
* The inquiry is sent to the support team.
* Replies go to the email address on your admin account.
* A success message confirms the inquiry was sent.
### Tips
* Include what you were trying to do.
* Include any error wording or unexpected result.
* Add enough detail for the support team to reproduce the issue.
## Push Notifications
Use Push Notifications to send updates to church members.
### Steps
1. Click your profile avatar in the top-right corner.
2. Select `Support`.
3. Enter a short title for the issue or question.
4. Add the full details in the message box.
5. Click `Send Inquiry`.
### Result
* The inquiry is sent to the support team.
* Replies go to the email address on your admin account.
* A success message confirms the inquiry was sent.
### Tips
* Include what you were trying to do.
* Include any error wording or unexpected result.
* Add enough detail for the support team to reproduce the issue.
## Push Notifications
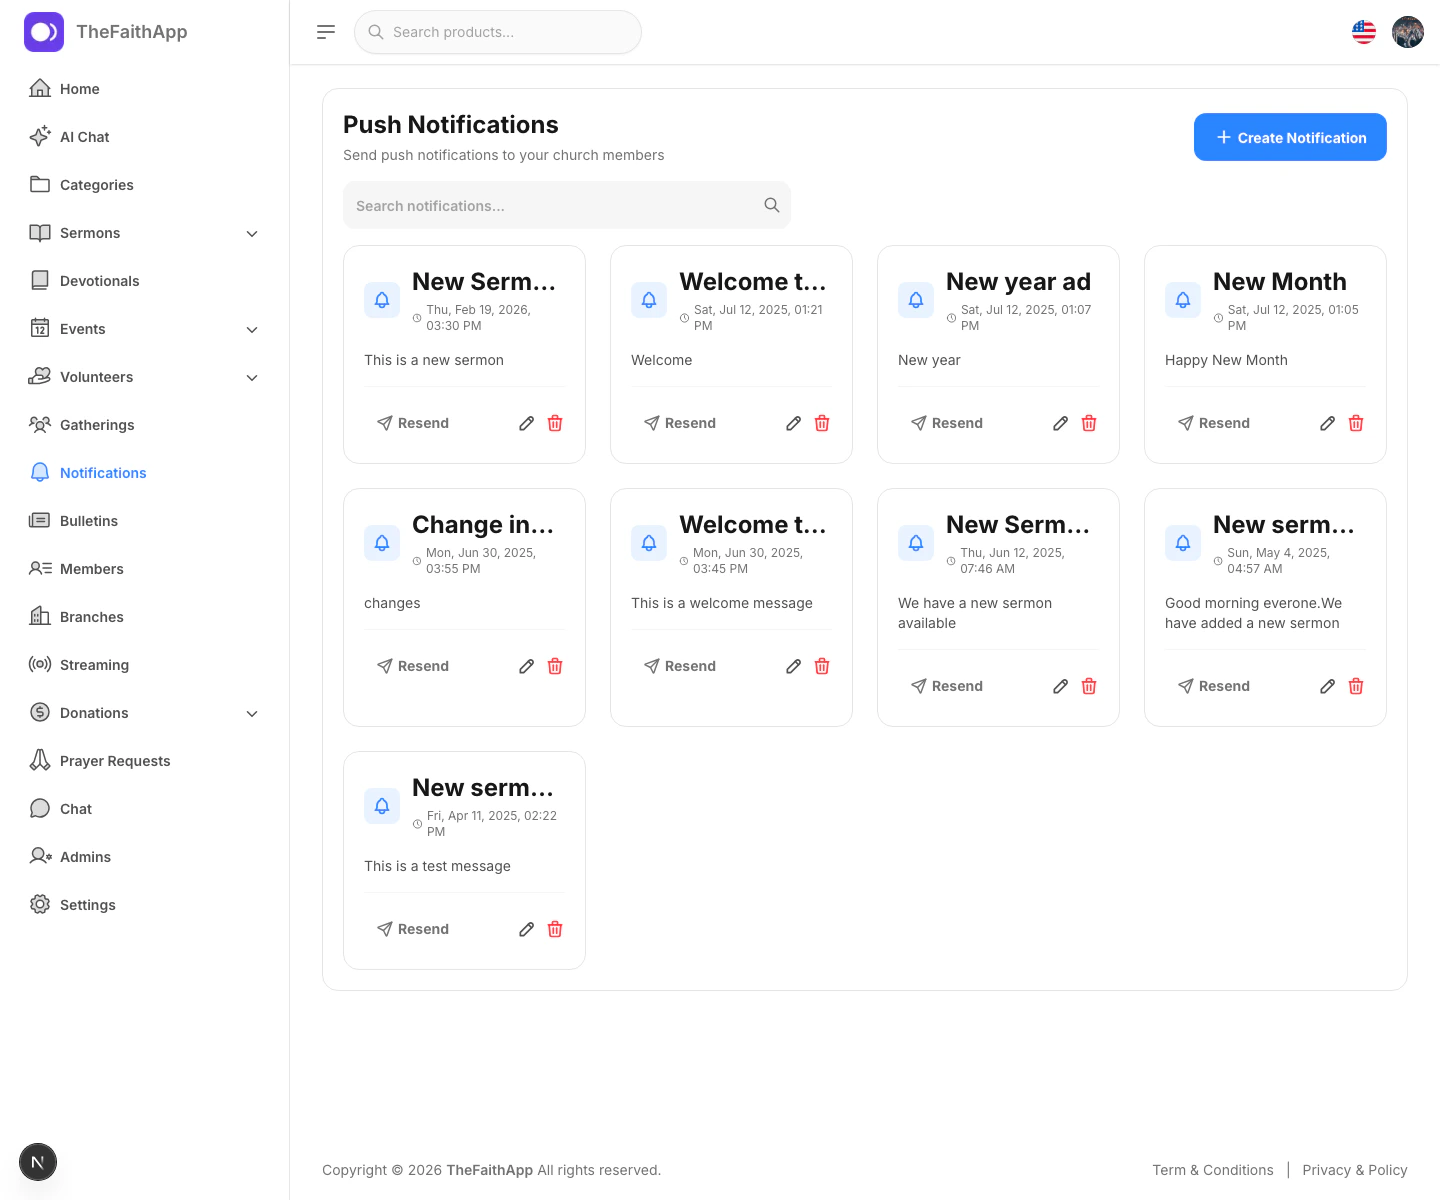
Use Push Notifications to send updates to church members.
 ### What You Can Do
* Create a new notification
* Search past notifications
* Edit an existing notification
* Resend an existing notification
* Delete a notification
### Steps
1. Click `Notifications` in the left sidebar.
2. Click `Create Notification`.
3. Enter the notification title.
4. Write the notification message.
5. Send the notification.
### Managing Existing Notifications
* Use the search field to filter the list.
* Use the edit icon to update a notification.
* Use `Resend` to send the same notification again.
* Use the delete icon to remove a notification.
### Notes
* Create and edit forms open in a right-side panel.
* Existing notifications appear as cards with quick actions.
## Profile
Use Profile to update your personal account details.
### What You Can Do
* Create a new notification
* Search past notifications
* Edit an existing notification
* Resend an existing notification
* Delete a notification
### Steps
1. Click `Notifications` in the left sidebar.
2. Click `Create Notification`.
3. Enter the notification title.
4. Write the notification message.
5. Send the notification.
### Managing Existing Notifications
* Use the search field to filter the list.
* Use the edit icon to update a notification.
* Use `Resend` to send the same notification again.
* Use the delete icon to remove a notification.
### Notes
* Create and edit forms open in a right-side panel.
* Existing notifications appear as cards with quick actions.
## Profile
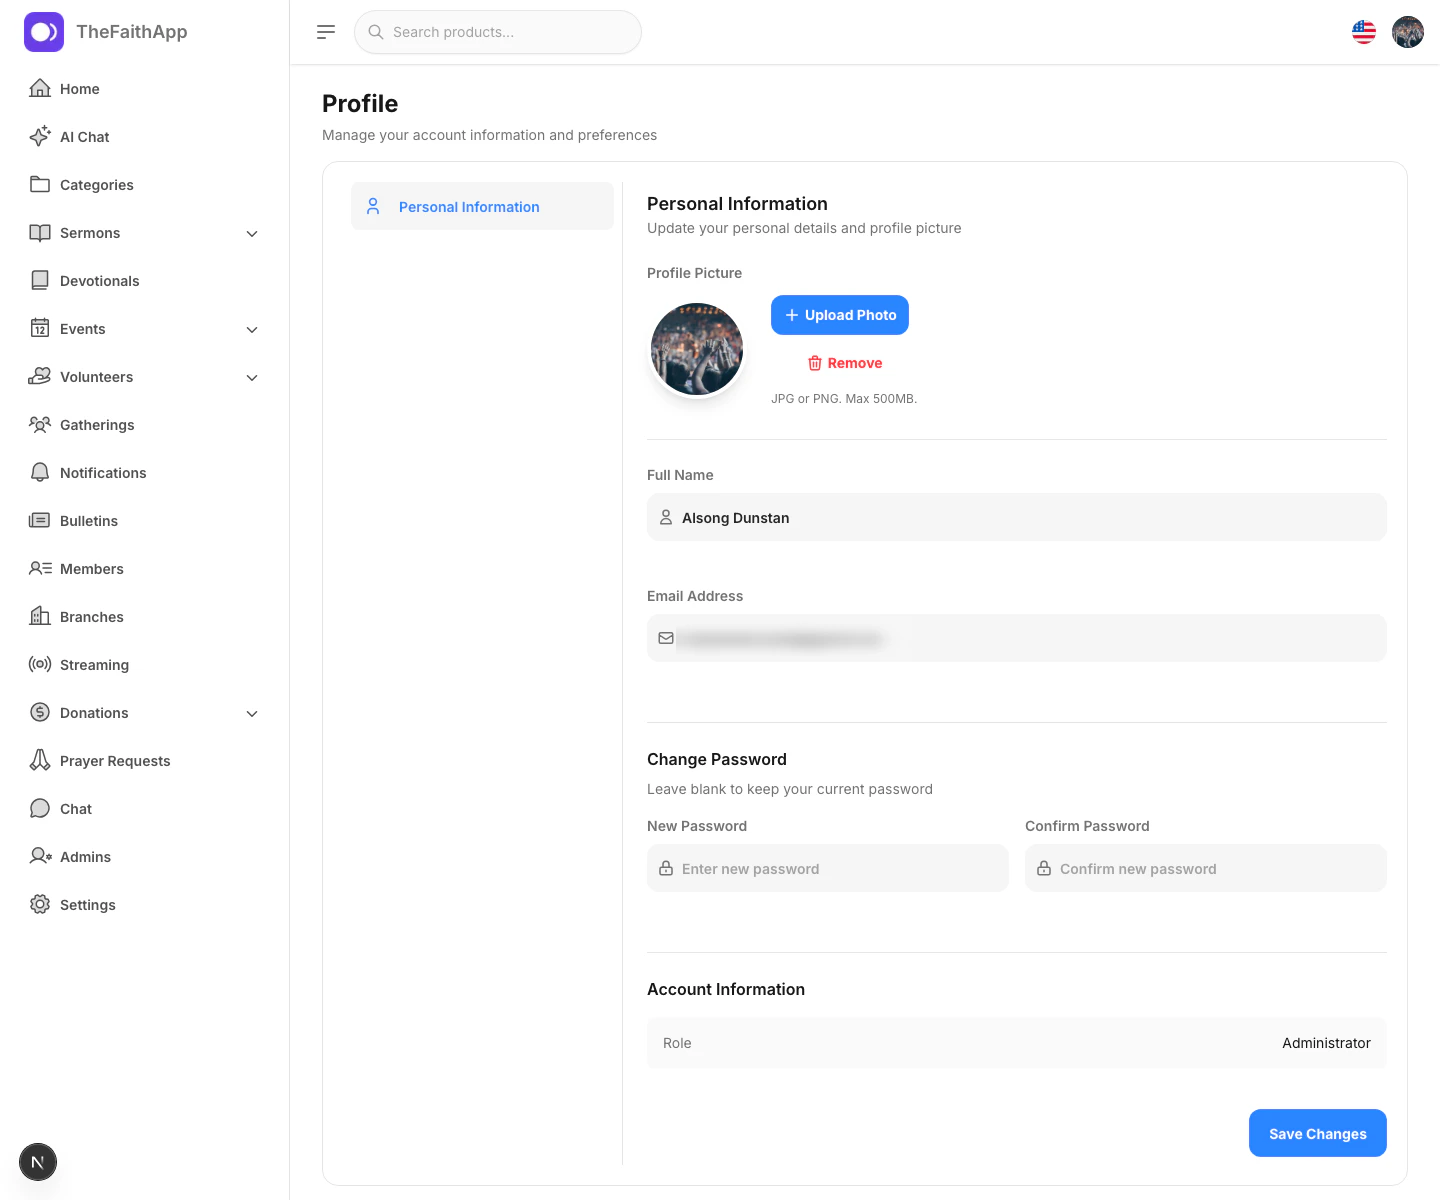
Use Profile to update your personal account details.
 ### Steps
1. Click your profile avatar in the top-right corner.
2. Select `Profile`.
3. Update your name or email address.
4. Upload or remove the profile photo if needed.
5. Enter and confirm a new password if you want to change it.
6. Click `Save Changes`.
### Notes
* Leave the password fields blank if you do not want to change your password.
* Profile photos accept JPG or PNG uploads.
* The current account role is shown on the page.
### Steps
1. Click your profile avatar in the top-right corner.
2. Select `Profile`.
3. Update your name or email address.
4. Upload or remove the profile photo if needed.
5. Enter and confirm a new password if you want to change it.
6. Click `Save Changes`.
### Notes
* Leave the password fields blank if you do not want to change your password.
* Profile photos accept JPG or PNG uploads.
* The current account role is shown on the page.