> ## Documentation Index
> Fetch the complete documentation index at: https://docs.thefaithapp.com/llms.txt
> Use this file to discover all available pages before exploring further.
# Church Operations
> Manage members, imports, branches, gatherings, admin accounts, roles, and permissions in TheFaithApp.
# Church Operations
This guide covers the main church administration tools used to manage people, locations, schedules, and internal access.
These tools include:
* Members
* Member imports
* Import history and undo
* Branches
* Gatherings
* Admin accounts
* Roles and permissions
## Before You Start
* Sign in to your admin account.
* `Members`, `Branches`, `Gatherings`, and `Admins` are in the left sidebar.
* Some account-management actions depend on your own admin level.
## Members
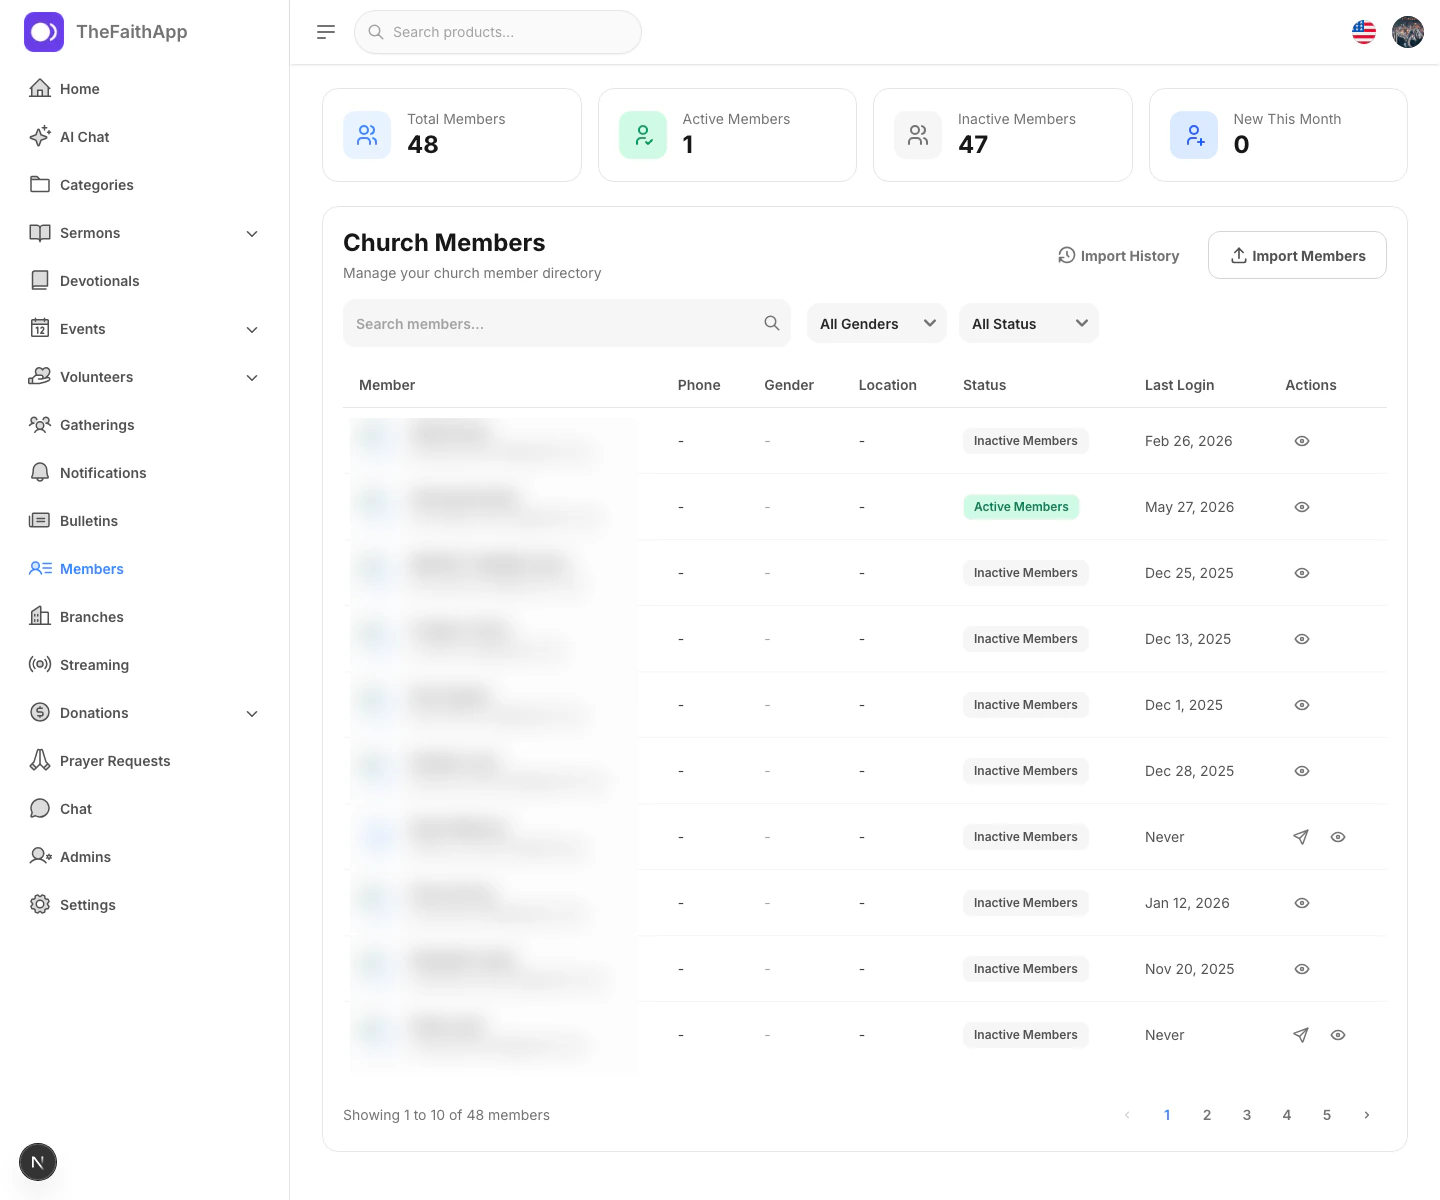
Use Members to manage your church member directory and review engagement status.
 ### What You Can Do
* Review total, active, inactive, and new member counts
* Search the directory
* Filter by gender and activity status
* Open a member profile to see more details
* Resend an invite to members who have not logged in yet
### Steps
1. Click `Members` in the left sidebar.
2. Use the search field to find a member by name or email.
3. Use the gender and status filters when needed.
4. Click the view icon to open the member details drawer.
5. Use the resend invite action for members who still need access.
### Notes
* Member status is based on recent login activity.
* The view drawer shows contact, personal, location, and account details.
## Member Imports
Use the import flow when you need to add many members at once from a CSV file.
### What You Can Do
* Review total, active, inactive, and new member counts
* Search the directory
* Filter by gender and activity status
* Open a member profile to see more details
* Resend an invite to members who have not logged in yet
### Steps
1. Click `Members` in the left sidebar.
2. Use the search field to find a member by name or email.
3. Use the gender and status filters when needed.
4. Click the view icon to open the member details drawer.
5. Use the resend invite action for members who still need access.
### Notes
* Member status is based on recent login activity.
* The view drawer shows contact, personal, location, and account details.
## Member Imports
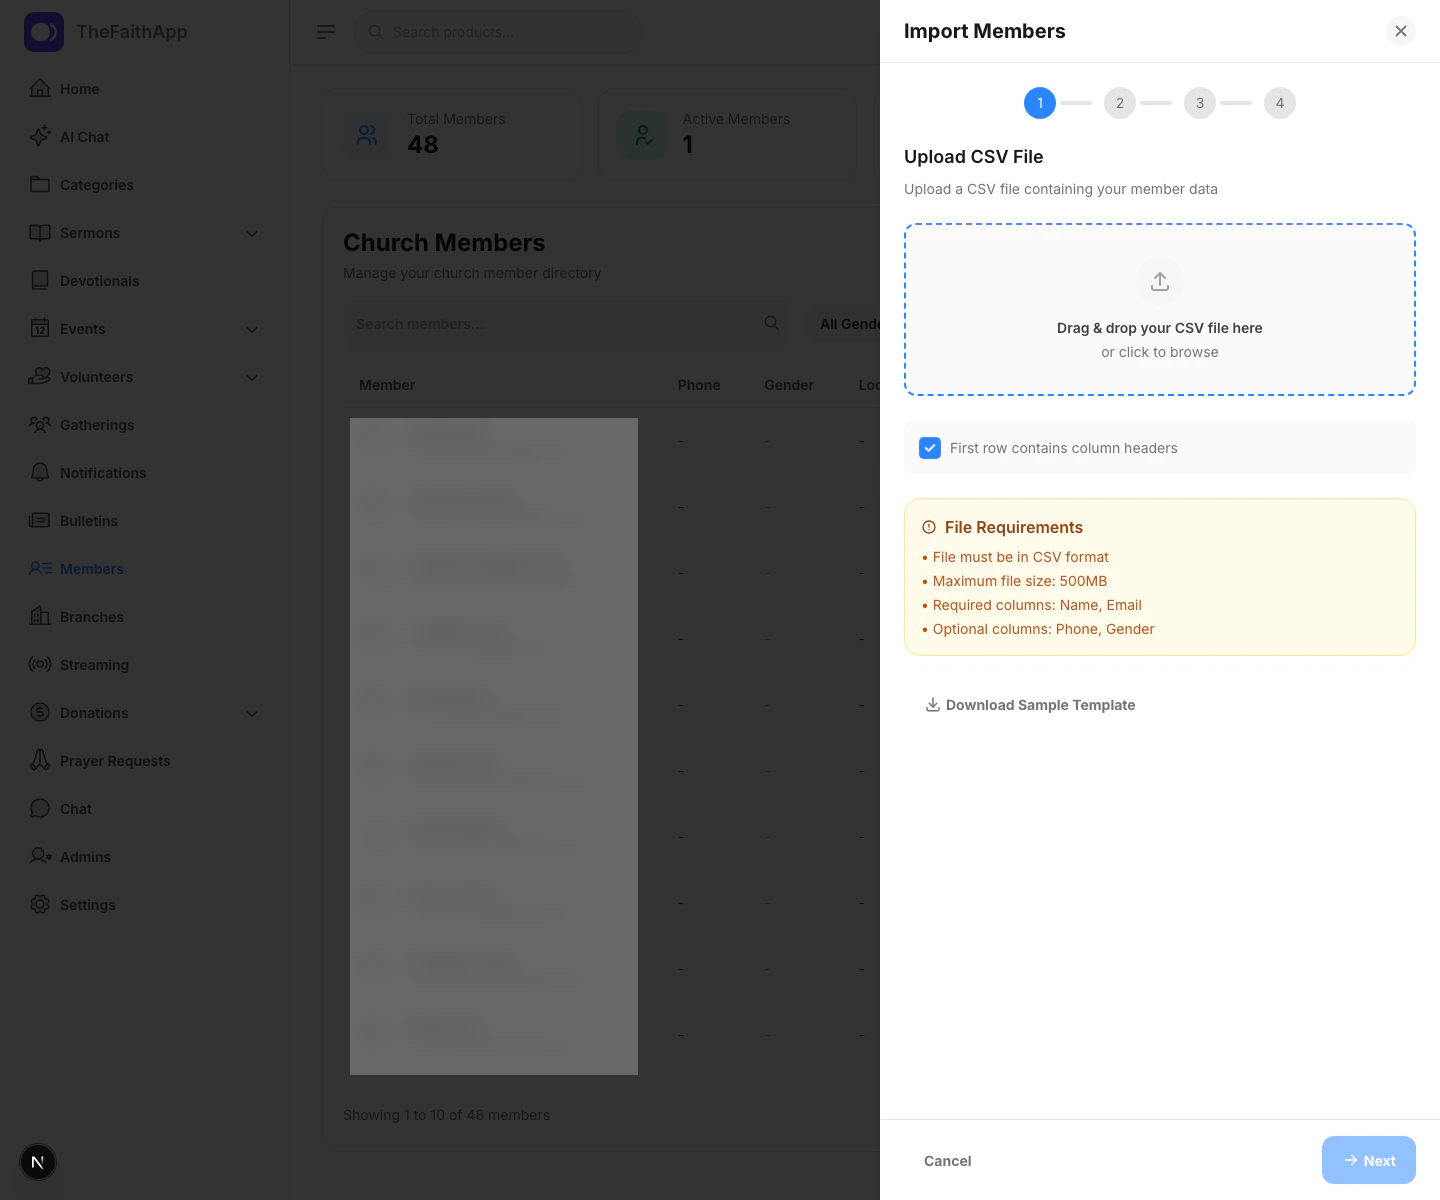
Use the import flow when you need to add many members at once from a CSV file.
 ### What You Can Do
* Upload a CSV file
* Confirm whether the first row contains headers
* Download a sample template
* Map CSV columns before processing the import
### CSV Requirements
* File type must be CSV
* Required columns are `Name` and `Email`
* Optional columns include `Phone` and `Gender`
### Steps
1. Open `Members`.
2. Click `Import Members`.
3. Upload the CSV file.
4. Confirm whether the first row contains column headers.
5. Continue to the mapping step.
6. Match each required field to the correct CSV column.
7. Review the sample data preview.
8. Start the import.
### Result
* The system processes the file and shows imported, skipped, and failed totals.
## Import History And Undo
Use Import History to review past member uploads and undo a completed import if needed.
### What You Can Do
* Upload a CSV file
* Confirm whether the first row contains headers
* Download a sample template
* Map CSV columns before processing the import
### CSV Requirements
* File type must be CSV
* Required columns are `Name` and `Email`
* Optional columns include `Phone` and `Gender`
### Steps
1. Open `Members`.
2. Click `Import Members`.
3. Upload the CSV file.
4. Confirm whether the first row contains column headers.
5. Continue to the mapping step.
6. Match each required field to the correct CSV column.
7. Review the sample data preview.
8. Start the import.
### Result
* The system processes the file and shows imported, skipped, and failed totals.
## Import History And Undo
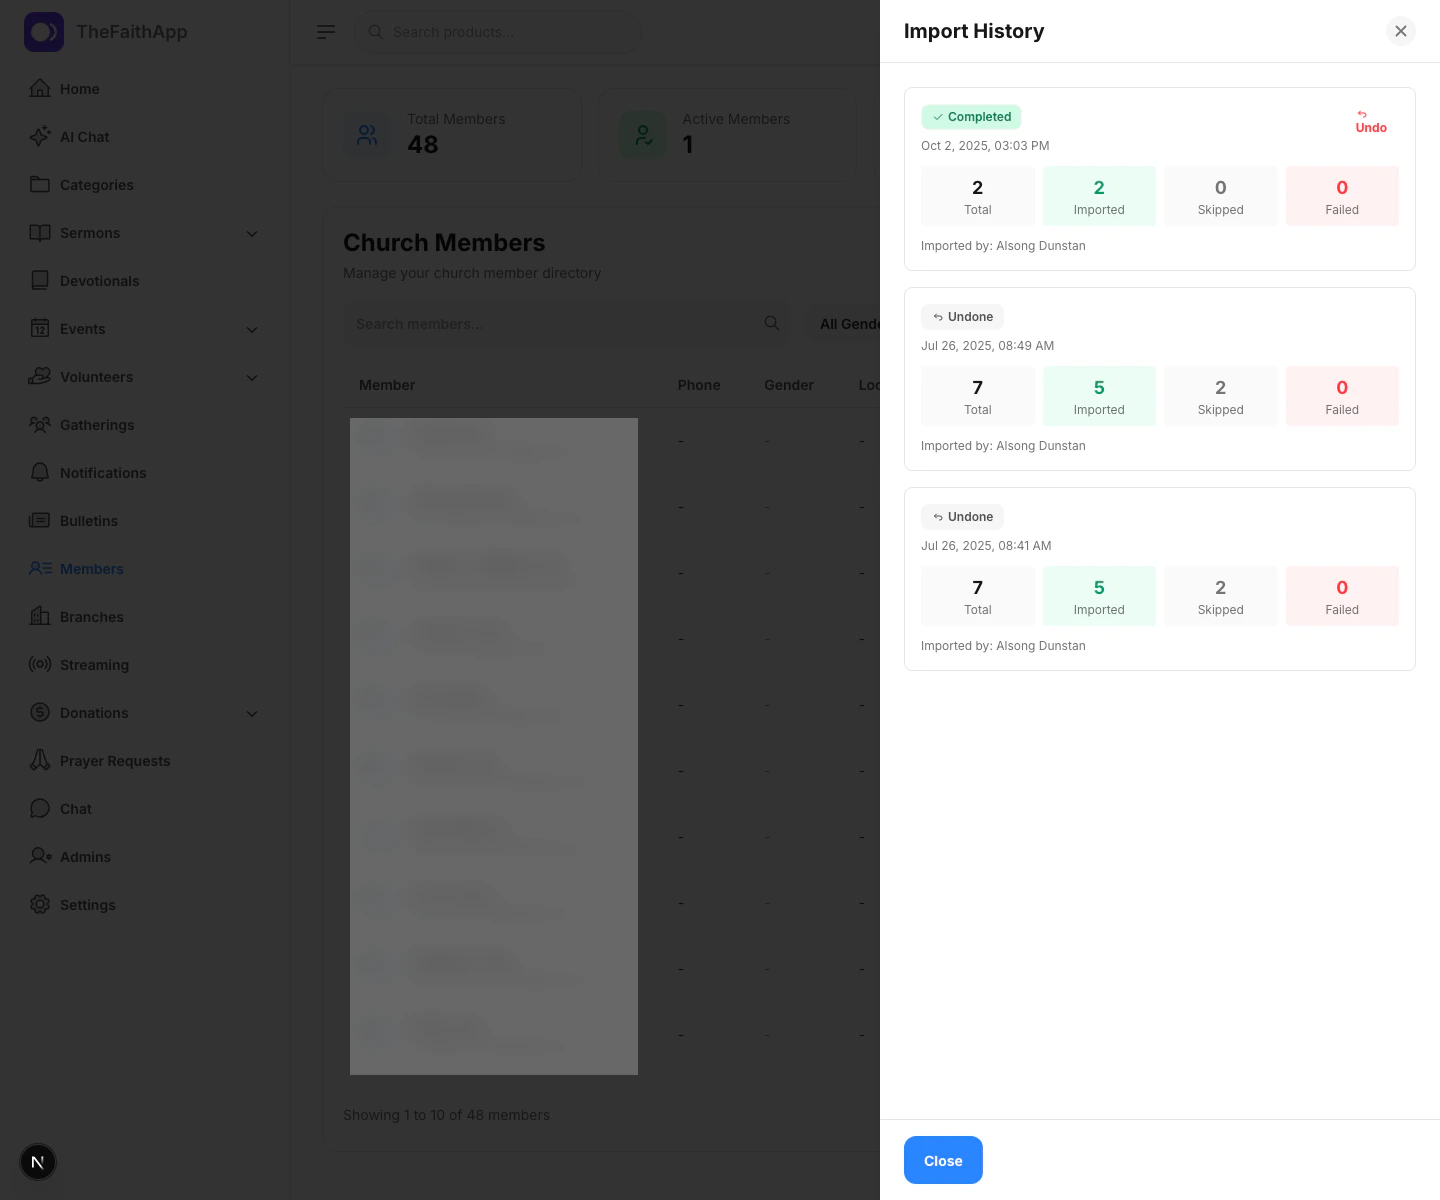
Use Import History to review past member uploads and undo a completed import if needed.
 ### What You Can Do
* Review past imports
* See totals for imported, skipped, and failed rows
* Undo a completed import that created members
### Steps
1. Open `Members`.
2. Click `Import History`.
3. Review the import status and totals.
4. Click `Undo` on a completed import if you need to reverse it.
5. Confirm the undo action.
### Notes
* Undo is only available for completed imports that successfully created members.
* The member directory refreshes after an undo is completed.
## Branches
Use Branches to manage church campuses or locations.
### What You Can Do
* Review past imports
* See totals for imported, skipped, and failed rows
* Undo a completed import that created members
### Steps
1. Open `Members`.
2. Click `Import History`.
3. Review the import status and totals.
4. Click `Undo` on a completed import if you need to reverse it.
5. Confirm the undo action.
### Notes
* Undo is only available for completed imports that successfully created members.
* The member directory refreshes after an undo is completed.
## Branches
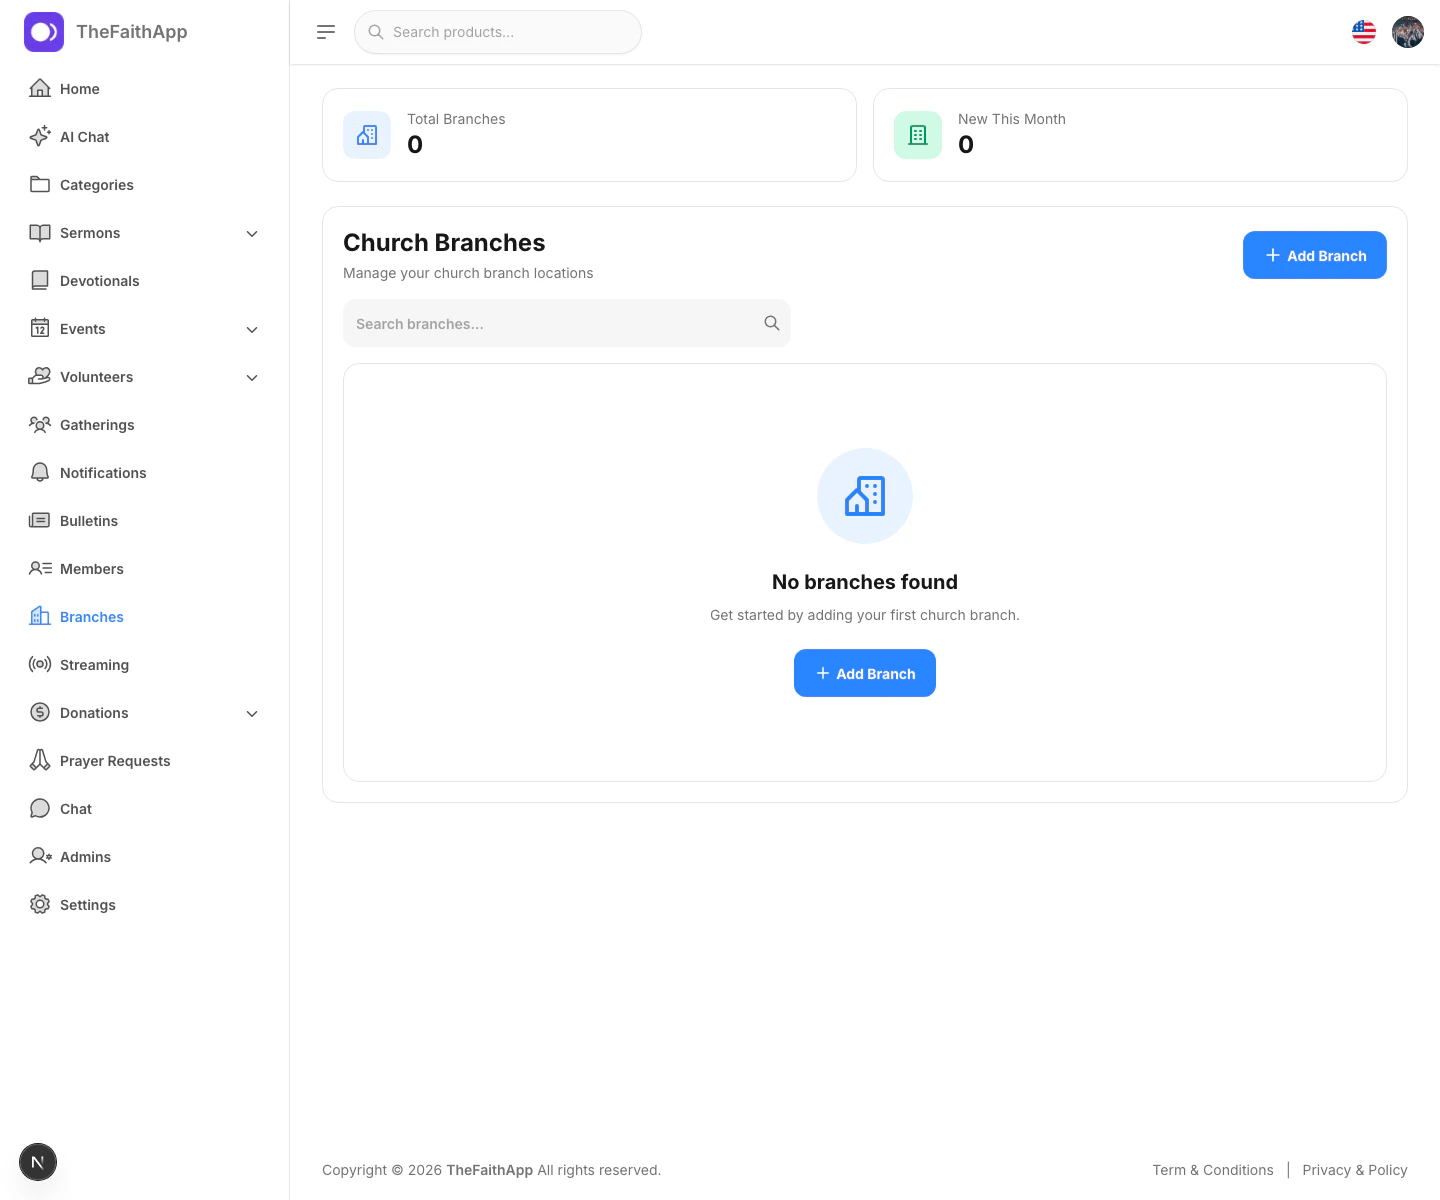
Use Branches to manage church campuses or locations.
 ### What You Can Do
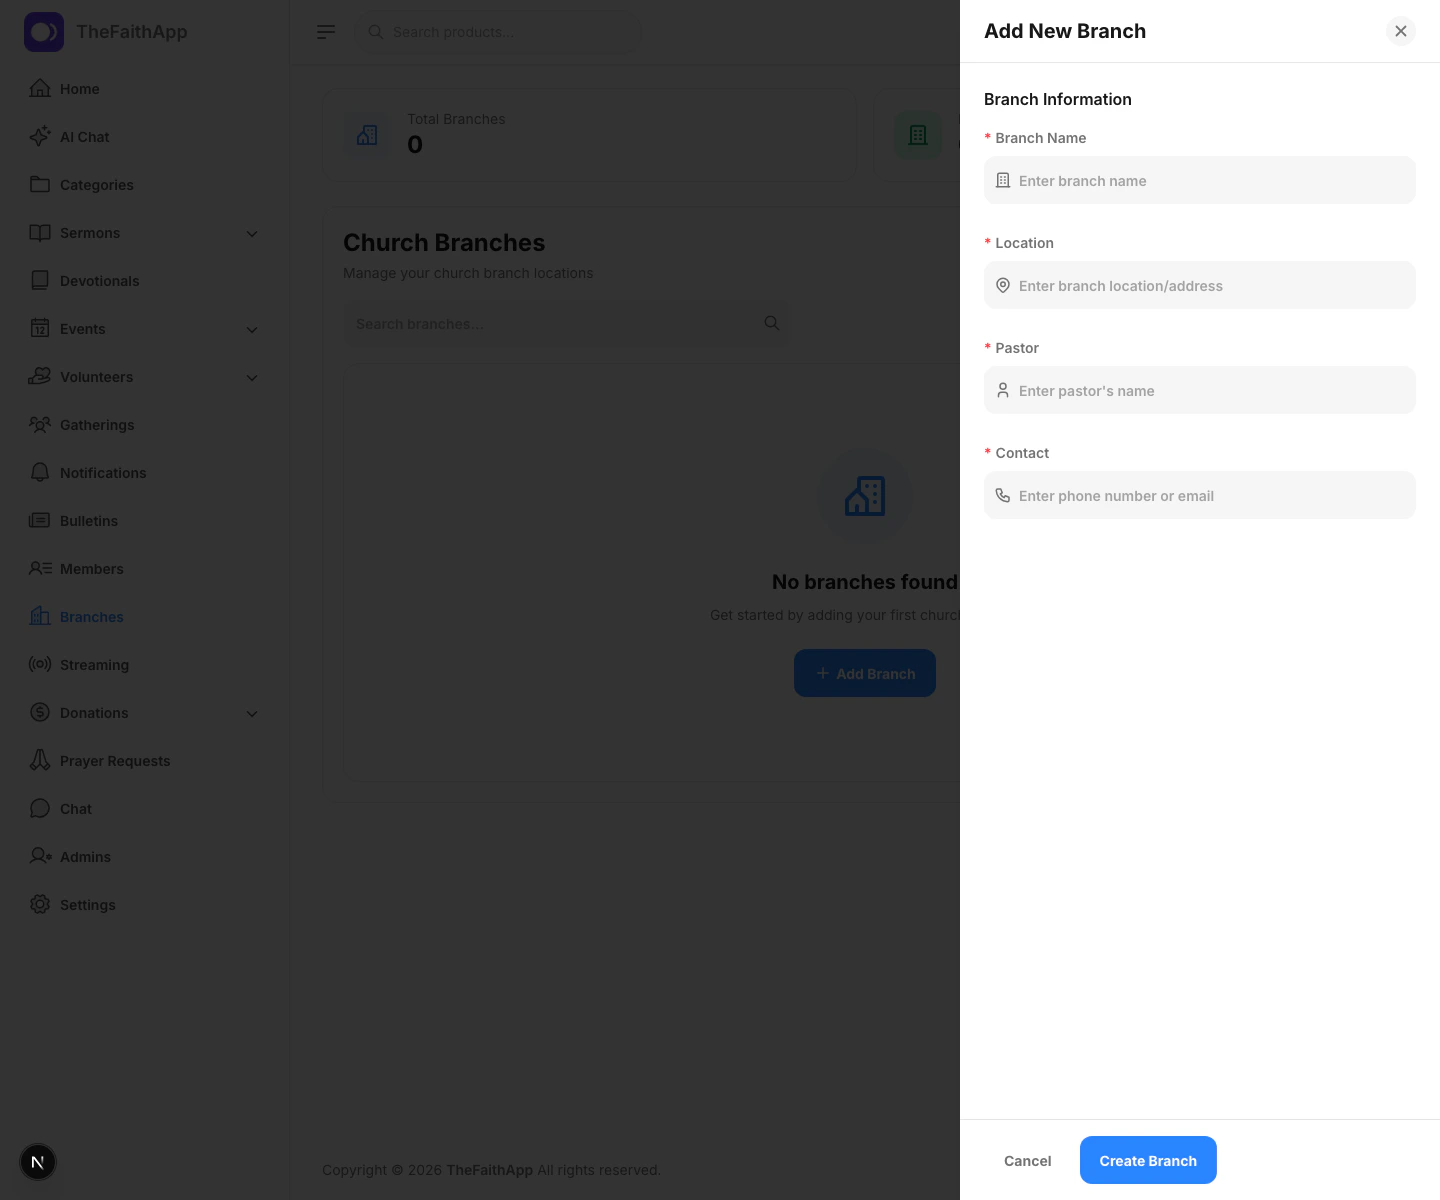
* Create a branch
* Search branches
* Edit branch details
* Delete a branch
### Branch Details
* Branch name
* Location
* Pastor
* Contact
### Steps
1. Click `Branches` in the left sidebar.
2. Click `Add Branch`.
3. Enter the branch details.
4. Save the branch.
5. Use the edit or delete actions from the list when updates are needed.
### Notes
* If no branches exist yet, the page shows an empty state with a direct `Add Branch` action.
## Gatherings
Use Gatherings to manage recurring church services and meetings.
### What You Can Do
* Create a branch
* Search branches
* Edit branch details
* Delete a branch
### Branch Details
* Branch name
* Location
* Pastor
* Contact
### Steps
1. Click `Branches` in the left sidebar.
2. Click `Add Branch`.
3. Enter the branch details.
4. Save the branch.
5. Use the edit or delete actions from the list when updates are needed.
### Notes
* If no branches exist yet, the page shows an empty state with a direct `Add Branch` action.
## Gatherings
Use Gatherings to manage recurring church services and meetings.
 ### What You Can Do
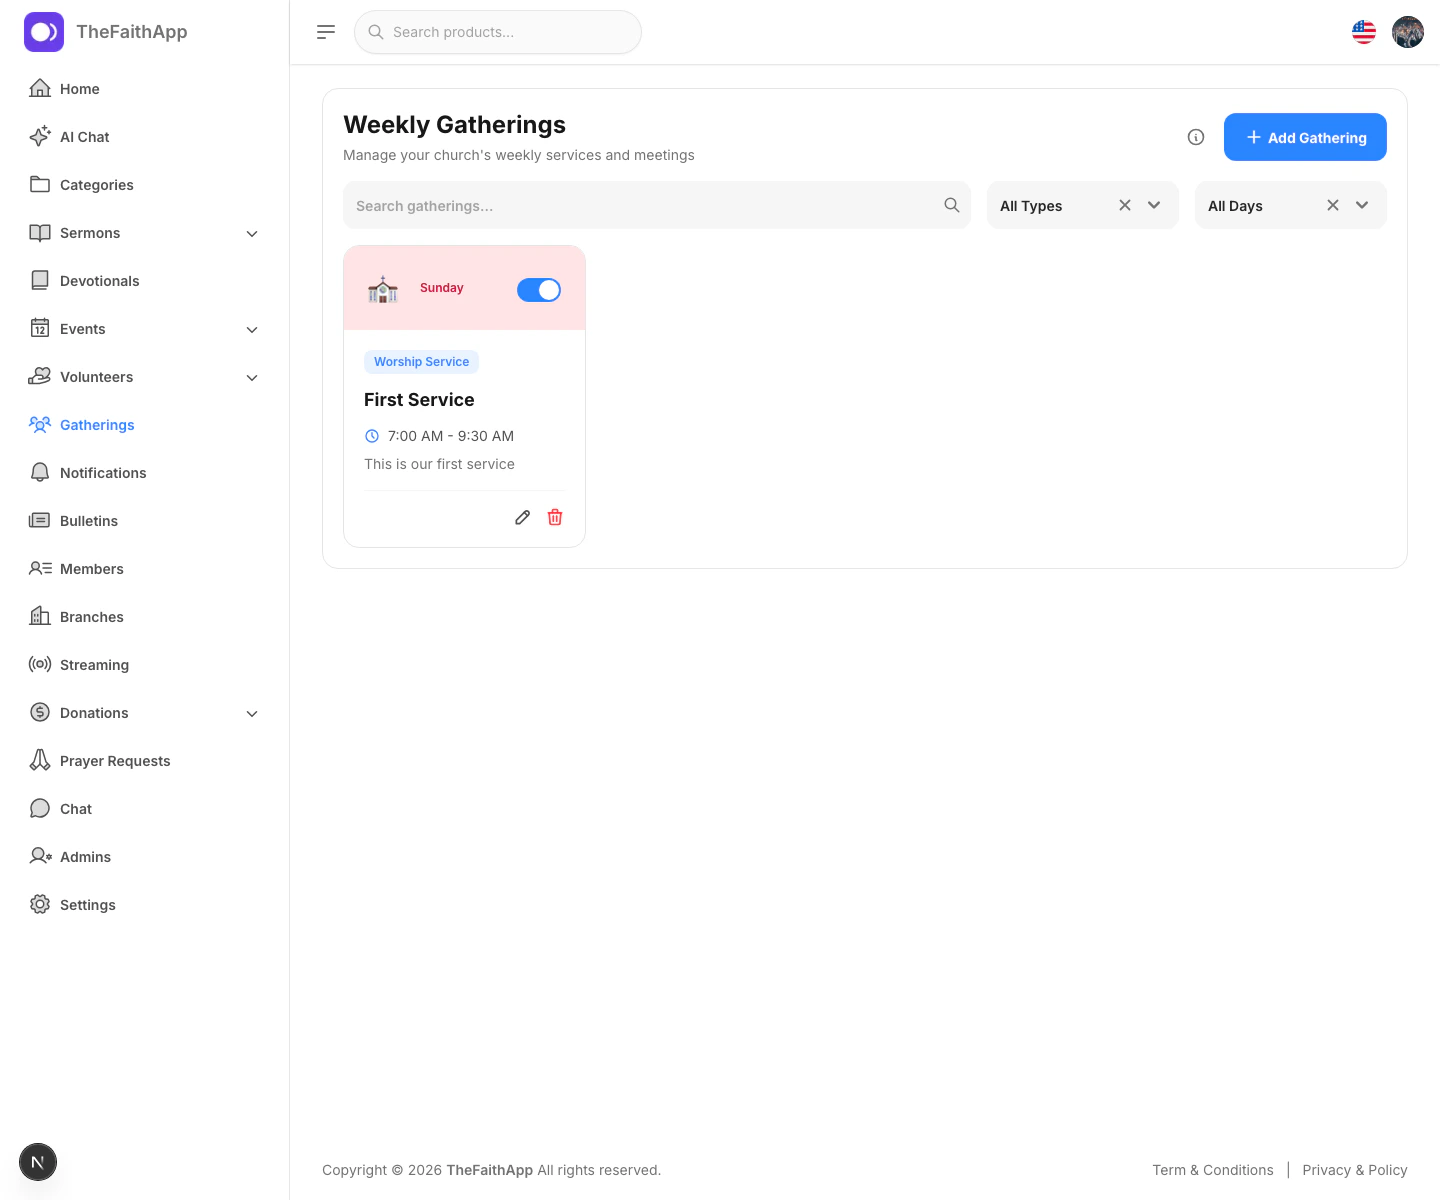
* Create a new gathering
* Search gatherings
* Filter by type or day
* Edit or delete a gathering
* Turn gatherings on or off with the active toggle
* View the list of available gathering types
### Gathering Details
* Gathering type
* Gathering name
* Day of the week
* Start time
* End time
* Description
* Active status
### Steps
1. Click `Gatherings`.
2. Click `Add Gathering`.
3. Choose the gathering type.
4. Enter the name, day, and time range.
5. Add an optional description.
6. Save the gathering.
7. Use the active toggle when you want to temporarily hide or reopen a regular gathering.
## Roles And Permissions
Use Roles and Permissions to control what each internal team role can access.
### What You Can Do
* Create a new gathering
* Search gatherings
* Filter by type or day
* Edit or delete a gathering
* Turn gatherings on or off with the active toggle
* View the list of available gathering types
### Gathering Details
* Gathering type
* Gathering name
* Day of the week
* Start time
* End time
* Description
* Active status
### Steps
1. Click `Gatherings`.
2. Click `Add Gathering`.
3. Choose the gathering type.
4. Enter the name, day, and time range.
5. Add an optional description.
6. Save the gathering.
7. Use the active toggle when you want to temporarily hide or reopen a regular gathering.
## Roles And Permissions
Use Roles and Permissions to control what each internal team role can access.
 ### What You Can Do
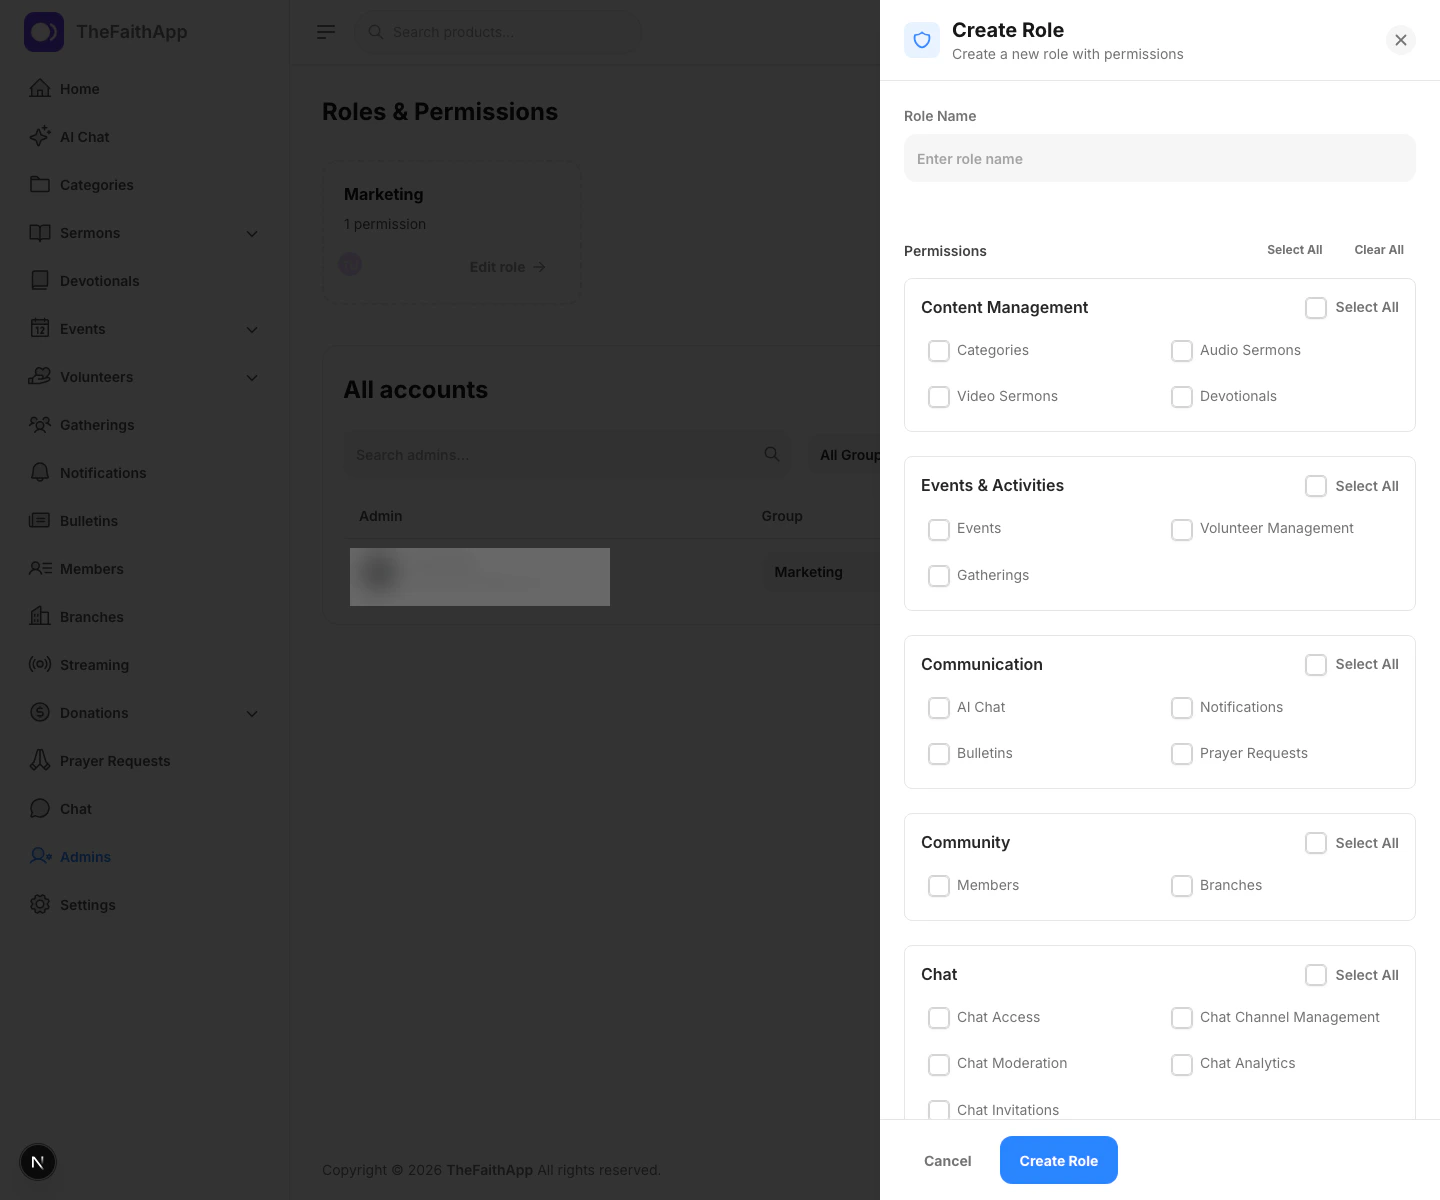
* Create a new role
* Edit an existing role
* Assign permissions by category
* Select all permissions in one category
* Select all or clear all permissions across the whole role
### Permission Areas
* Content management
* Events and activities
* Communication
* Community
* Chat
* Media and finance
* Marketing
* Administration
### Steps
1. Click `Admins` in the left sidebar.
2. In `Roles & Permissions`, click `Create role`.
3. Enter the role name.
4. Select the permissions the role should have.
5. Save the role.
### Notes
* Roles are used when assigning or updating admin accounts.
* Existing roles can be opened again to adjust permissions later.
## Admin Accounts
Use Admins to manage internal staff and assign them to the right role.
### What You Can Do
* Create a new role
* Edit an existing role
* Assign permissions by category
* Select all permissions in one category
* Select all or clear all permissions across the whole role
### Permission Areas
* Content management
* Events and activities
* Communication
* Community
* Chat
* Media and finance
* Marketing
* Administration
### Steps
1. Click `Admins` in the left sidebar.
2. In `Roles & Permissions`, click `Create role`.
3. Enter the role name.
4. Select the permissions the role should have.
5. Save the role.
### Notes
* Roles are used when assigning or updating admin accounts.
* Existing roles can be opened again to adjust permissions later.
## Admin Accounts
Use Admins to manage internal staff and assign them to the right role.
 ### What You Can Do
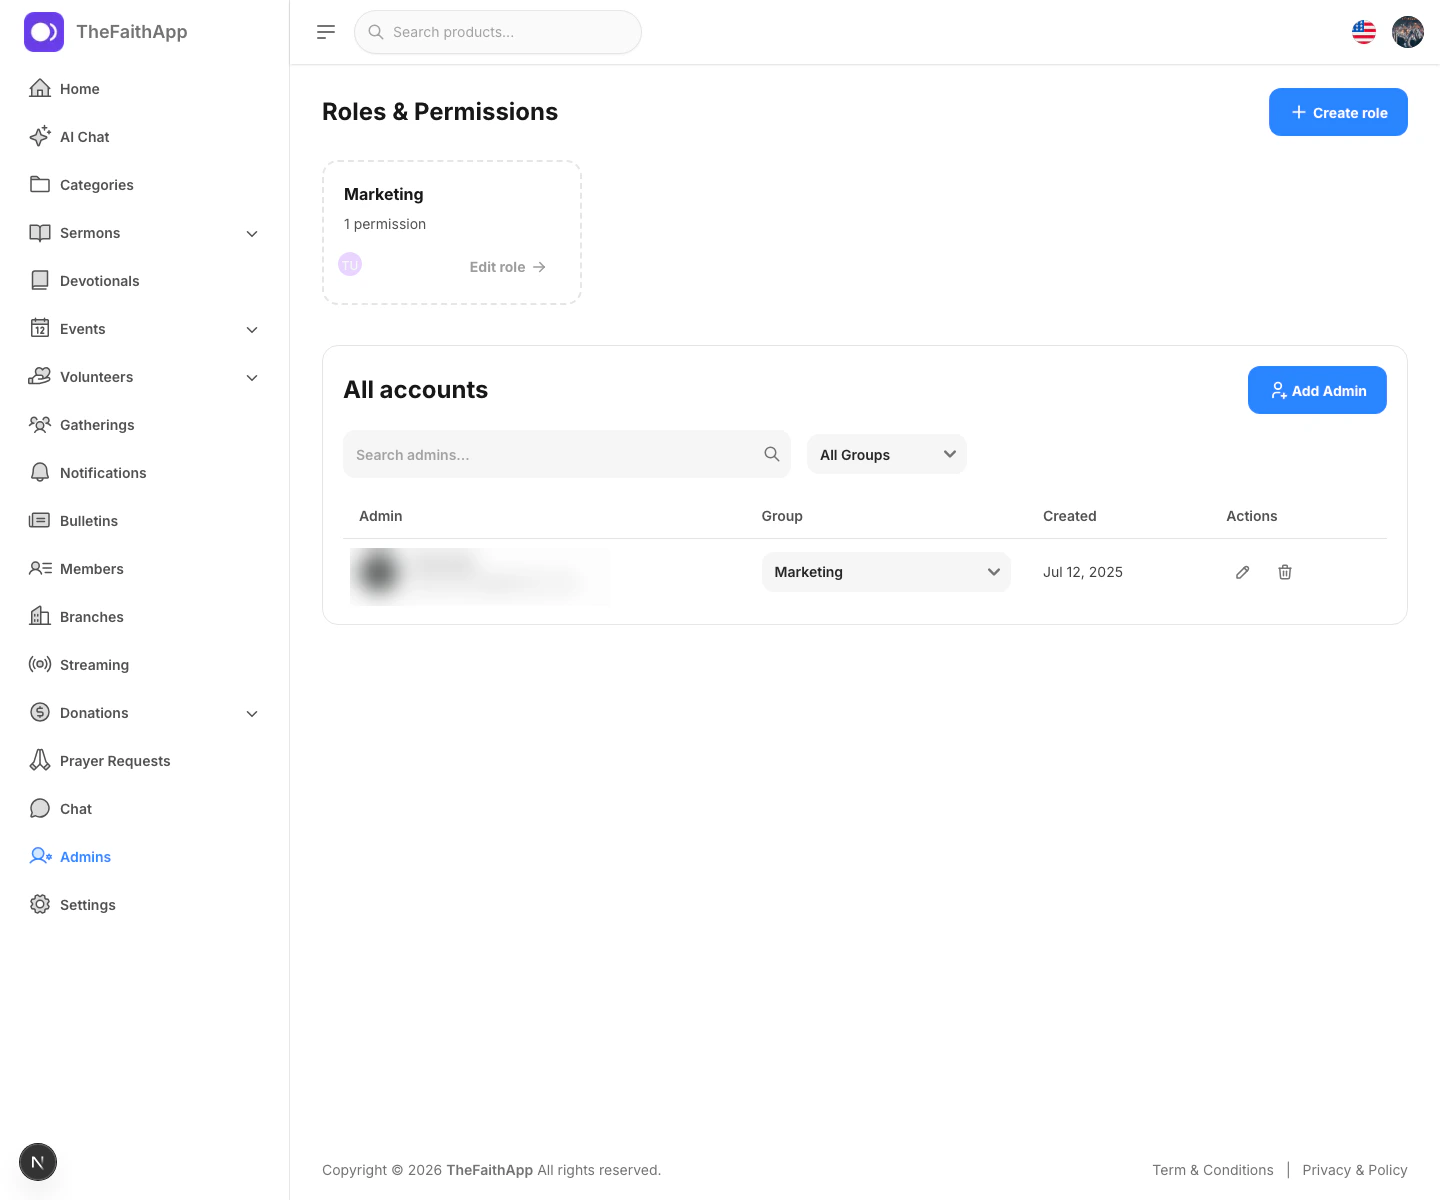
* Add a new admin account
* Search admin accounts
* Filter by role or group
* Change an admin’s assigned role
* Edit account details
* Delete an admin account when allowed
### Steps
1. Click `Admins`.
2. Click `Add Admin`.
3. Enter the admin name, email address, role, and password.
4. Save the account.
5. Use the group dropdown in the table when you want to reassign a role quickly.
6. Use the edit action for account updates.
### Notes
* The roles section sits above the accounts table on the same page.
* Some group changes or delete actions may be limited to higher-level admins.
### What You Can Do
* Add a new admin account
* Search admin accounts
* Filter by role or group
* Change an admin’s assigned role
* Edit account details
* Delete an admin account when allowed
### Steps
1. Click `Admins`.
2. Click `Add Admin`.
3. Enter the admin name, email address, role, and password.
4. Save the account.
5. Use the group dropdown in the table when you want to reassign a role quickly.
6. Use the edit action for account updates.
### Notes
* The roles section sits above the accounts table on the same page.
* Some group changes or delete actions may be limited to higher-level admins.